5.Platform user manual
5.1 Login and Registration
Pls use Google or Foxfire explore to log in the http://www.iledcloud.com, log into the platform after click the log in or register.

picture 5.1- 1 open the platform
5.1.1 Registration
User can register according to requirement for enterprise or individual,like in the picture 5.1-2
picture 5.1- 2
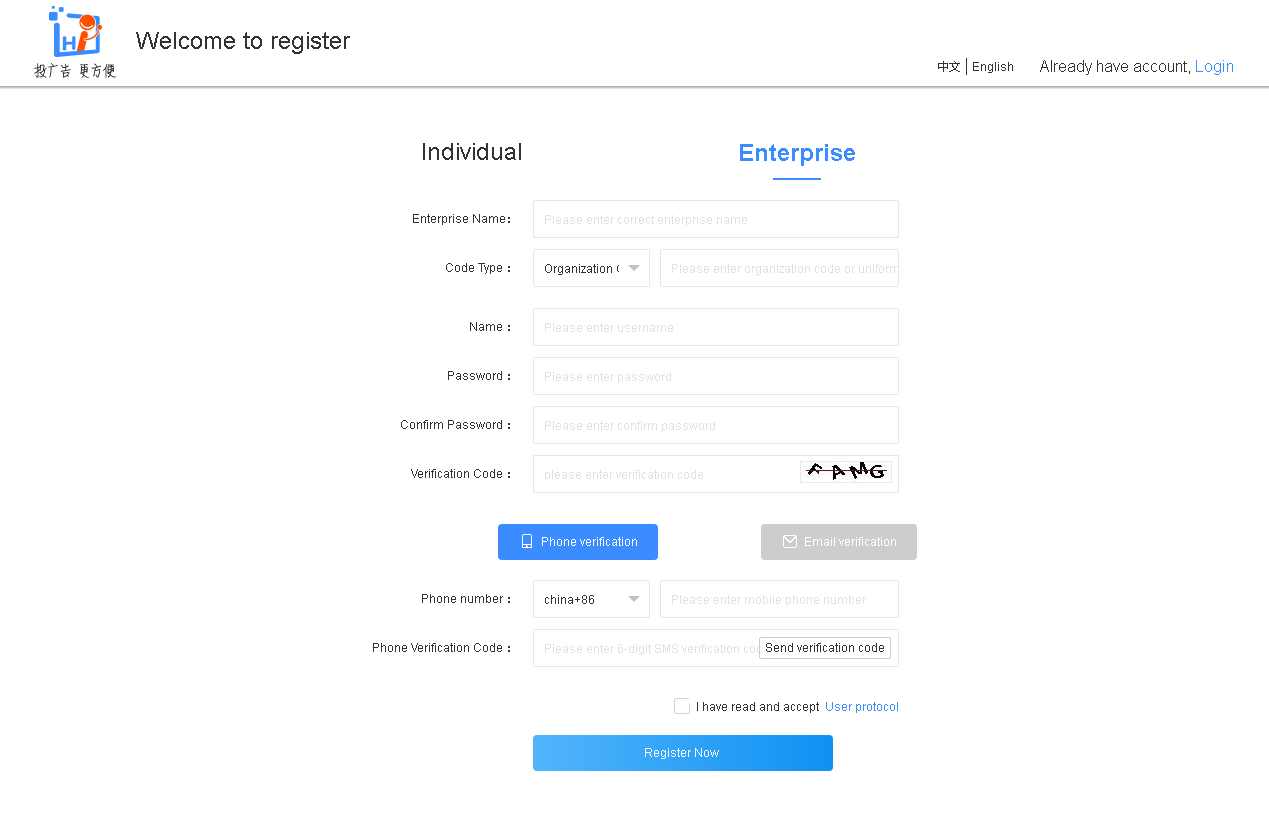
1. Enterprise user
Enterprise Users can use phone number or mail to register from this platform. Enterprises registered users need to fill in company name, organizing institution code, and if you registered by mobile phone number or email, you will receive a dynamic verification code,after verification, can use phone number or email to log in.
After registration, the role of enterprise user is the business administrator. There are 6 functions:program management, bulletin management, resource management, system management, paid service and space&flow management. Program management function is mainly to edit program, such as program production, program review, playlists, program review, issue and automatic release task. Bulletin management is to create and edit bulletin, it is divided into three parts: edit bulletin, audit bulletin and release bulletin. Resource management is mainly used for modify the screen and material, including the material management and administration of the screen. System management is mainly used for the user's organization and modify the permissions, including subdivided into user management, organization management, rights management and log management role. Paid service is divided into: package&service, orders management, discount coupon. Space&Flow management is divided into: capacity management,flow management and space allocation.
Enterprise users, refers to the business administrator, can independently add new users (do not need to register through the platform's way), but can modify the organization role permission , default roles such like: business administrator, program designing, program assessor and publisher .
2. Individual user
Individual users can register by a mobile phone number and email. Using a mobile phone number or email address for registered, at the time of registration must provide personal phone number and email address, this platform will send dynamic verification code to verify, after complete the verification, user can use their phones number or email address to log in.
There are 6 functions:program management, bulletin management, resource management,system management, paid service and space&flow management in individual user. Individual user program management and resource management function is same to enterprise users , but individual users in the system management only have log management, no user management, organization management and role authorization management. Individual users can only view the user operation record, can’t do any other operations on their own account./p>
5.1.2 Login
After all register process,user can log in the platform by phone number or mail .like in the login picture:
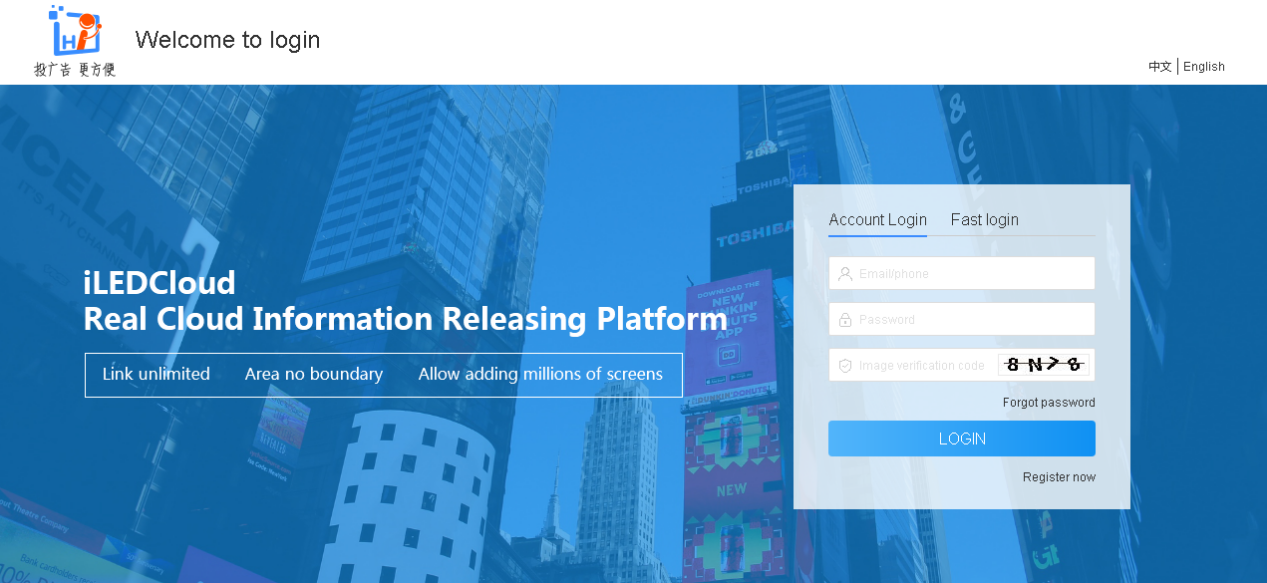
picture 5.1- 3
If binding the mobile phone ,user can use fast log in ,only click the fast log in is ok .like in the picture 5.1-4
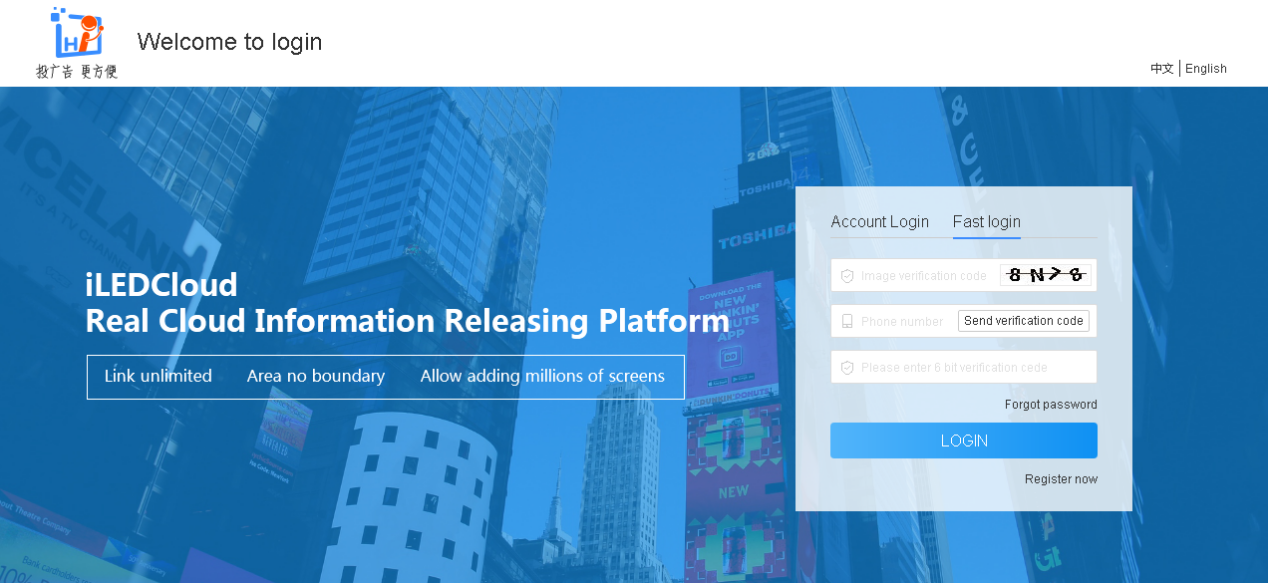
picture 5.1-4 fast login
When the user forgot password, click forgot password link on the login page, enter the retrieve password page, as shown in picture 5.1-5.Users only need input registered phone number19 or email, click to get verification code, after input and click submit, can enter the page of setting a new password, as shown in picture 5.1-6, users can set the new password, and after set up complete, can use the new password to login.
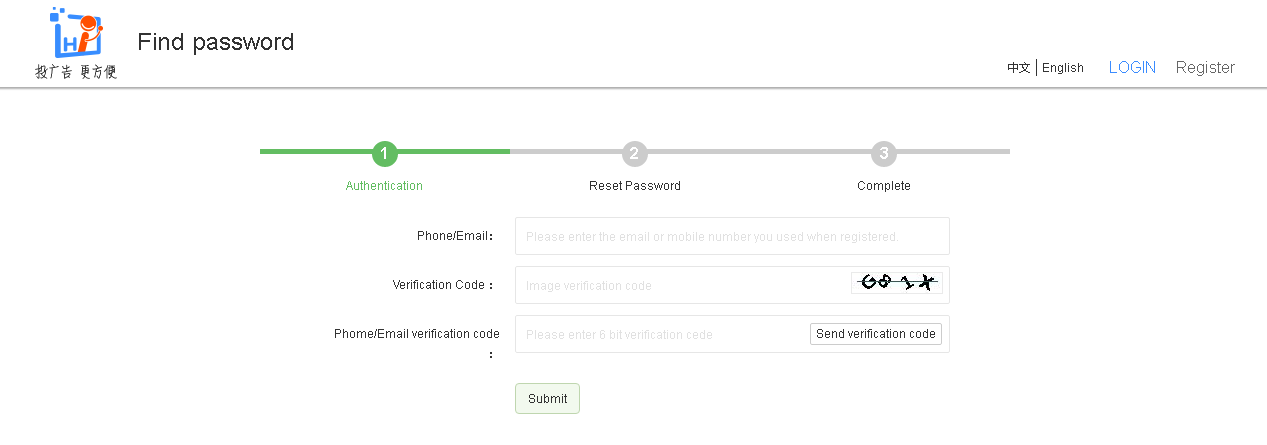
picture 5.1- 5
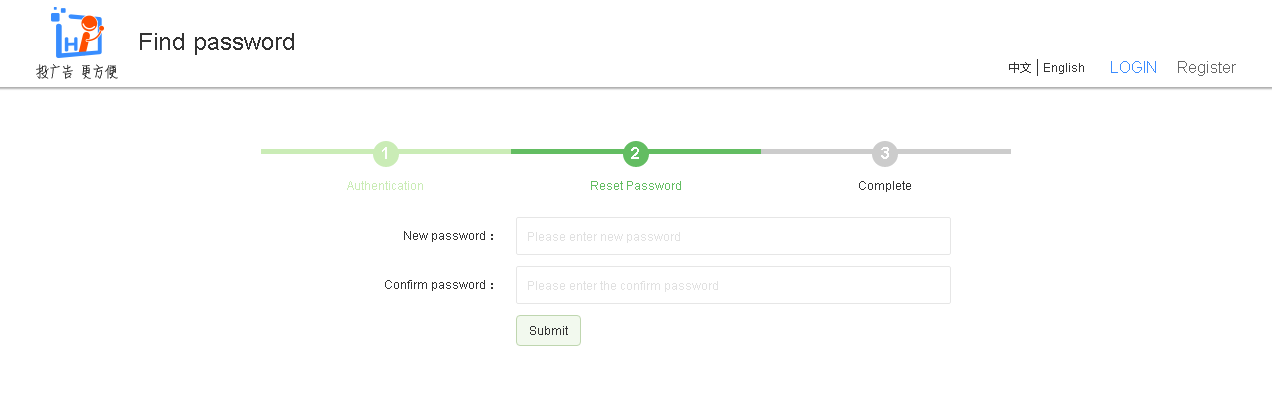
picture 5.1- 6
5.2 Resource management
After successful login, the user in the resource management function of the screen to add and upload material,prepare to make program.
5.2.1 Screen management
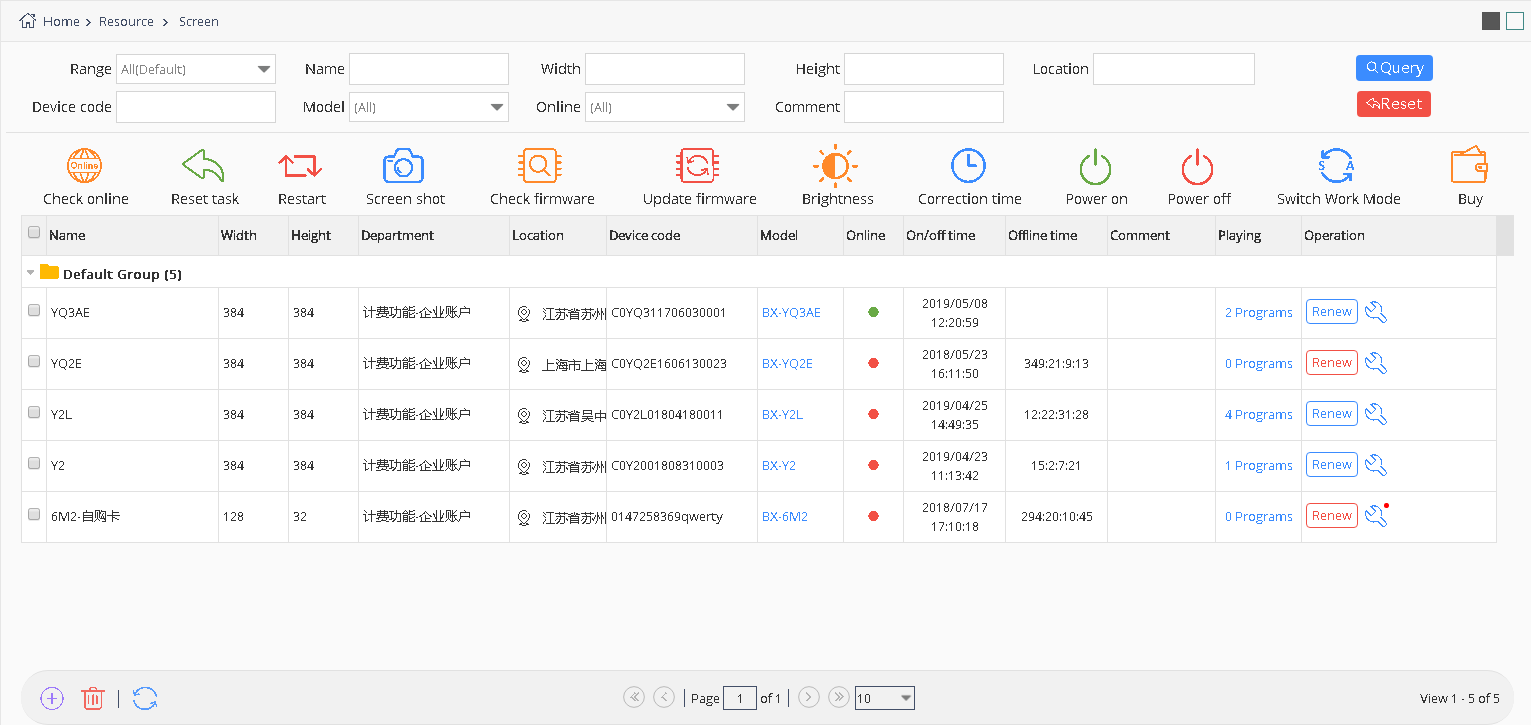
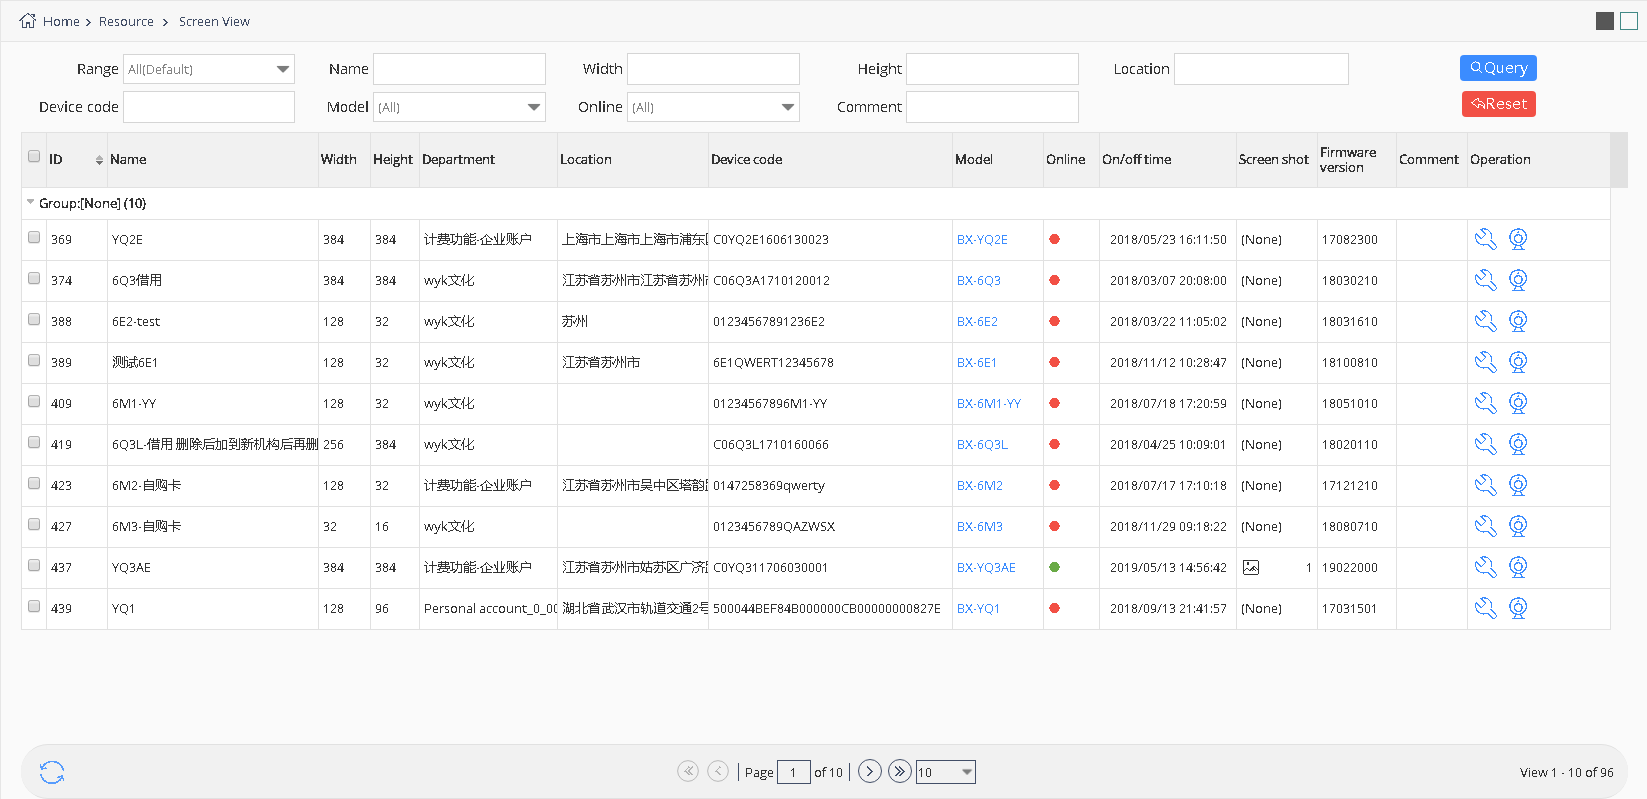
Users can operate the screen by screen management page ,like in the picture 5.2-1 and table 5.2-1
picture 5.2- 1
| Button | Function |
|---|---|
 |
Screen control button ,click into the control page ,set the screen parameters |
 |
Add button, used for add new record |
 |
Delete button ,used for deleting the single or bulk records |
 |
Refresh button ,used for refreshing the list |
 |
Check the button online ,after select the screen ,can check the screen is online or not |
 |
Reset task button ,click to reset the task ,cancel the current task. |
 |
Restart the controller button, used for restart the controller |
 |
Screenshot button ,used for screenshot of the current screen program,now only YQ5E、YQ2A、YQ2AE、YQ3A、YQ3AE and Y series support this function |
 |
Checking and Update button ,used for checking and update the new firmware |
 |
Update firmware button,if have new firmware,select the screen and click it to make updating the screen. |
 |
Screen brightness button,used for changing the screen brightness. |
 |
Screen time correction function, select it can used for controller time correction , it will correct the time to be the same with where the screen is in. |
 |
Power on |
 |
Power off |
 |
Buy button, choice screen then buy the service packages |
 |
Working mode switching button. Users can switch the working mode of YQ5E,YQ2AE and YQ3AE |
table 5.2-1 screen management page button note
5.2.1.1 Add screen
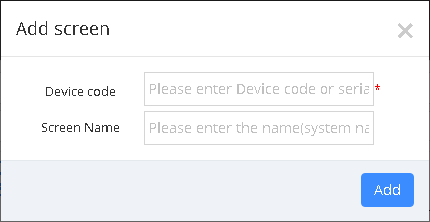
If want to make program,the first step is add screen .pls click the add screen button ,then will display the page like this picture 5.2- 2, input the device code and screen name is ok, but pls make sure the controller is online then can add successfully.
picture 5.2- 2
To the YQ controller ,if u set the IP of the user name and name ,then no need to manual add it. It can automatically added to specify user name after the control card is online;On the other hand, you need to manually add, when adding screen, priority recommended used as serial number, bar code identification code for serial Numbers are used if without bar code.For 6Q series controller, currently only support added manually, and can only use the bar code as serial number.After add the screen successfully, relevant information will be displayed on the screen management page, as shown in picture 5.2-3.

picture 5.2- 3
5.2.1.2 Edit screen information
Click the corresponding button of screen settings ,then edit related information, see picture 5.2-4. Users can edit screen group, name , screen type, address, address detail, time zone Location and memo .Users can add location or use the map to add location. When users modify the time and correction the time, the screen time will be the same with where the screen is in.Enterprise Users can use “transfer screen” function.
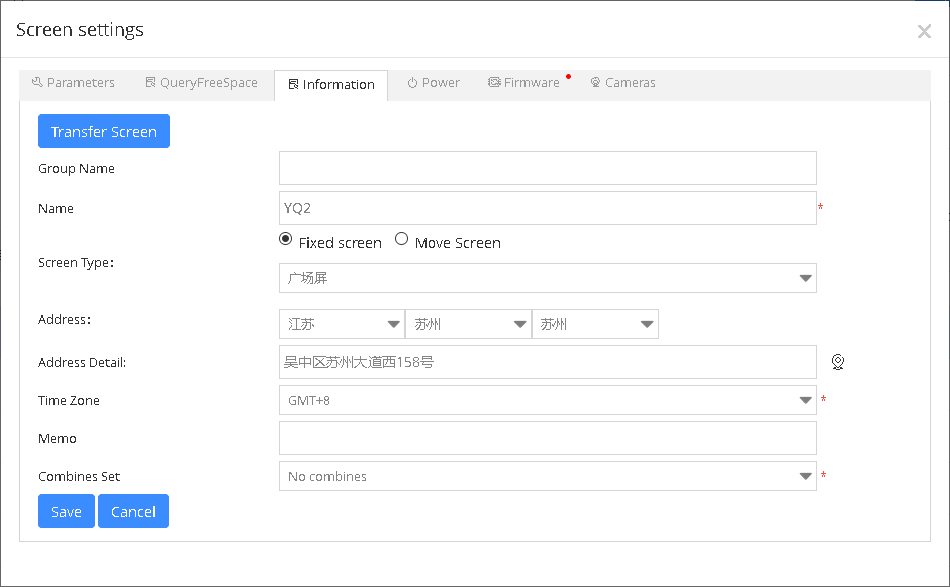
picture 5.2- 4
5.2.1.3 Firmware updating
When the screen need update the firmware, it will show red light on the corresponding control button , as shown in picture 5.2-5.
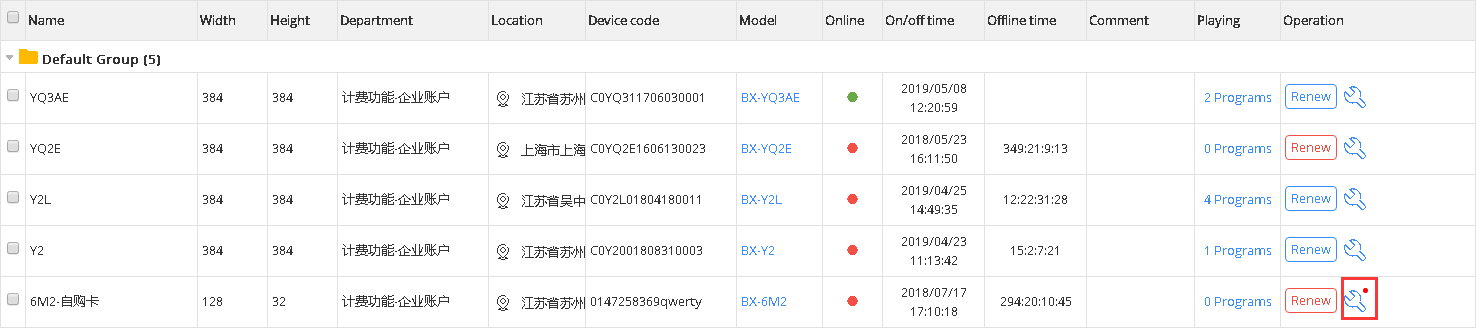
picture 5.2- 5
When users click the screen controlling button which has red light, it will show the available firmware version which can be updated and corresponding info for the current screen, such as picture 5.2-6, then start of the upgrade, click “update firmware”, after the success of the upgrade, users can check the information in the notice list, as shown in picture 5.2-7.
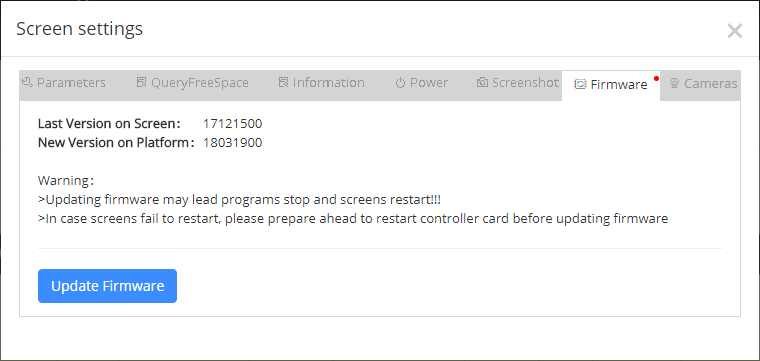
picture 5.2- 6
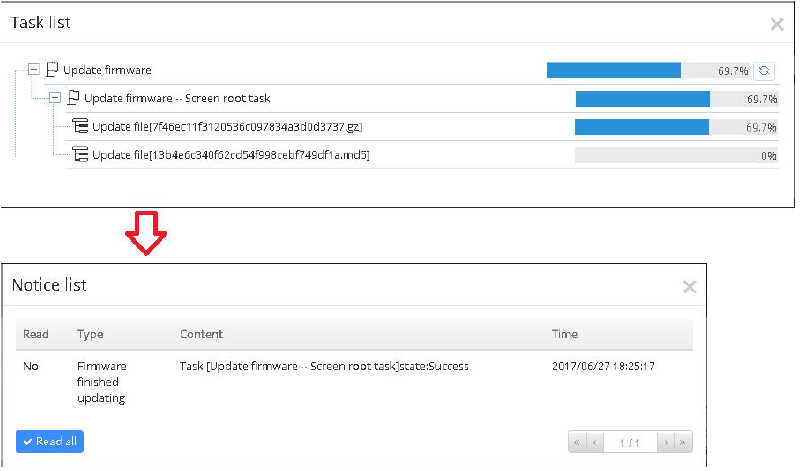
picture 5.2- 7
5.2.1.4 Edit screen parameter
When users click screen management button , “Screen settings” window will appear, see picture 5.2 8. Users can check the rest storage of controller and turn on&off the screen on this window, like picture 5.2-9 and 5.2-10.
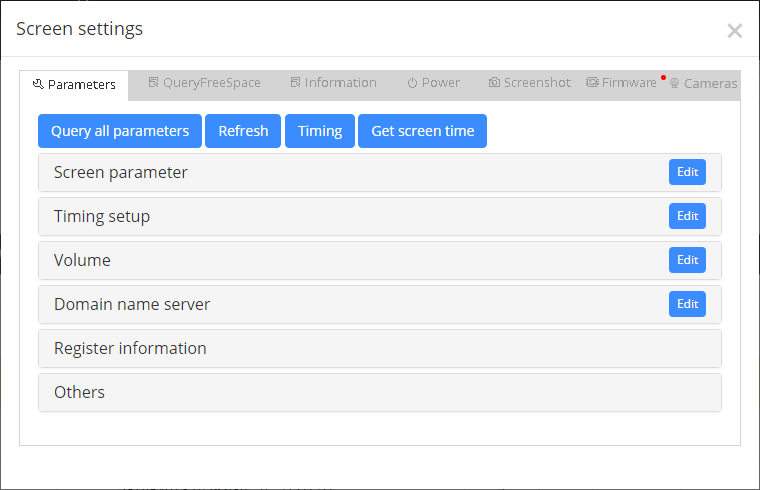
picture 5.2- 8
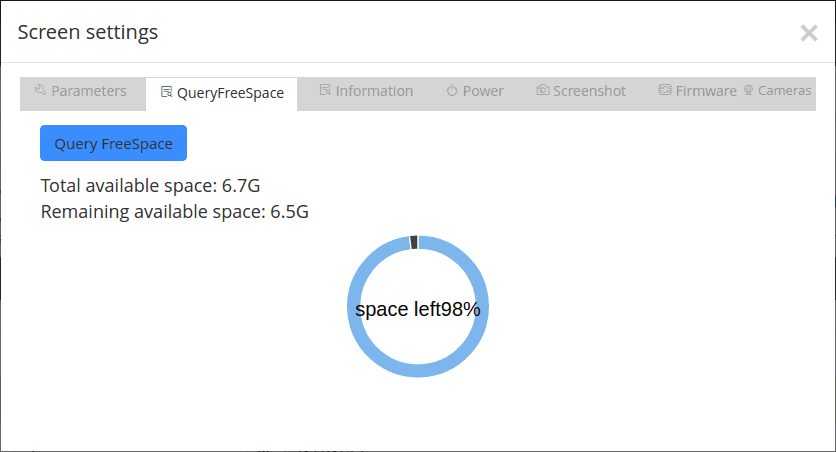
picture 5.2- 9

picture 5.2- 10
5.2.1.5 Camera function
In addition to set the parameter of the controller, users can also bind the camera to the control card, and use the camera to check the status of the screen in real time. User can click the screen controlling button, then click “Cameras” as to enter the camera management interface, as shown in picture 5.2-11, the platform supports camera Hikvision (ezviz) and Dahua (LeCheng), some function of the buttons on the camera management interface, please refer to table 5.2-2.
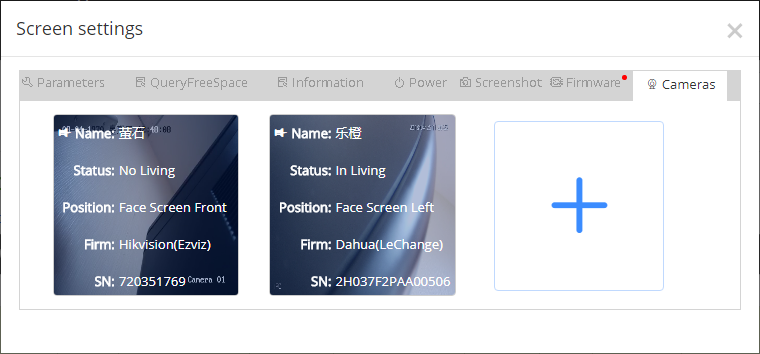
picture 5.2- 11
| Button | Function |
|---|---|
 |
Binding button, binding camera |
 |
Remove bind button ,unbind the camera |
 |
Live button ,Start the live show function of the camera |
 |
Stop living button,Stop living show of the camera |
table 5.2-2 camera management page button note
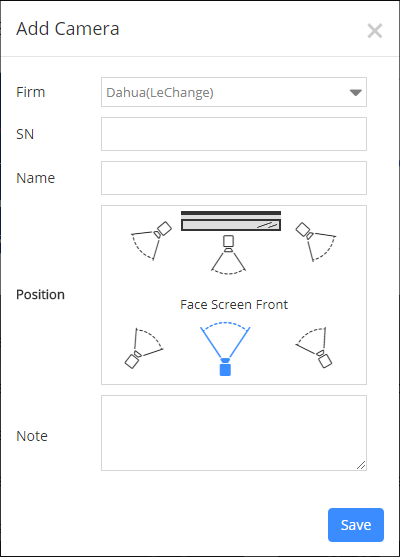
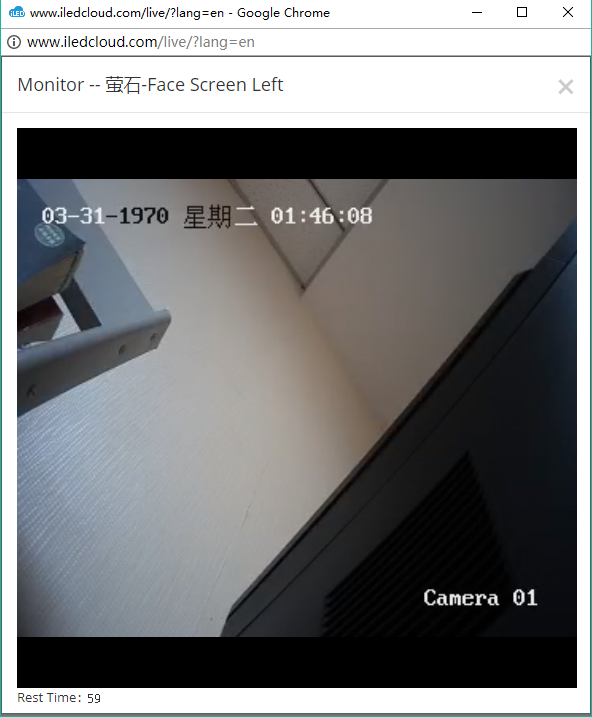
In the camera management interface, click the "+" button, Users can add camera , as shown in picture 5.2-12, users only need to choose the camera manufacturers,fill in the camera's serial number and verification code and other information,then click Save to complete adding camera. Then click on the binding button,when bind the camera successfully , Users can click on the "open live button" then click the image area below the button to display the live interface, as shown in picture 5.2-13. Each time can only watch the live screen of 1 minutes, and the live page will be automatically closed after that.
picture 5.2- 12
picture 5.2- 13
5.2.1.6 Buy Screen flow package and renewal it
After the user added the screen successfully, users also needs to buy a screen flow package to be used normally. On V1.4.7 version, our platform releases some discount coupons for users, and users can also click on "buy" button in the screen management, or check the required screen, click the purchase button above the page,. When the mouse hovers on the "Buy" button, a suspension frame is popped out to show a brief description of the 2 Flow packages, as shown in picture 5.2-14. The user clicks on "view the details" and the page will jump to the "package and service" page, and the user can see the detailed description of the package.

picture 5.2- 14
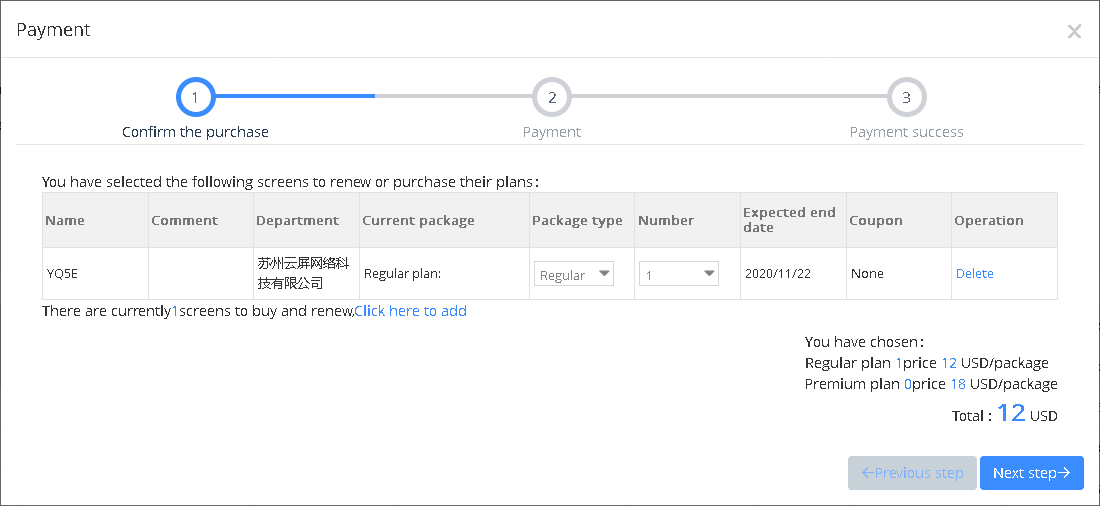
Click buy button ,then will enter into payment process ,in the step of confirm purchase , it will show the purchased flow package details, as shown in picture 5.2-15.In this page, it will show the amount of screens which need to be renewed. When user clicks the link “click here to add”, those screens will be added in current order details to facilitate user purchase.
picture 5.2- 15
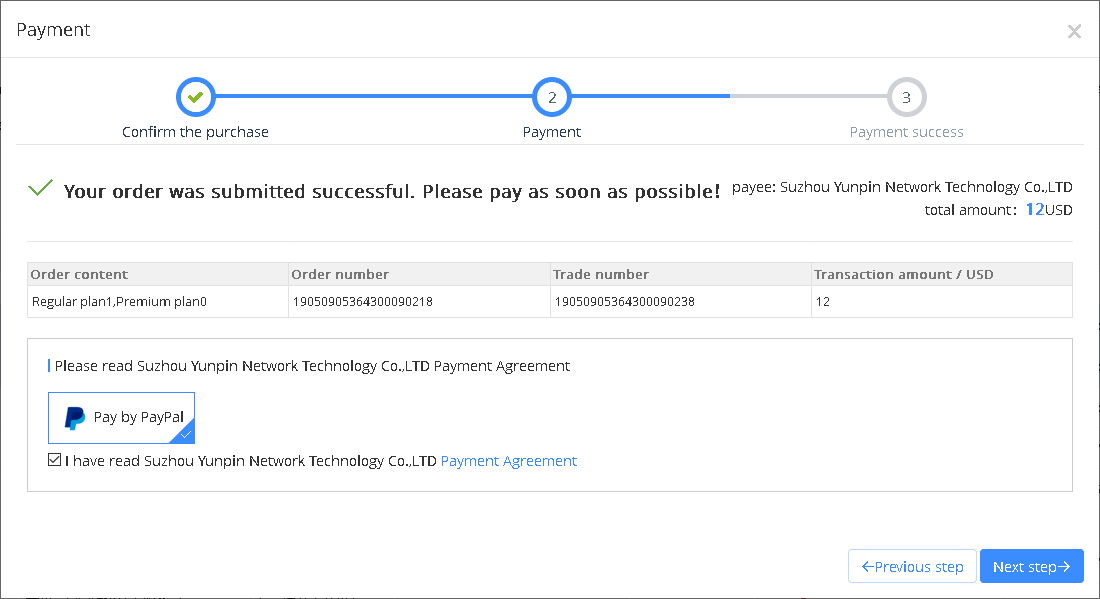
Then click next ,payment interface .The page will display the order information, payment user initiated and the platform of the payment protocol, as shown in picture 5.2-16. Overseas customers can pay by Paypal.
picture 5.2- 16
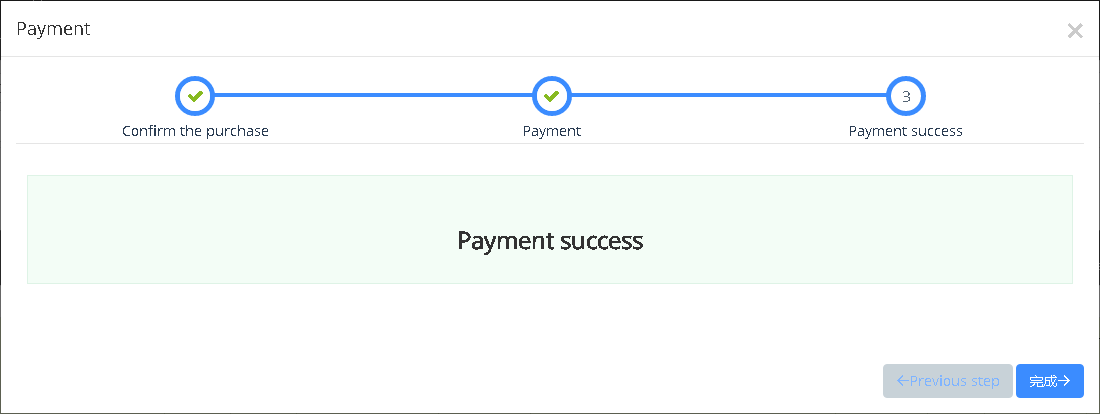
Click next , then enter into PayPal interface ,When paid successfully , a new window will pop up to inform of the successful payment. See picture 5.2-17.Then the screen can be used normally.
picture 5.2- 17
When the screen’s flow package is about to expire, the user can also renewal it by clicking the corresponding screen button such as "renewal" button or click the buy button . Please follow the instruction to finish the renewal or purchase new flow package ,details as shown in picture 5.2-18.

picture 5.2- 18
5.2.1.7 Delete screen
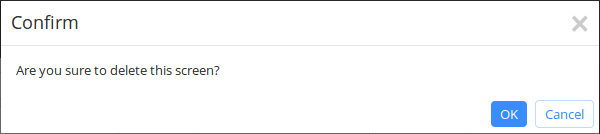
Select the controller which you want to delete, and click “delete” button, like picture 5.2-19.When you delete, it will delete all the data of “add screen automatically” from control cards. After delete the screens from iLEDCloud, what you bought will be always there, later, if you want, you can use again.
picture 5.2- 19
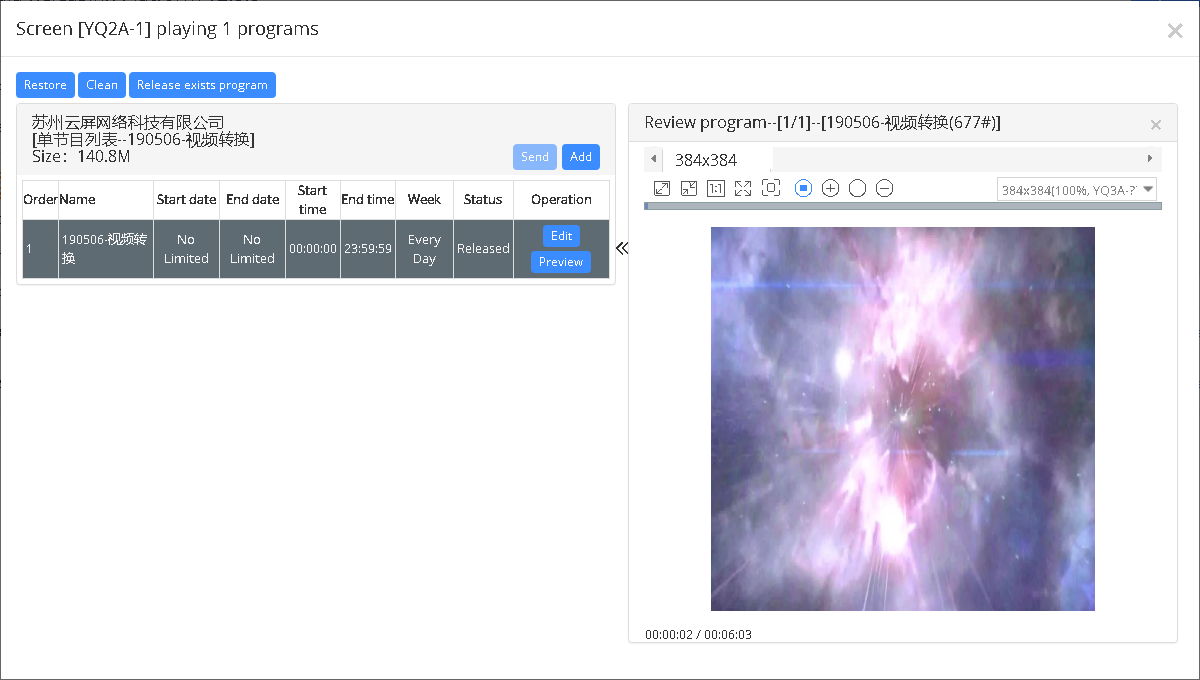
5.2.1.8 Current playing function
Add “check current playing list” function in screen management. Click the corresponding “current playing” link, it will show the current playing list and all programs in, like picture 5.2-20.Users can preview program or view the file size of this playlist on this page too.
picture 5.2- 20
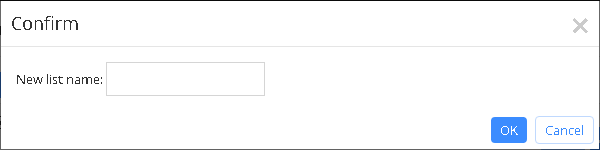
Users can modify, recover and clean the programs in this list. And can also click “add program” button to add program or make a new playing list, and users need to fill in the new name of new playing list, like picture 5.2-21.
picture 5.2- 21
5.2.1.9 Check screen
Please check the below picture 5.2-22.
picture 5.2- 22
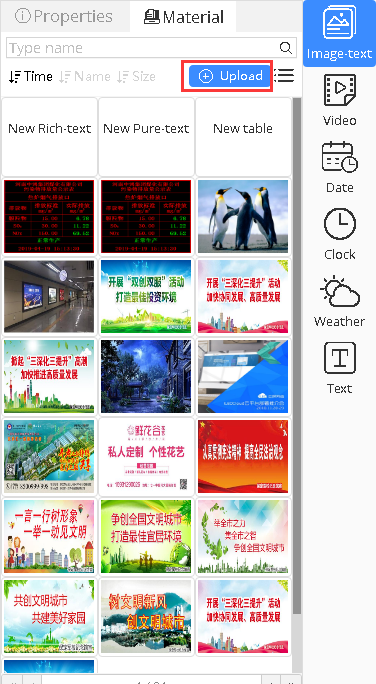
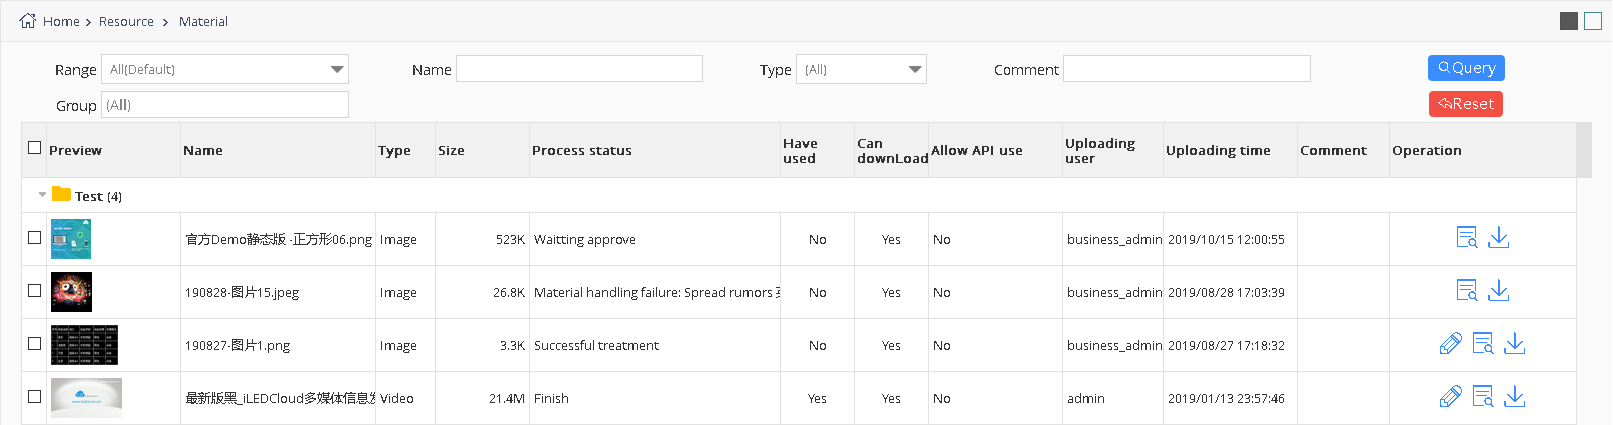
5.2.2 Material management
Users can operate to the materials in resource management page, page as shown in picture 5.2-23, users can add, delete, search, edit,download and view material, combination material and so on.The action button comments on some of the material management page, as shown in table 5.2-3.
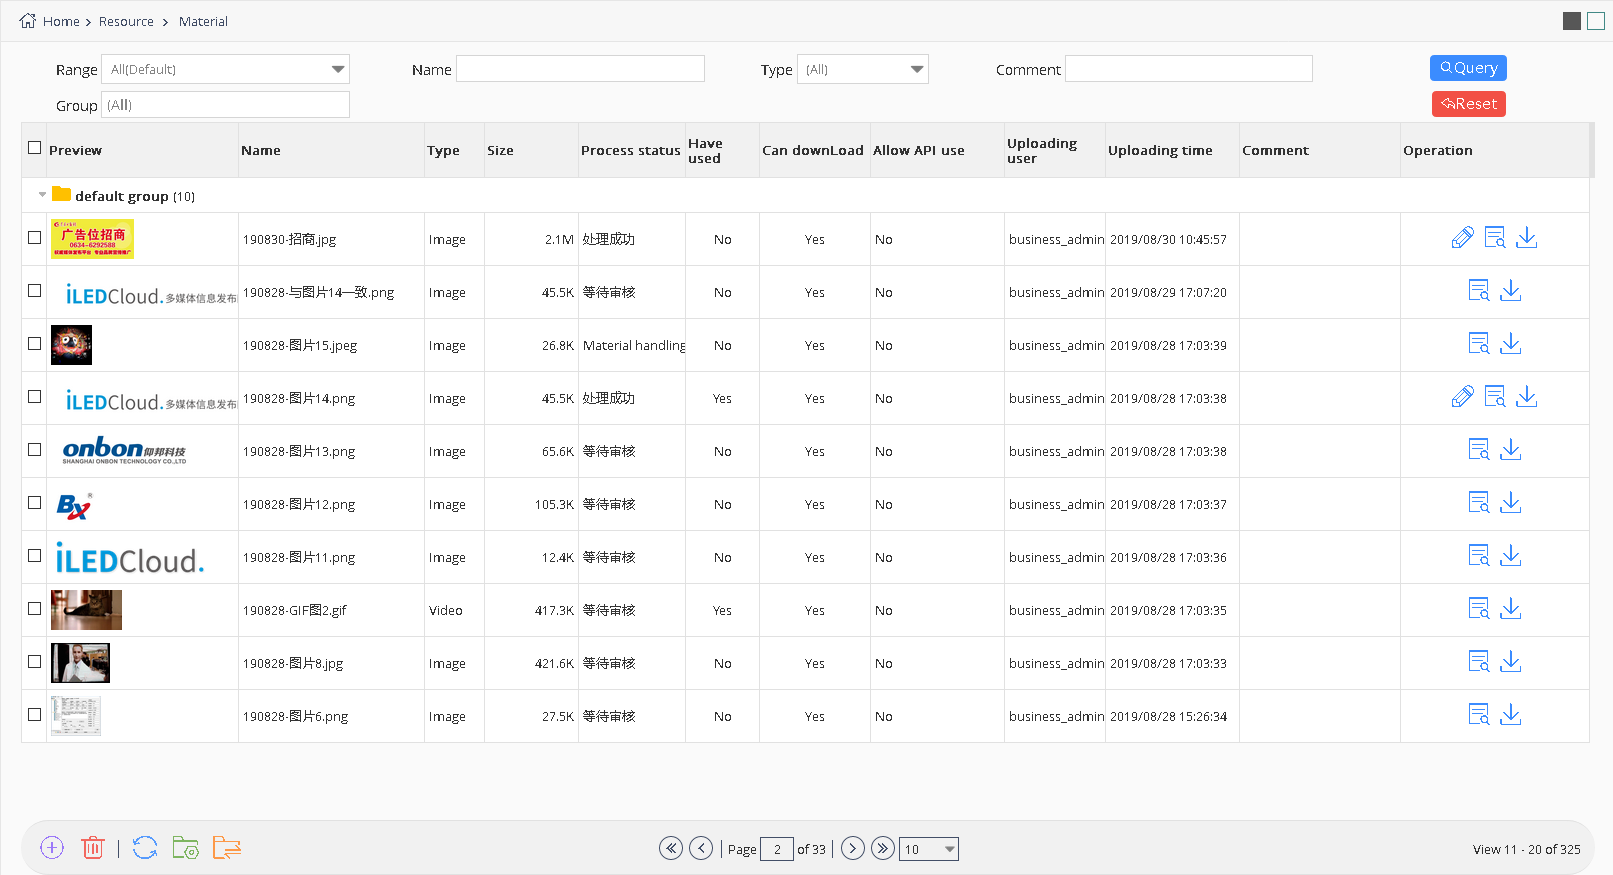
picture 5.2- 23
| button | Function |
|---|---|
 |
view button ,click to view the detail page of the record |
 |
Download button , download the present material. |
 |
group management button ,select it to check the current group and add ,modify or delete it. |
 |
select material button ,select to move the material to other group |
table 5.2-3 material management page button notes
5.2.2.1 Add Material
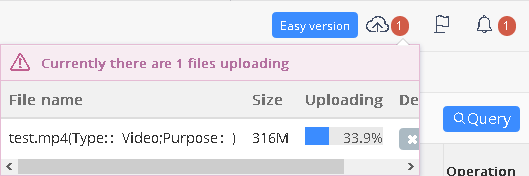
Add Program the need the screen and material, the user can add the button on the page by clicking the add button on the material management page ,after Click the add button will pop up the page of batch upload material , as shown in picture 5.2-24.Click "add files", users choose the material(document, picture, video, font or video url), click upload.In the material upload process, the user can close the upload dialog box, enter the other pages for other operation, material to upload and processing in small window as shown in picture 5.2-25.User can modify the “can download” “can use API” and purpose function,After the completion of the upload process, material management page will display the newly added material record.
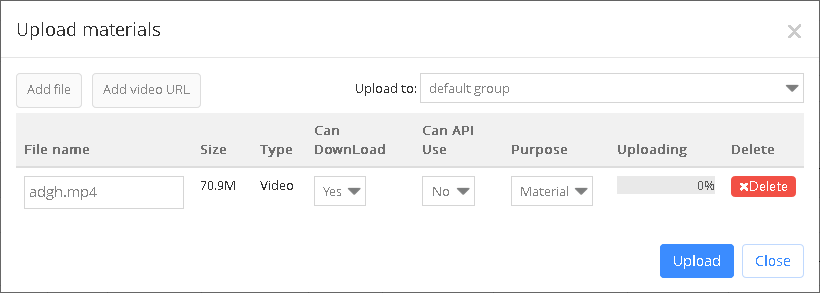
picture 5.2- 24
picture 5.2- 25
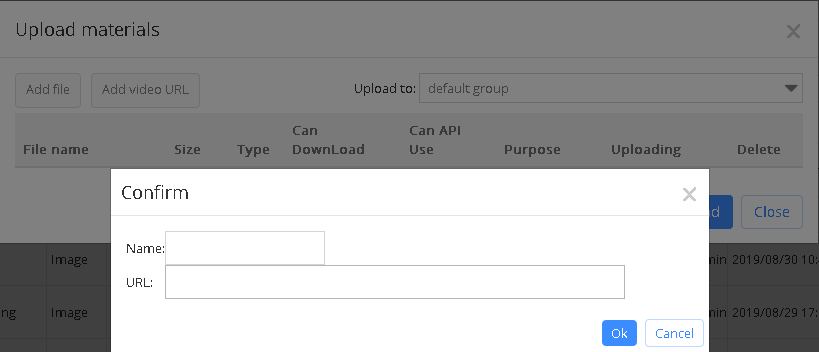
Y series controller supports live program, so, we add “add live URL” button in “Materials”. Like picture 5.2-26. Presently, support RTMP,RTSP and HTTP address.
picture 5.2-26
5.2.2.2 Edit material information
After users click the edit record button ,will pop up like in the picture 5.2-27

picture 5.2- 27
5.2.2.3 Video transcoding
Our platform supports online transcoding. When users need to send video file which is not supported by our platform, then, our platform will transcode automatically. After transcoding, there will be a new video file record in users’ materials, like picture 5.2-28.

picture 5.2- 28
5.2.2.4 Delete material
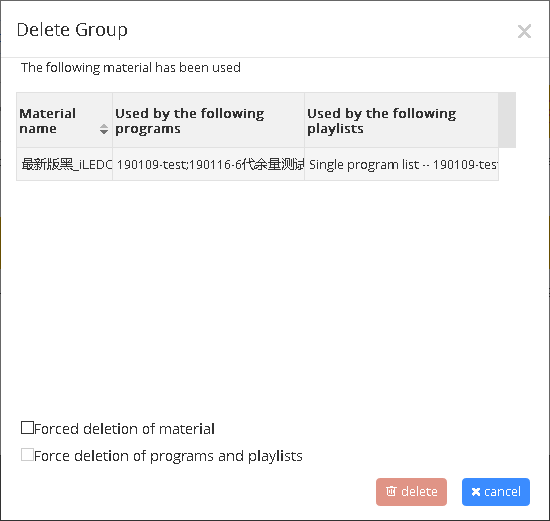
Users can delete the materials according to their needs.For unused materials, it will be deleted directly after users confirm to delete it. For already used material, It will inform you the current situations of this material and ask users to confirm again. If users select “Force delete material”, this material records can be deleted. When users need to send the programs which was used this material, our platform will inform you that the material was deleted, cannot be released. If users select “Force deletion of programs and playlists”, the programs which used this material and the playlists will be deleted.
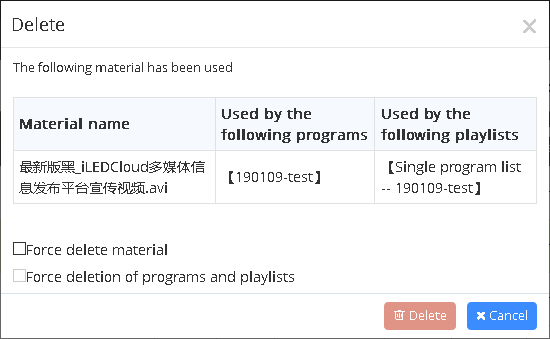
picture 5.2- 29
5.2.2.5 manage group
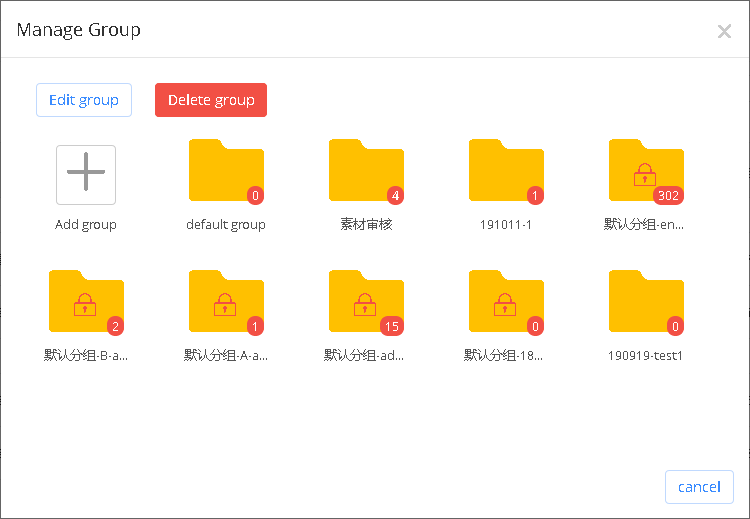
The platform supports users to group management of materials. Users can click the "group management" button on the material management page to view the group information visible to current users, as shown in picture 5.2-30.Individual users have a "default group" and each organization has a "default group" under the enterprise account.The default group name cannot be changed or deleted.
picture 5.2- 30
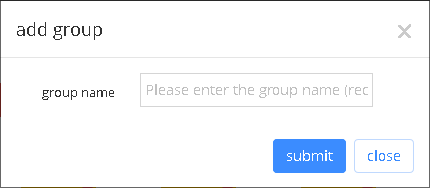
If the user wants to create a new group, just click "add group" and the page as shown in picture 5.2-31 will pop up. Enter the group name.Users can upload materials in bulk, manage groups, edit materials and other pages for new group operations.
picture 5.2- 31
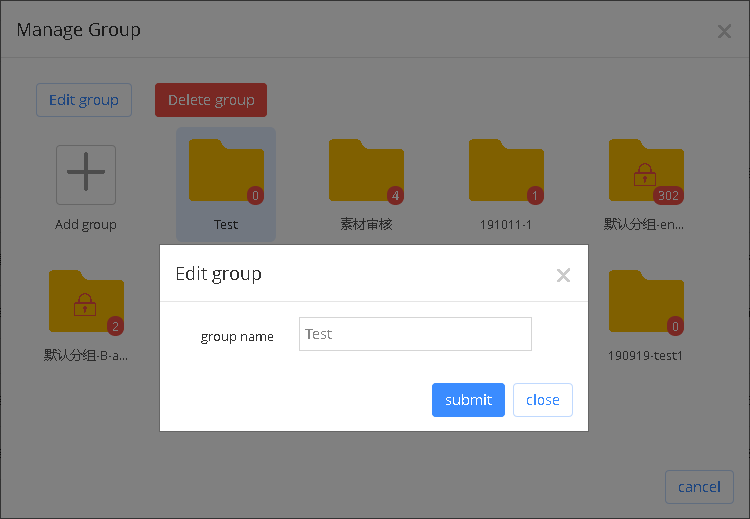
If the user wants to modify the group name of the existing group, just select the corresponding group in the management group page and click the "edit group" button, and the modified page will pop up, as shown in picture 5.2-32.
picture 5.2- 32
Users can also delete the group. Select the group on the management group page and click "delete group".If the material in the group has not been used, the user will delete the material in the group and group after confirmation.If any material in the group is in the state of "used", the occupied material will pop up after clicking the "delete group" button, as shown in picture 5.2-33. Check the corresponding option according to your own needs and click delete.
picture 5.2- 33
5.2.2.6 Select group
After the user selects the material to be moved, click the "select group" button on the material management page, and the selection group page pops up, as shown in picture 5.2-34. Select the group to be moved to and click "move" to complete the operation of moving batch material.Users can also modify the grouping of stories in the edit page of stories.
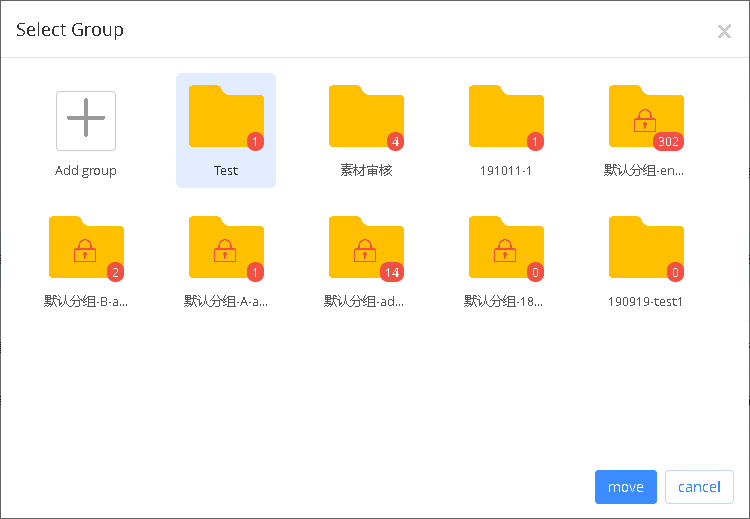
picture 5.2- 34
5.3 Program management
User can edit the program ,view ,audit and publish in the program management page.
5.3.1 Create new program
The user can create new program and modify operation in the "program management" page .If the user wants to create a new program, click on the navigation bar on the left in the "programming", as shown in picture 5.3-1, page will display window to create a new program,select controller manufacturers, controller product series, program types and size of drawing board to create a new program.
Users can add many drawing boards with different sizes in “Multimedia”, the platform will count the matching rate between drawing boards and screen, and if the matching rate is over than 60%, the programs can be sent to the corresponding size screen by self-adaption. Programs which are made by text only, can be 100% matching.
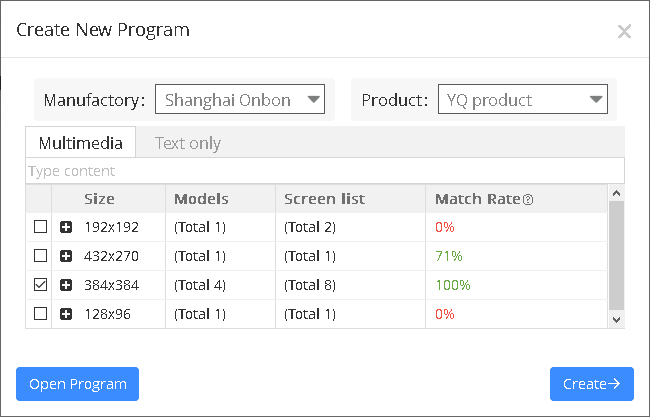
picture 5.3- 1
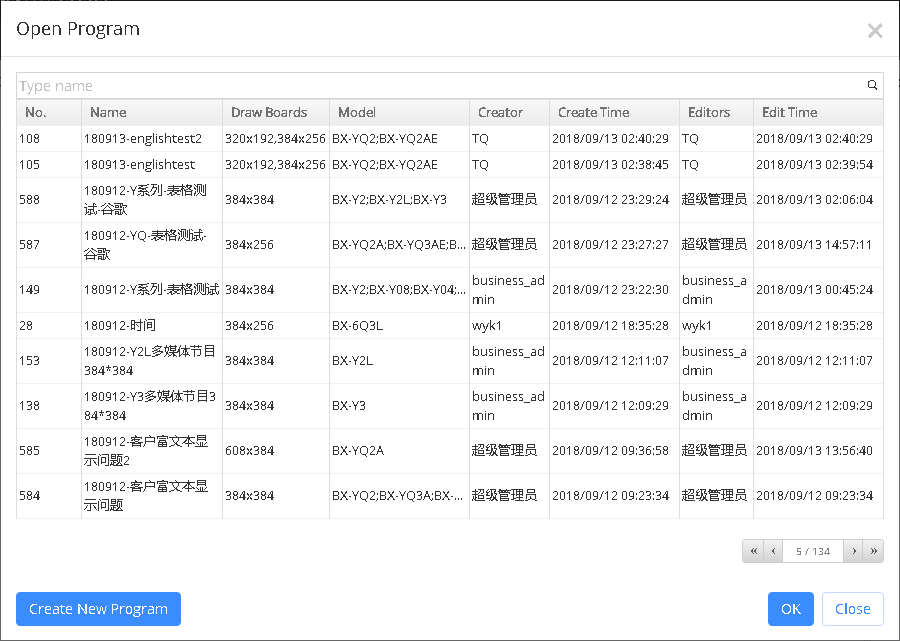
If users want to modify the original program ,can create new program in the”open program” then will display the current program like shown in the picture 5.3-2,click the “create new program”,then will return the window for creating new program.
picture 5.3- 2
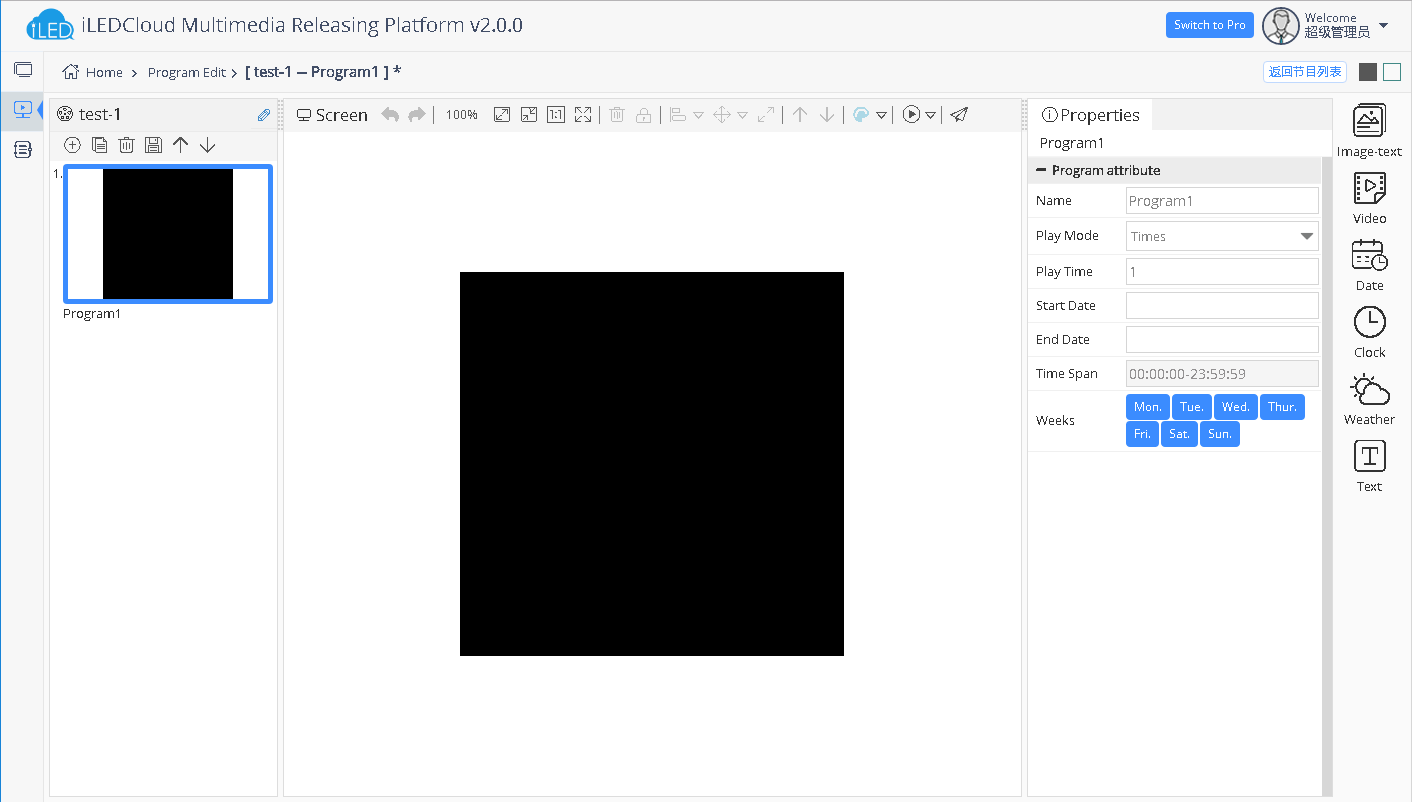
After create the new program then turn to the make program page ,including right,middle and right parts ,as shown in picture 5.3-3.
picture 5.3- 3
1. Left side of page
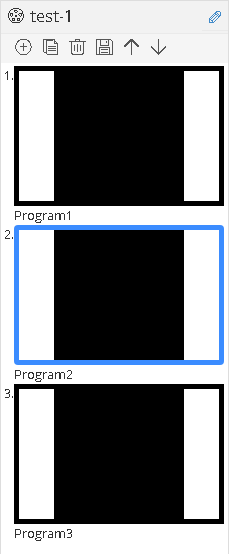
Left side of page including program items and playlist items ,playlist is at left of the page as shown in picture 5.3 4, users can check all the playing program also can edit other program.

picture 5.3- 4
The content bar is used to display the program's tree structure, as shown in picture 5.3-5, and some of the buttons are annotated as shown in table 5.3-1.
picture 5.3- 5
| button | function |
|---|---|
 |
delete |
 |
Up Down button ,Edit the position of material |
 |
Edit program name |
 |
Edit list ,display material list under current area |
 |
Content setting ,can open the content interface ,see picture 5.3-6 |
 |
Edit button,edit text and table |
table 5.3-1 content button function notes
2. Middle of the page
Middle of the page constructed by the screens used for partition and display effect like shown in the picture 5.3-6, the button notes like in table 5.3-2. the black background is screen, user can edit the zone, and also can add or delete drawing board.
picture 5.3- 6
| Button | Function |
|---|---|
 |
create new program |
 |
Open program |
 |
Save program(There are save as and delete program button in sub menu) |
 |
Zoom rate, showing the scale of the current screen, and manually adjusting |
 |
Zoom up screen |
 |
Zoom down screen |
 |
1:1 display screen |
 |
full screen display |
 |
delete the partition |
 |
locked ,move after unlocked |
 |
Alignment, can set alignment at same time by select multiple partitions(There are a variety of alignments in the sub menu) |
 |
size of assimilation, can remain consistent size, the width or height of the selected multiple partitions.(There are a variety of size assimilation in the sub menu) |
 |
partition can expend to full screen |
 |
move up and down, can change the selected partition construction location |
 |
Non gray scale program preview button,preview different color based program effect (Please choice single color ,dual color and tri color button in sub menu) |
 |
play the program to preview(There are accelerate display ,normal display ,accelerate display button in sub menu) |
 |
Release program |
table 5.3-2 screen button function notes
3. Right of the page
Right of the page including the zone ,properties zone and material zone. It will show the corresponding zones, as shown in picture 5.3-7,each zone have different effect ,user can use double click or drag to add zone.(v1.0.40 platform has deleted the picture zone and text zone, v1.0.42 platform has added the local live zone, v1.4.4 platform has added the voice zone and restored the text zone, v1.4.5 platform has merged the simple image-text zone and the rich text zone into the image-text text, v1.5.3 platform has added the colorful font zone)

picture 5.3- 7
In the material items,there is different material for different partition as shown in picture 5.3-8,user can use right click ,double click or drag function to add material.also use can add material by click add button as shown in picture 5.2-19.
picture 5.3- 8
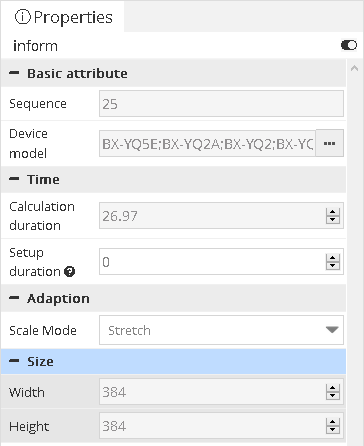
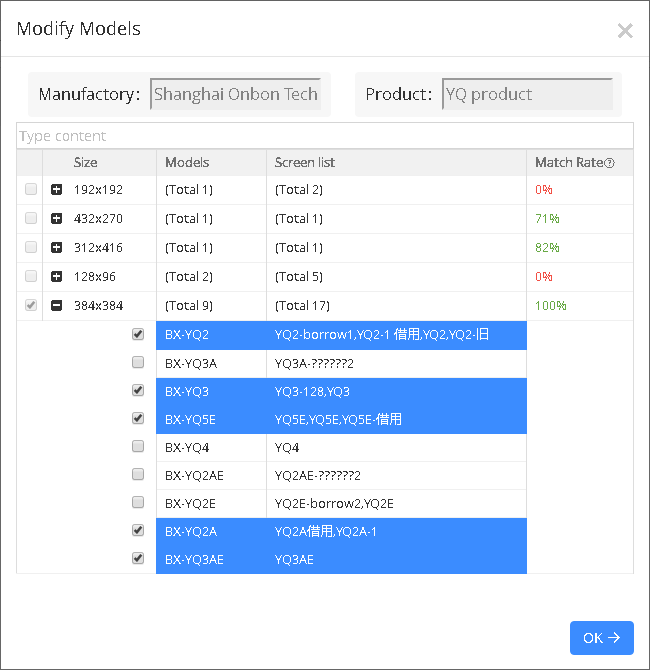
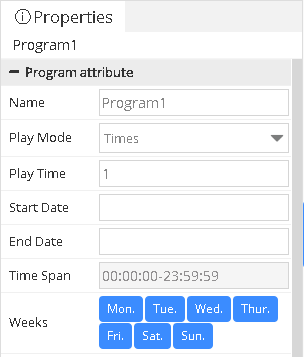
In the attribute items will display current program and attribute value,here take program attribute as an example as shown in picture 5.3-9,user can use the device model to setup .when reset ,user only can select the device model same as the program size .as shown in picture 5.3-10.The new "setup time duration" attribute will only work if the program is posted to the syncing screen.
picture 5.3- 9
picture 5.3- 10
5.3.1.1 Release in the making program page
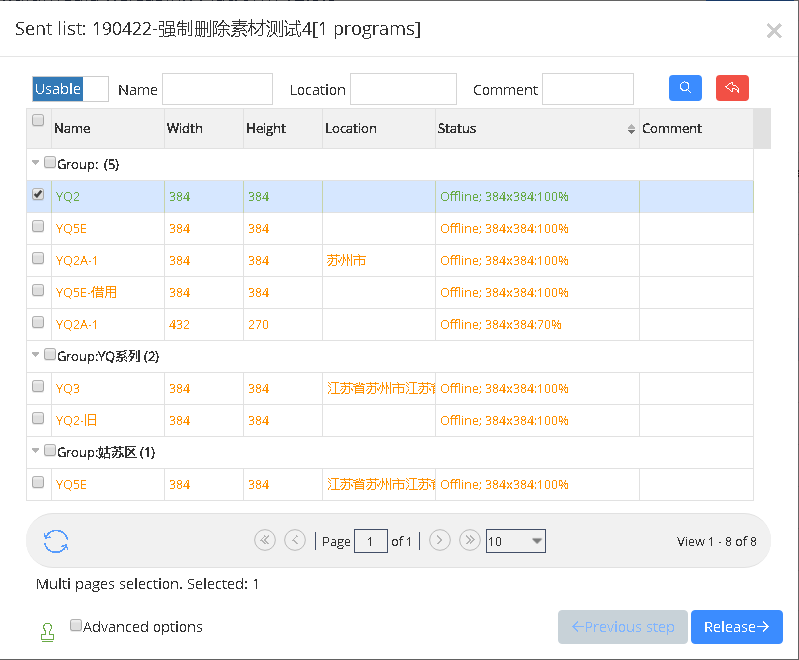
Users can release the program by clicking the release button then enter into the release guide .In the play settings, Users can select the corresponding screen, like picture 5.3-11, under “Usable screen”it will show the screen which is 60% matched with program, and it is also the screen which is supported by the program; Under “All screen”, like picture 5.3-12, it will show all the programs under this account, and the reasons why it cannot be used. If users select “release directly” and click “Finish”, then, it will release immediately; If users check the "Clean up useless material" option, will clean the old program then release the new program.
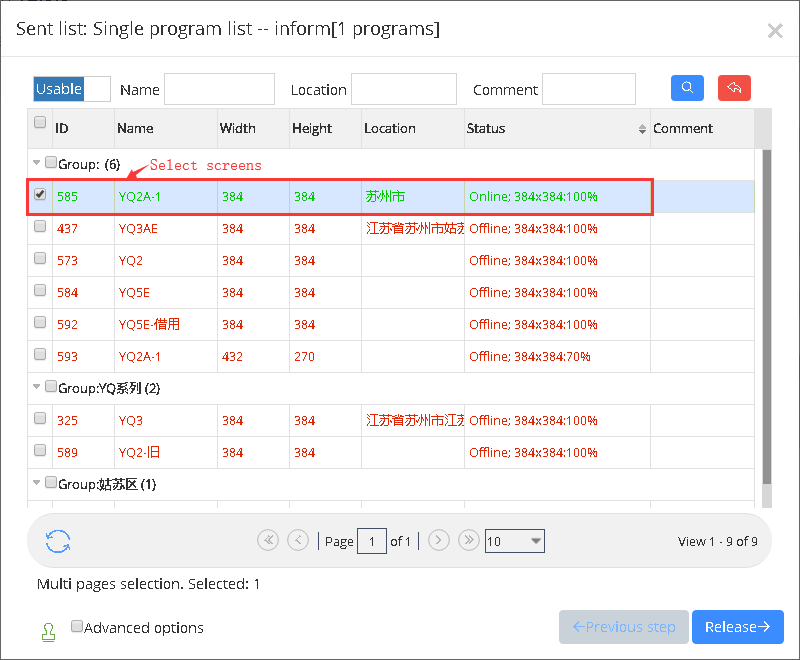
picture 5.3- 11
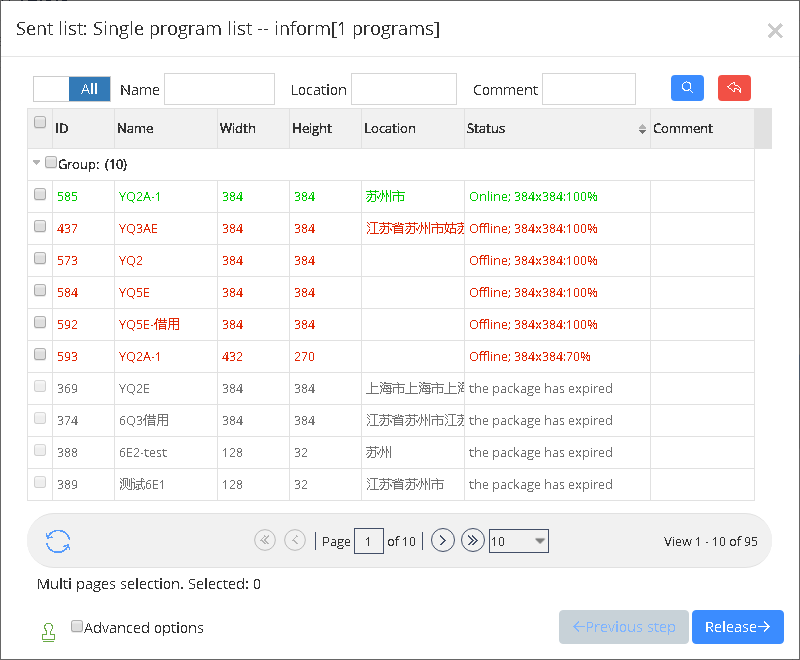
picture 5.3- 12
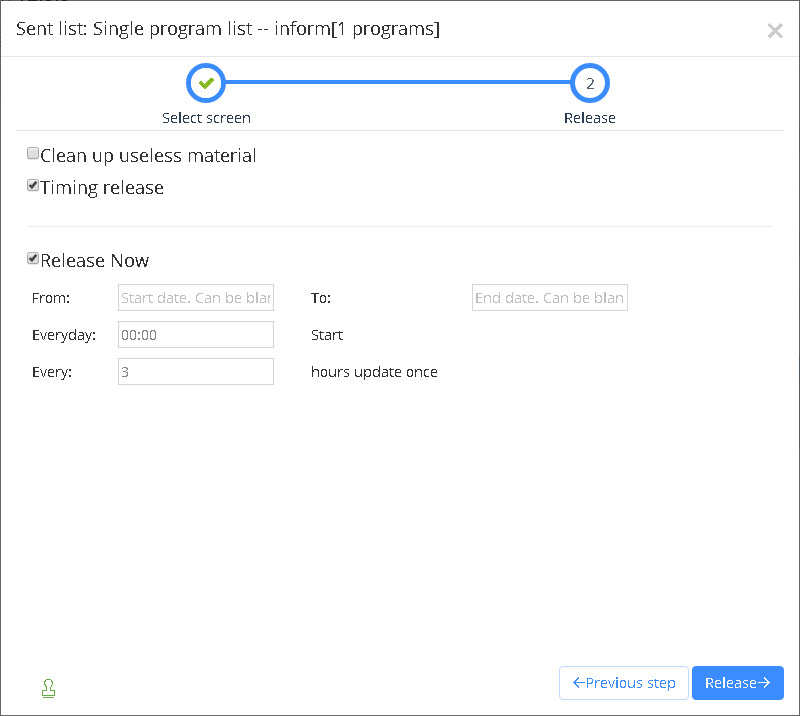
picture 5.3- 13
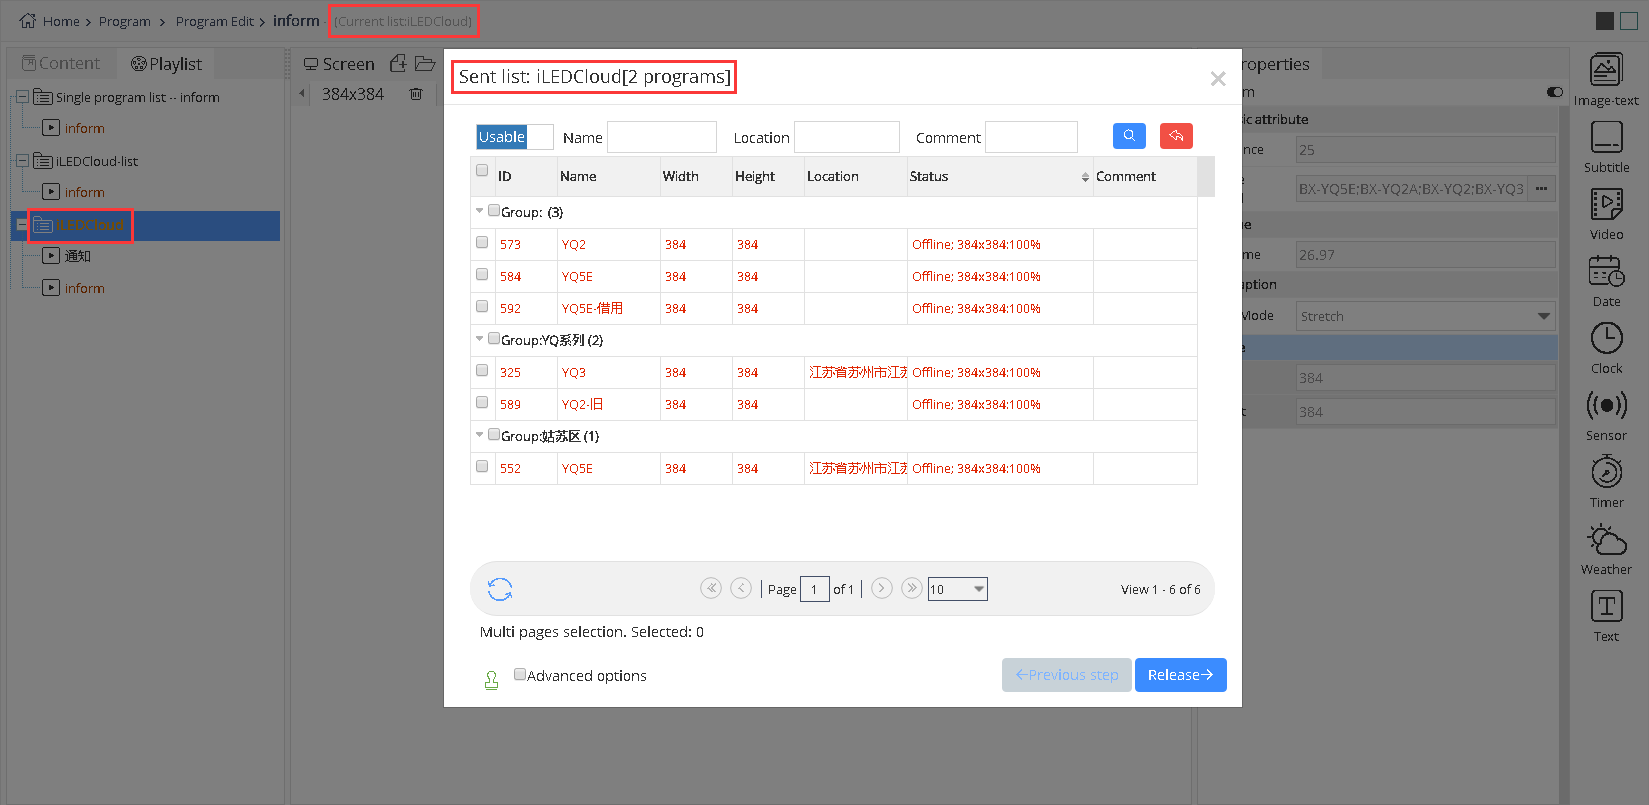
Users can also release playing list on “Programs”, like picture 5.3-14: switch to “playing list” page, click the playing list name, and then click “release” button.
picture 5.3- 14
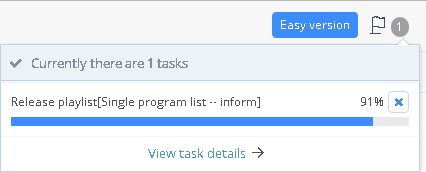
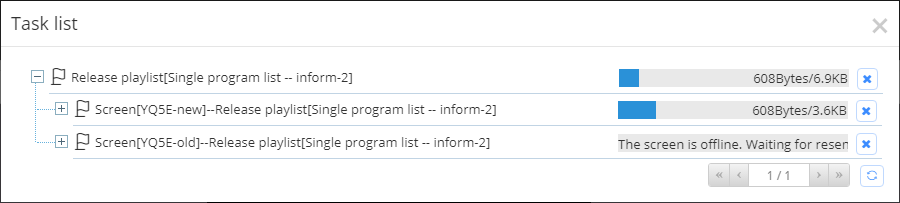
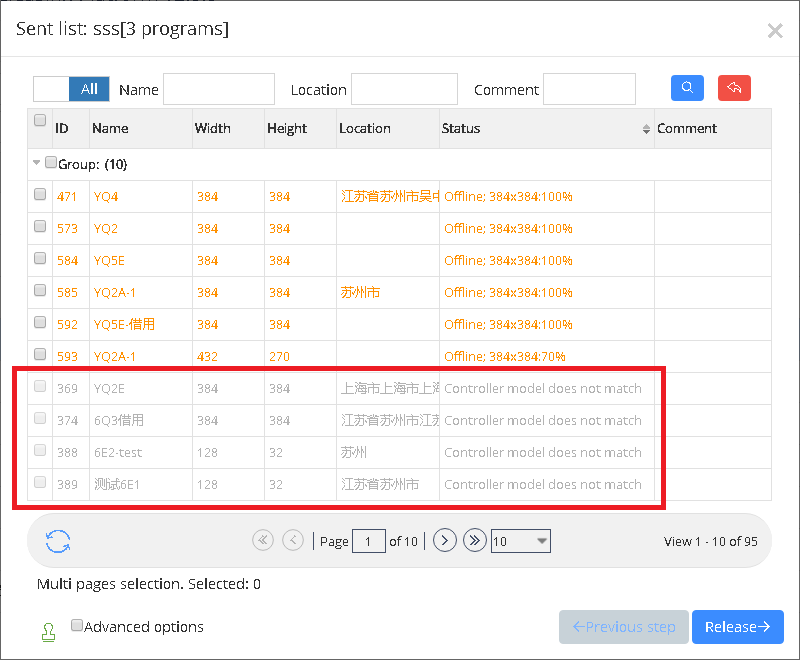
After finishing the program release wizard, you can check the release process in the top right corner of the page view as shown in picture 5.3-15,Now, iLEDCloud can be used to release, to operate as to create the releasing task for both online or offline screen,like picture5.3-16. For online screen, will release the program as usual; For offline screen, it will inform you that “the screen is not online, will resend automatically when it’s online”, if it is failed for 3 times, our platform will inform you and ask you to resend. Like Picture5.3-17.
picture 5.3- 14
picture 5.3- 15

picture 5.3- 16
You can check here, whether the program is sent successfully.
picture 5.3- 18
picture 5.3- 19
5.3.1.2 Self-adaption function
Self-adaption function means the program can match with different sizes screen automatically in a fixed range.There are two programs types, multimedia program and text program.Multimedia program supports adding many sizes drawing boards. When users want to release programs, platform will count the matching rate, if the matching rate is over than 60%, the program will be sent successfully; If the matching rate is less then 60%, then, cannot. For this circumstance, users can add corresponding size drawing board as to solve this problem. Text program support only one size drawing board, and it can be 100% matched.
We also add the properties which is relative to program properties and zone properties. Add “scale mode” in program properties, it’s stretch and according to width and height. Add “scale mode”, “wrap line height”, “wrap lines number”, “font scale” in zone properties. Scale mode in zone is the same with program properties. Wrap line height, when users set value, if the zone height transcend the wrap line height, zone will do line feeds automatically, and the font size will be made by the properties of wrap line height, and it’s fixed. Wrap lines number means the zone will change to the lines which is set by wrap lines number and the font size will be changed by the height of zone. Wrap line height and wrap lines number influence the effect of line feeds in zone. If users set values for both, zone height transcends wrap line height, then, the contents in zone will change to the corresponding lines according to the value in wrap lines number. And with the bigger of zone height, font size will be bigger too; If users set only wrap line height, zone height transcends wrap line height, then, zone will do line feeds, the lines number is according to the zone height, and the font size is fixed. If both of them are 0, then, default is no “line feeds”. Font scale will valid only in this drawing board.
5.3.2 Program reviewing
User can view all program from program management as shown in the picture 5.3-20,there is some button notes like in the talbe 5.3-3.
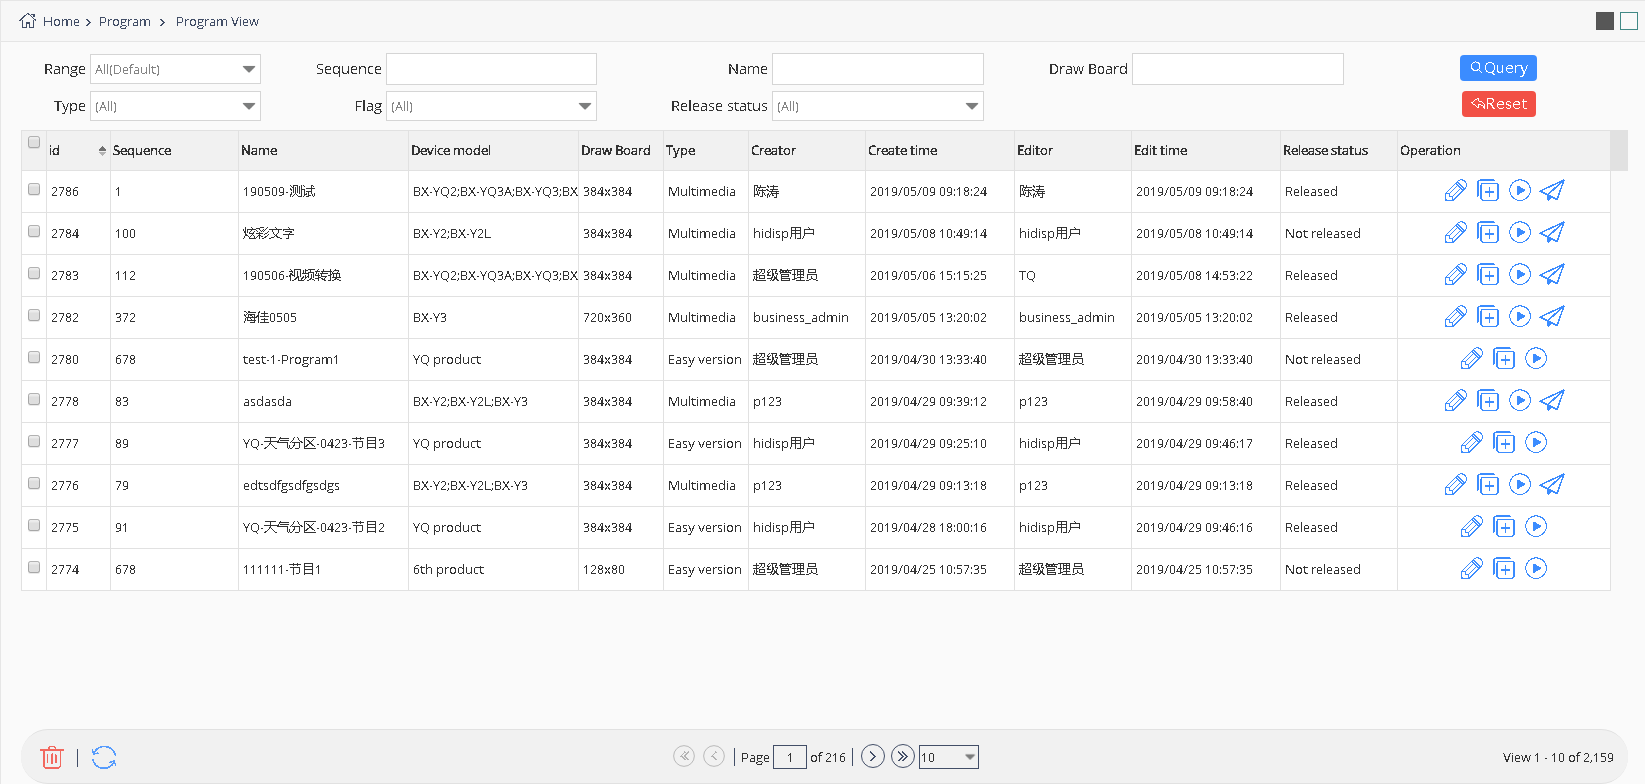
picture 5.3-20
| button | function |
|---|---|
 |
Edit program button ,click to create program ,user can modify it according to the original program.If user want to edit the program of simple version, a prompt message will pop up, after confirming user will enter the edit page of this program. |
 |
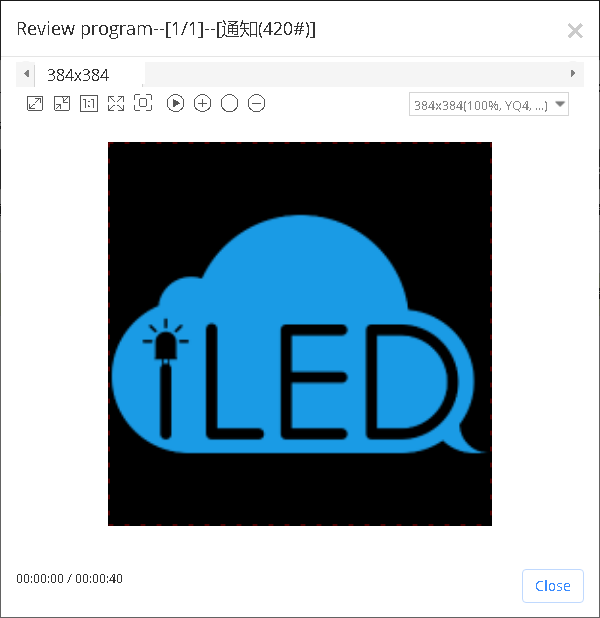
Preview button ,click and step into the preview page as shown in thepicture 5.3- 20 |
 |
Release button ,click and step into the release process as shown in the picture 5.3- 11~picture 5.3- 13 |
 |
Copy button , copy the present program |
table 5.3-3 program view button notes
picture 5.3- 21
5.3.2.1 Pre set program
When users add controller in our platform, it will add some programs automatically according to this controller (including text, graphic, video), as to give some simple testing programs for customers. Those pre set programs are added automatically, users cannot edit and cannot delete, and it will not waste your network flow which you already bought.
5.3.3 Playlist
Users can view all the playlist in the program management page ,as shown in the picture 5.3-22 ,and manage the playlist button as shown in the table 5.3-4
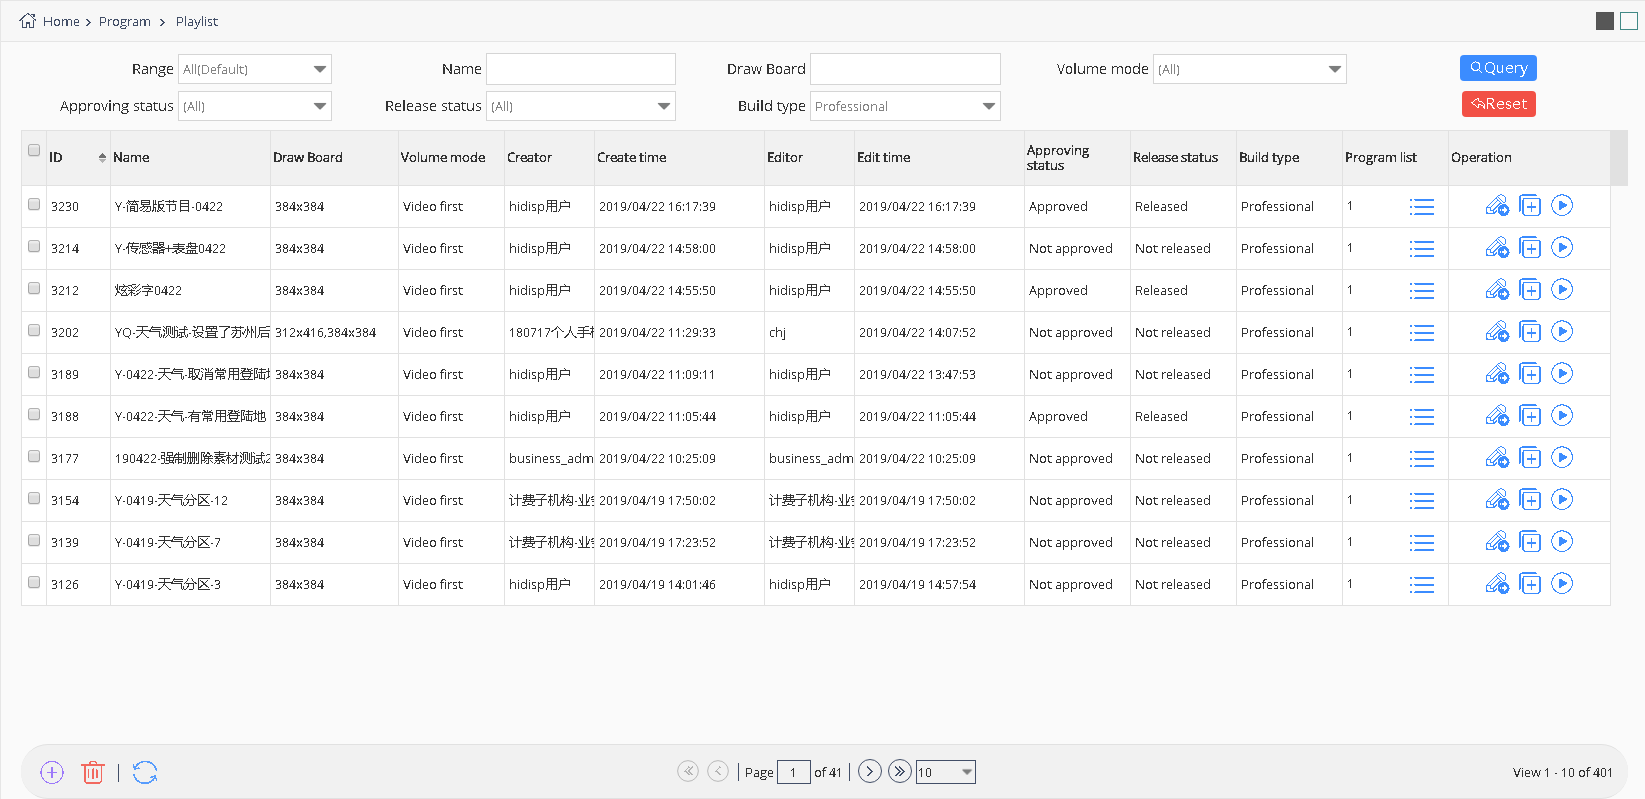
picture 5.3- 22
| button | function |
|---|---|
 |
Program list button ,click to view and edit the playlist as shown in the picture 5.3-23 |
 |
Edit button ,click to modify the playlist guide.If user want to edit the playlist of simple version, a prompt message will pop up, after confirming user will enter the playlist wizard interface of this playlist. |
 |
Play button ,click to preview the playlist |
|
Copy button , copy the present playlist |
table 5.3-4 playlist button function notes
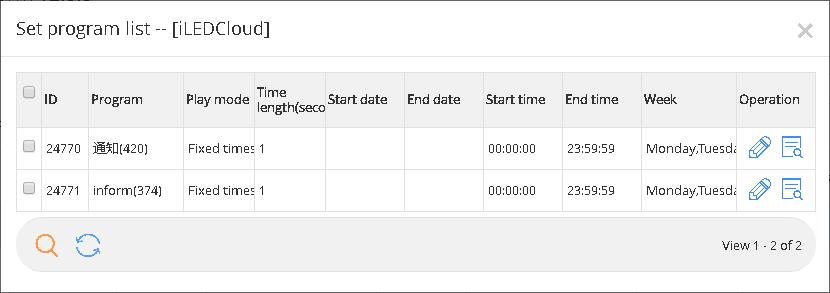
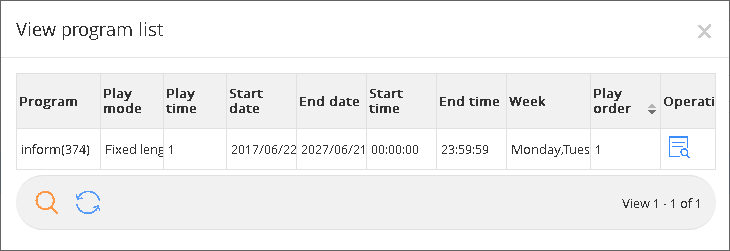
If users want to edit playlists, can click program list button,as shown in the picture 5.3-23, can add ,edit view and make order adjustment, click the edit button to change the program mode and play time, click move up down button to set the program broadcast priorities order.
picture 5.3- 23
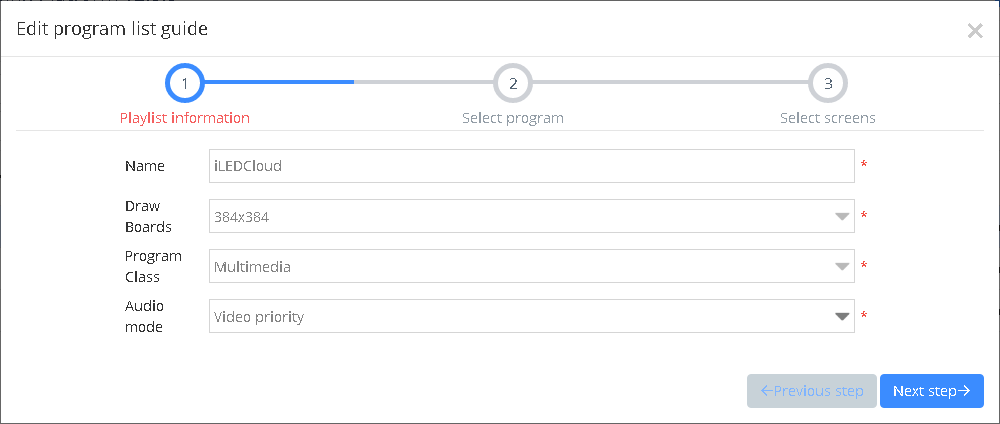
Users in the playlist page click add or edit button, will enter the playlist wizard interface, as shown in picture 5.3-24, users need to fill in the corresponding name,program drawing board and program types.
picture 5.3- 24
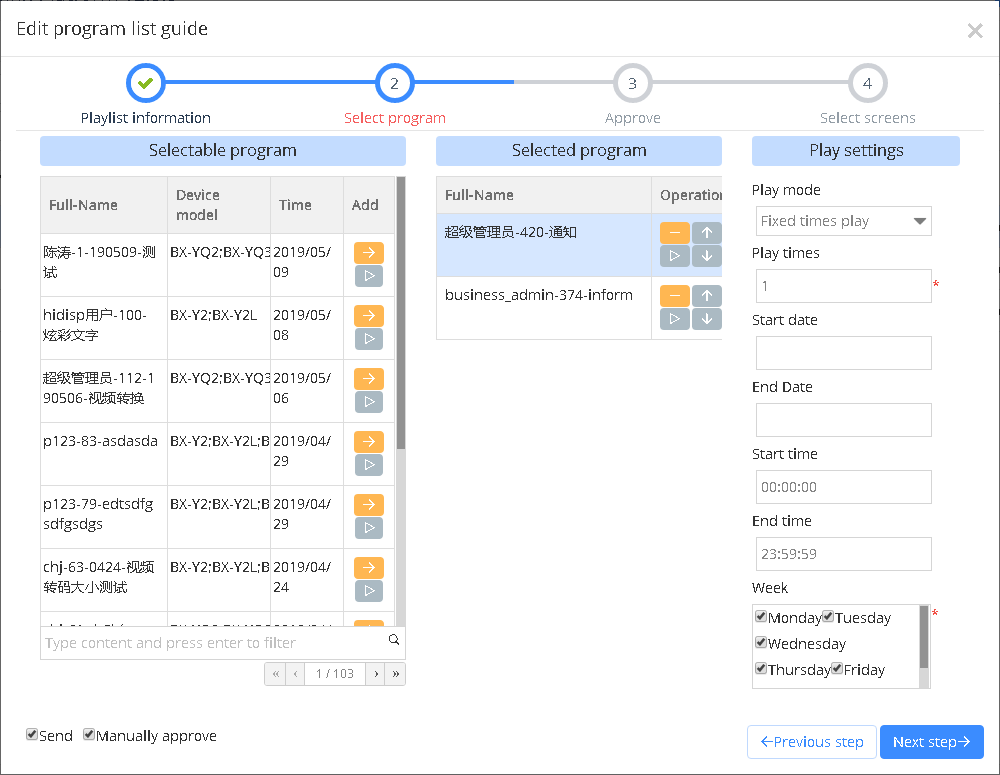
Then click "next step", as shown in picture 5.3-25, click the button"  ”add program to the playlist ,or view the program through button“
  ”remove the program by button“
  ”,after select “manually approve “release”s ,then will skip the review and release, simply
create list, after that need manually reviewed after release.
”,after select “manually approve “release”s ,then will skip the review and release, simply
create list, after that need manually reviewed after release.
picture 5.3- 25
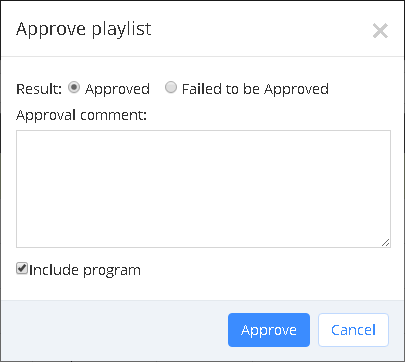
Click the next step to the manual approve interface as shown in the picture 5.3- 26 ,select the result as “approved”
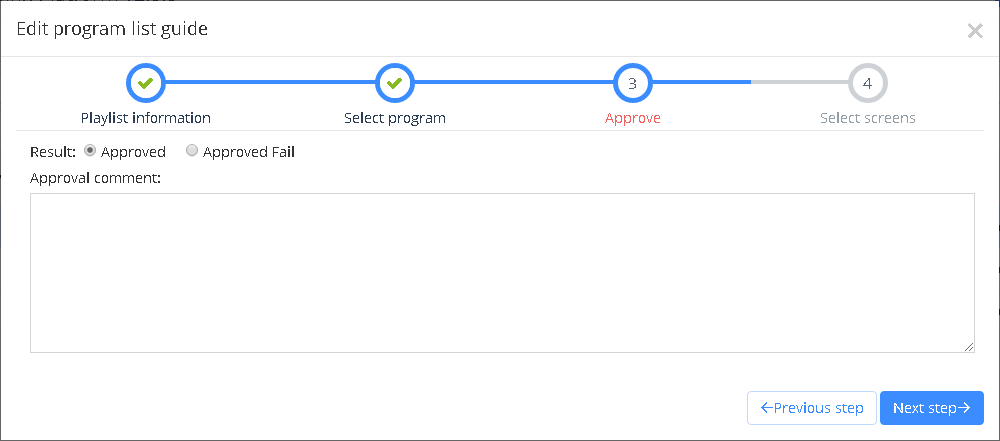
picture 5.3- 26
Click the next step button as shown in thepicture 5.3- 27,select the screen ,then will display the correspond usable screen ,user can view the screen status in the”all screen” option.
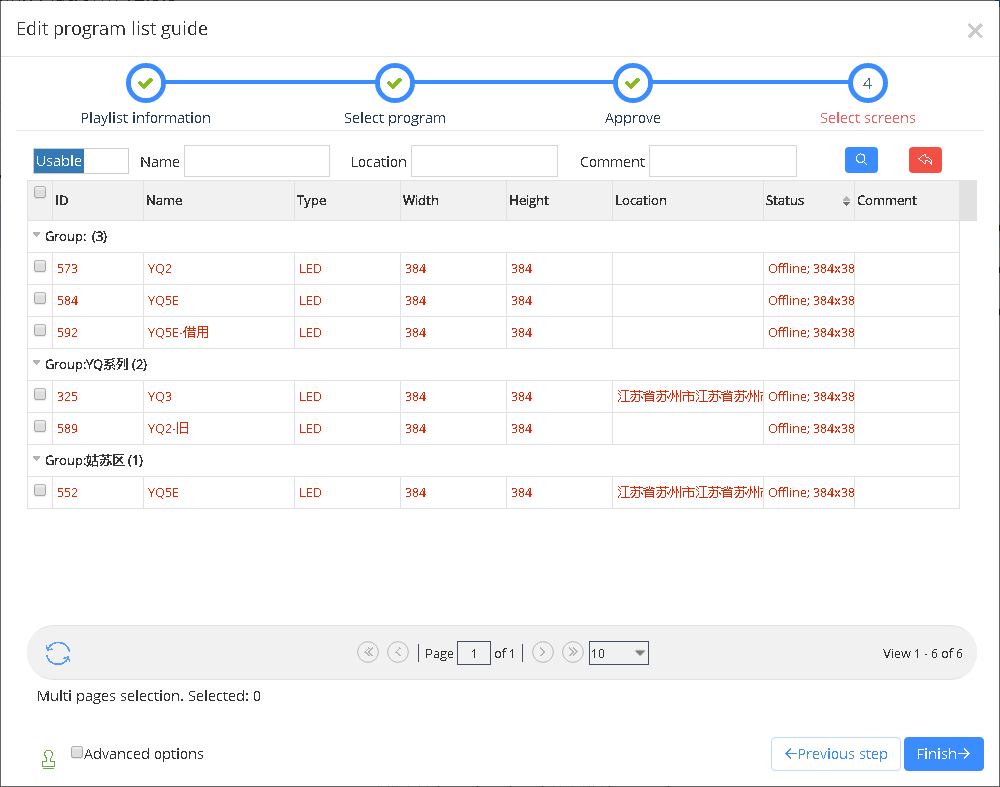
picture 5.3-27
If user want to create auto task, need to check the “Advanced options” and click the next step as shown in the picture 5.3-28, users write the data then click finish will be ok.
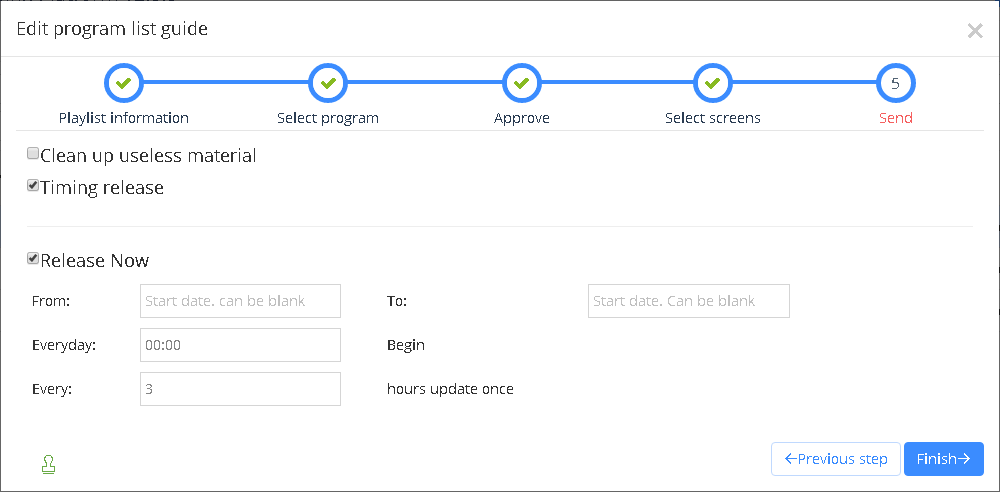
picture 5.3-28
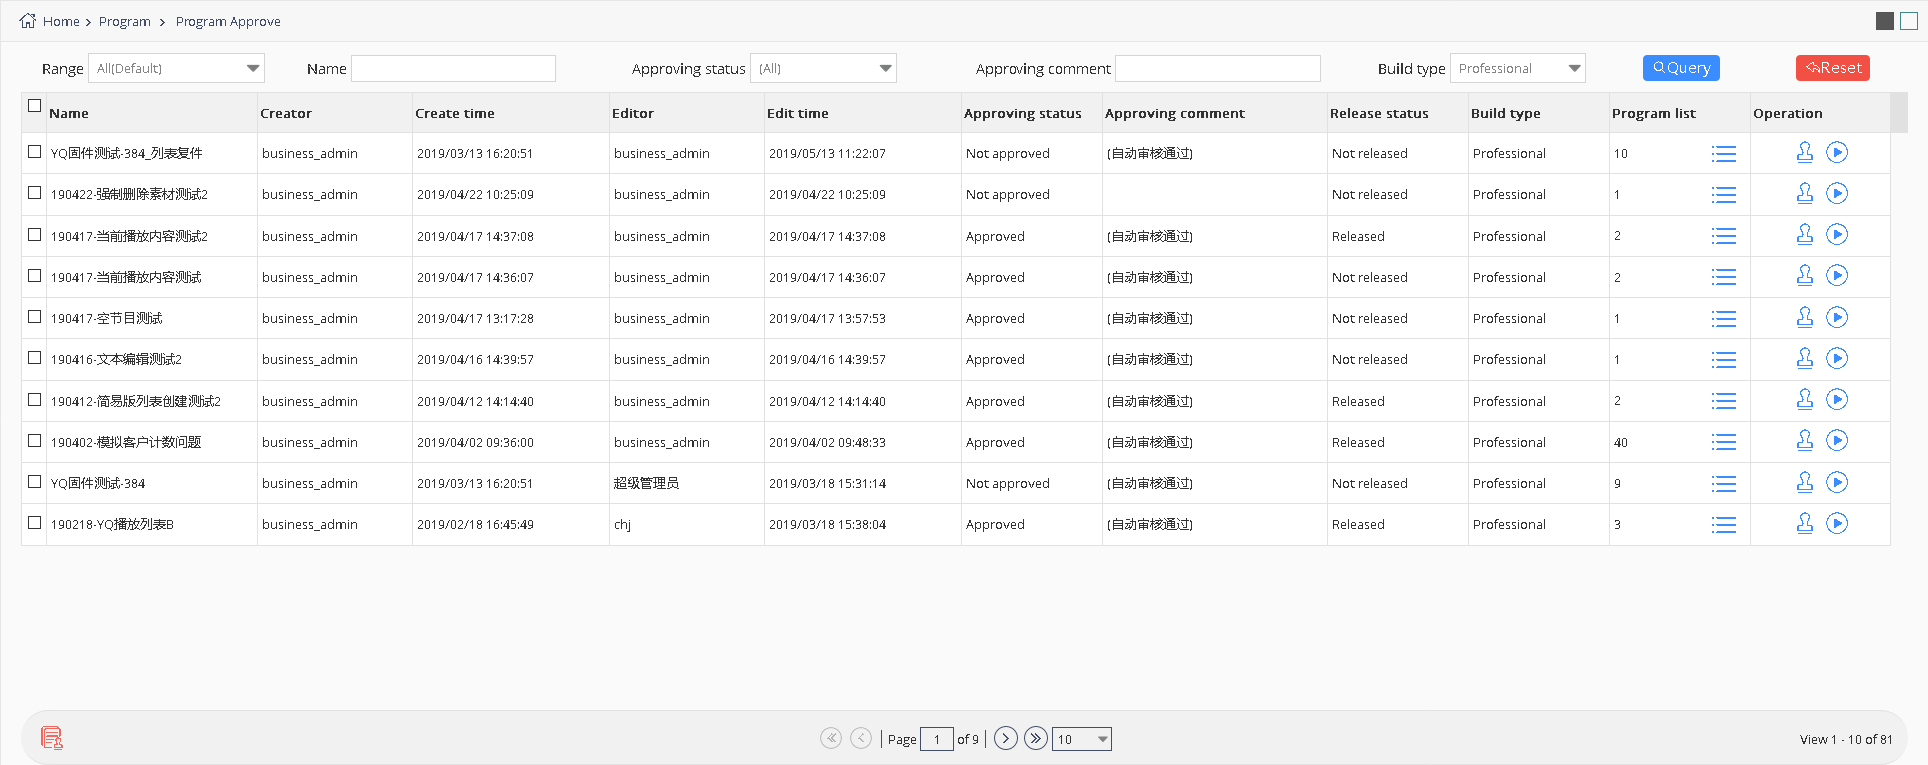
5.3.4 Program approve
Users can see all the playlist in the program management as shown in thepicture 5.3- 29, there is button on the page as shown in table 5.3-5
picture 5.3- 29
| button | function |
|---|---|
|
Program list button ,only can check current program list ,can’t edit or modify as shown in the picture 5.3- 30 |
 |
Program approve button ,can approve single or multiple program |
table 5.3-5 program approve function notes
picture 5.3- 30
user can click the button to approve the program by single or multiple as shown in picture 5.3- 31 to prevent duplicate audit, the audit button is hidden after the list audited.
picture 5.3- 31
5.3.5 Program releasing
User can view the in the approved playlist from program release management page (note:not allowed to release the failed audit program list), as shown in picture 5.3-32,user can view playlists, release and preview for each approved list.
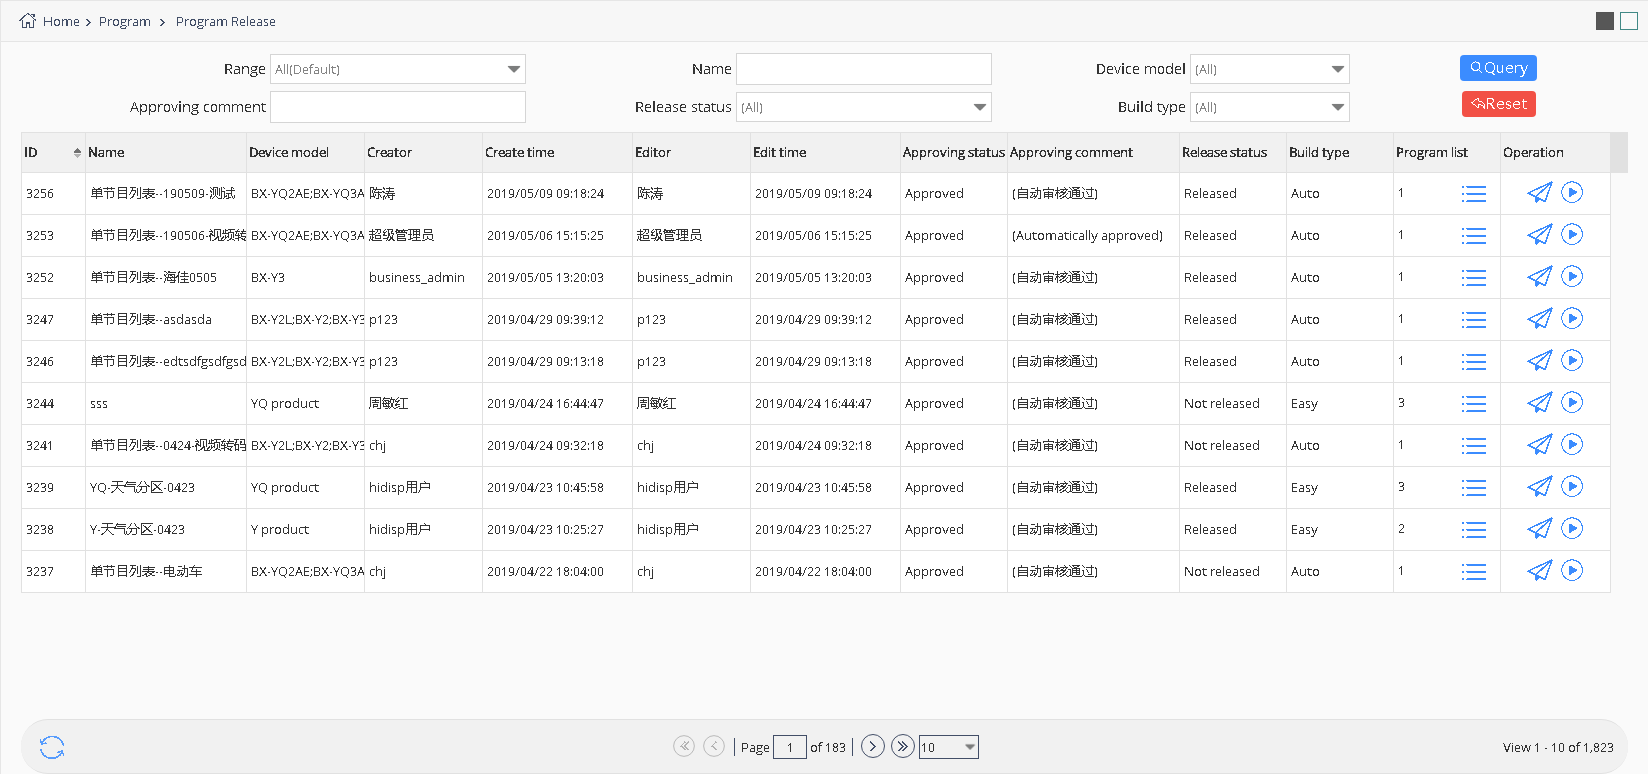
picture 5.3- 32
User click the release button of each playlist can step into the release interface as shown in picture 5.3- 33,user can select the next step to finish the release according to the release mode.

picture 5.3- 33 release
5.3.6 Automatically releasing
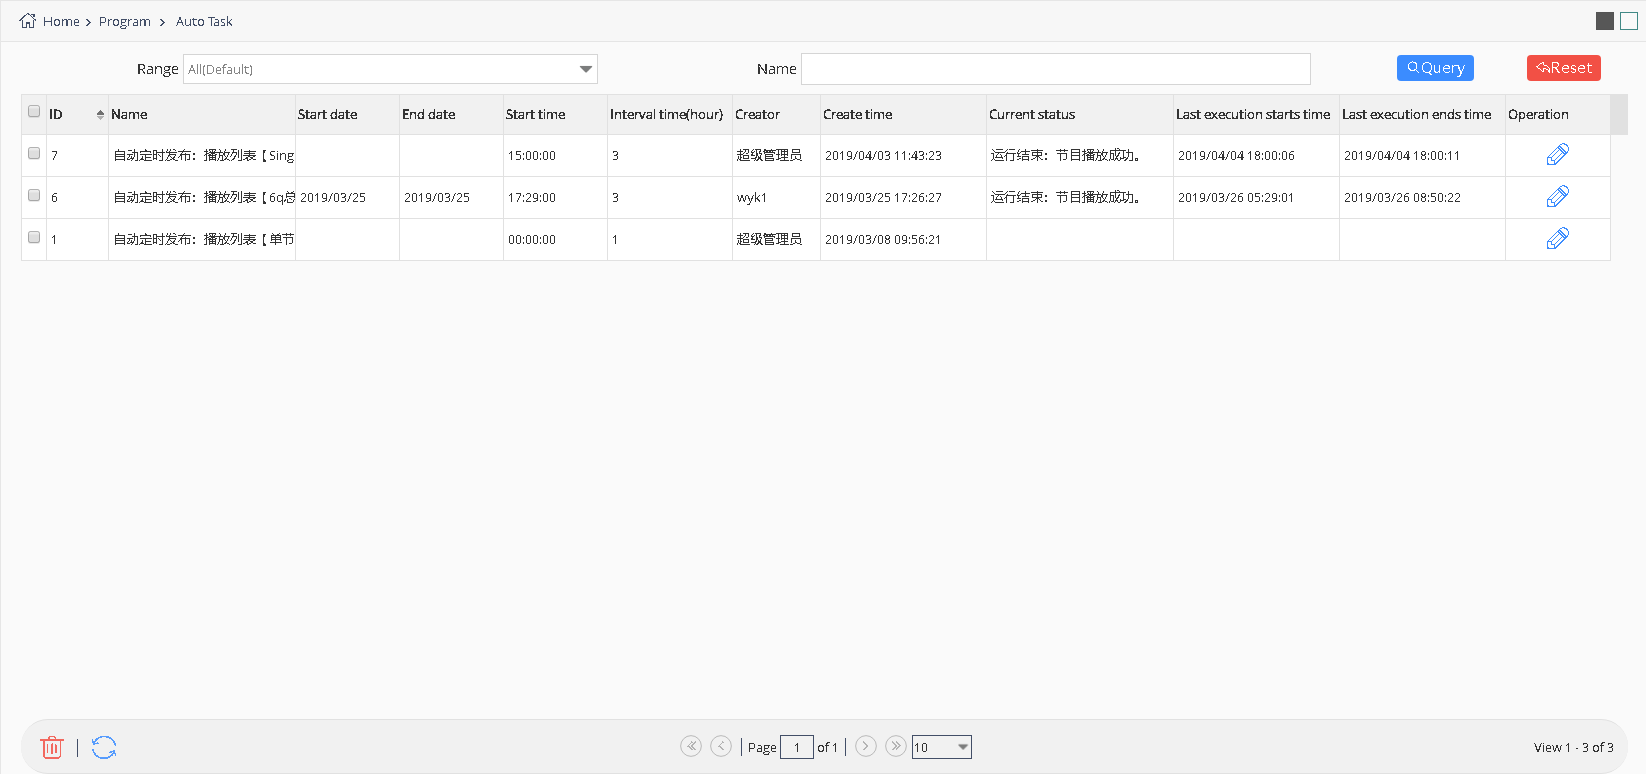
In program management of the automatic release task page, will show timing automatically release task at the end of the release program, as shown in picture 5.3-34.Users can modify, and delete operations, automatic release task modification operations can modify the task start date and end date, start time and interval time, delete operation requires users to select the corresponding tasks, then click the delete button.
picture 5.3- 34
5.4 Bulletin Management
bulletin Management function is released in the version after V1.0.42 (including V1.0.42), users can create, edit, check, audit and release bulletin by this function. Presently, this bulletin can only be released to online YQ and Y series controller.
5.4.1 Create bulletin
Users can create new bulletin list and new bulletin. If the current users have right, he can also finish the releasing operation.
On the page of creating bulletin, the left side is bulletin list, and the right side is bulletins for each list. Like picture 5.4-1. Every bulletin list can add mostly 10 bulletins.
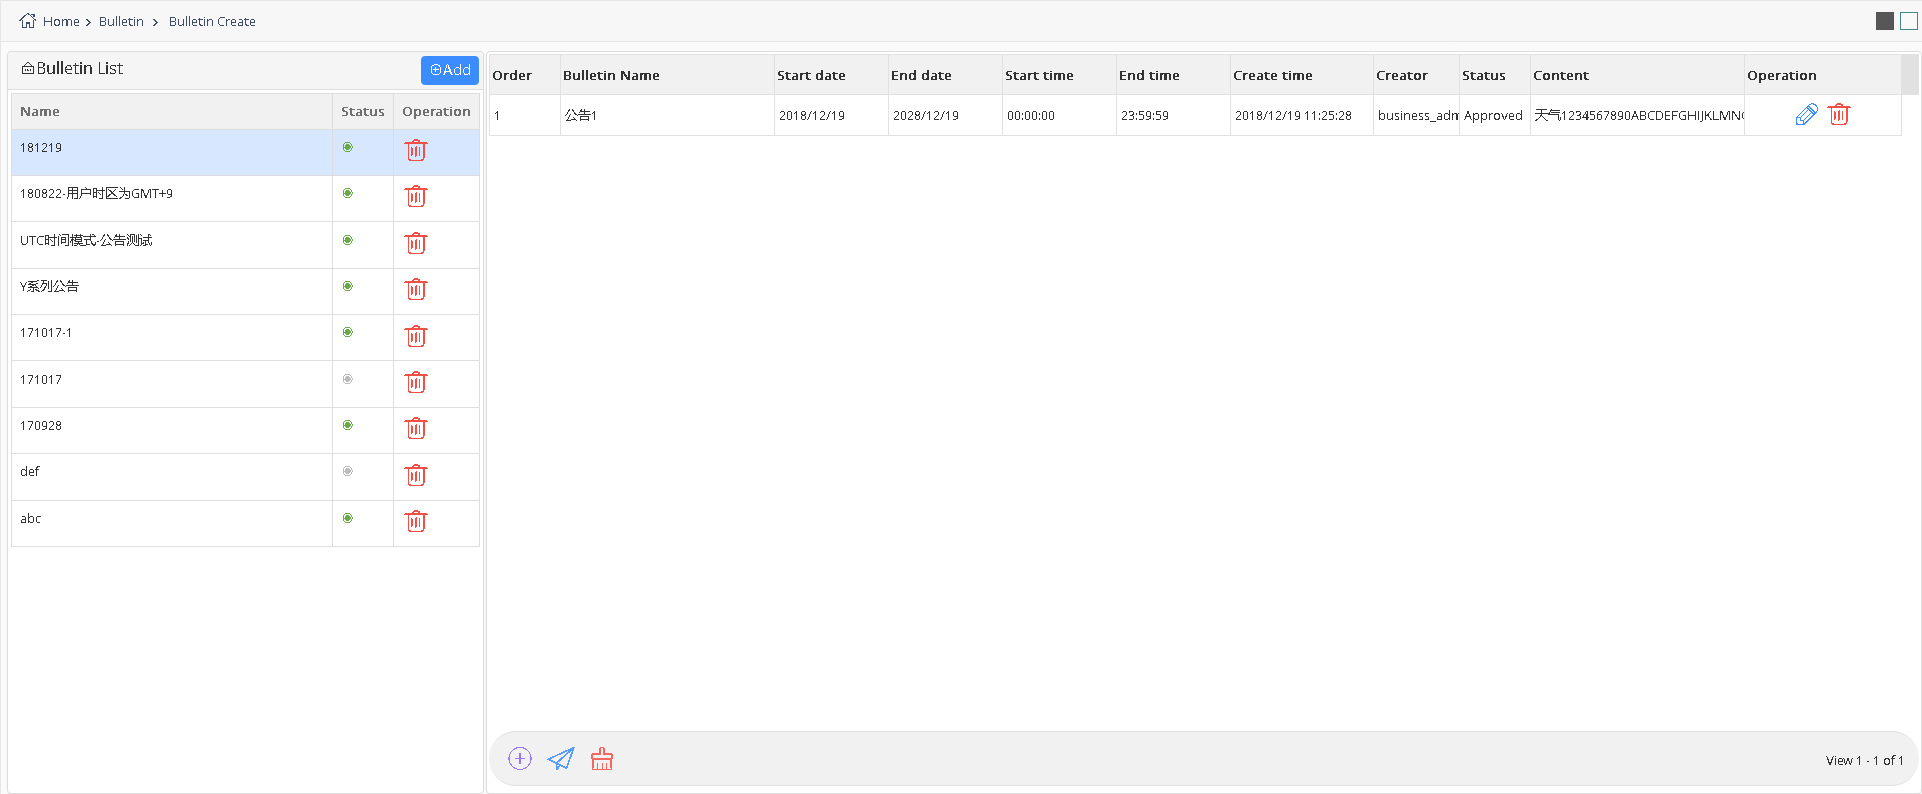
picture 5.4-1
| button | Function |
|---|---|
 |
Bulletin release button,click to display the screen page on line, after users select it ,then can finish the bulletin release. |
 |
Clean bulletin button ,click to display the online screen pages ,after users select it, then can clean the bulletin list. |
table 5.4-1 bulletin management button and notes
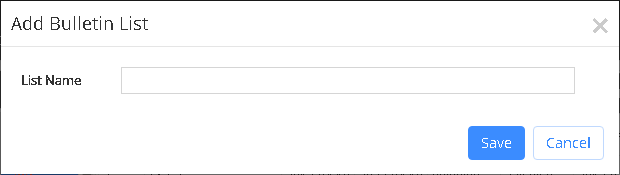
Click “Add” button on bulletin list, and input the list name, like picture 5.4-2.
picture 5.4-2
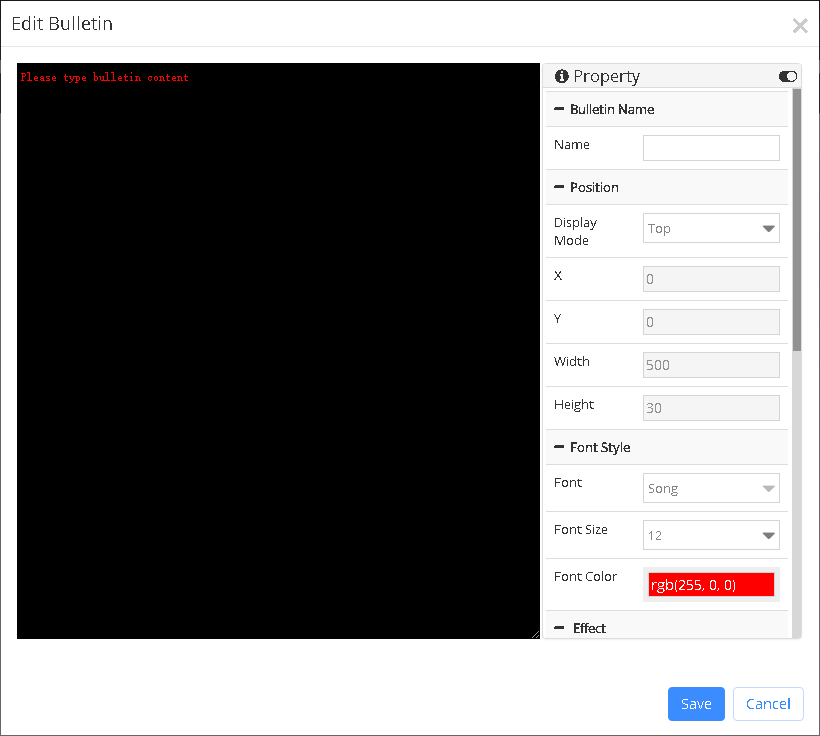
After create bulletin, click “Add” button on the right corner, will show Edit bulletin page, like picture 5.4-3. “Name”; “Display mode” (top, bottom, middle and customized), for customized, users can decide the width and height according to their requirements. “Permanent play”, if you choose “yes”, it will keep playing after plug off/on and if you choose “no”, the bulletin will be deleted after plug off/on; Users can also set playing period. “Background”, users can set the background for bulletin(please note that YQ2E,YQ3 and YQ4 cannot set transparent background).
picture 5.4-3
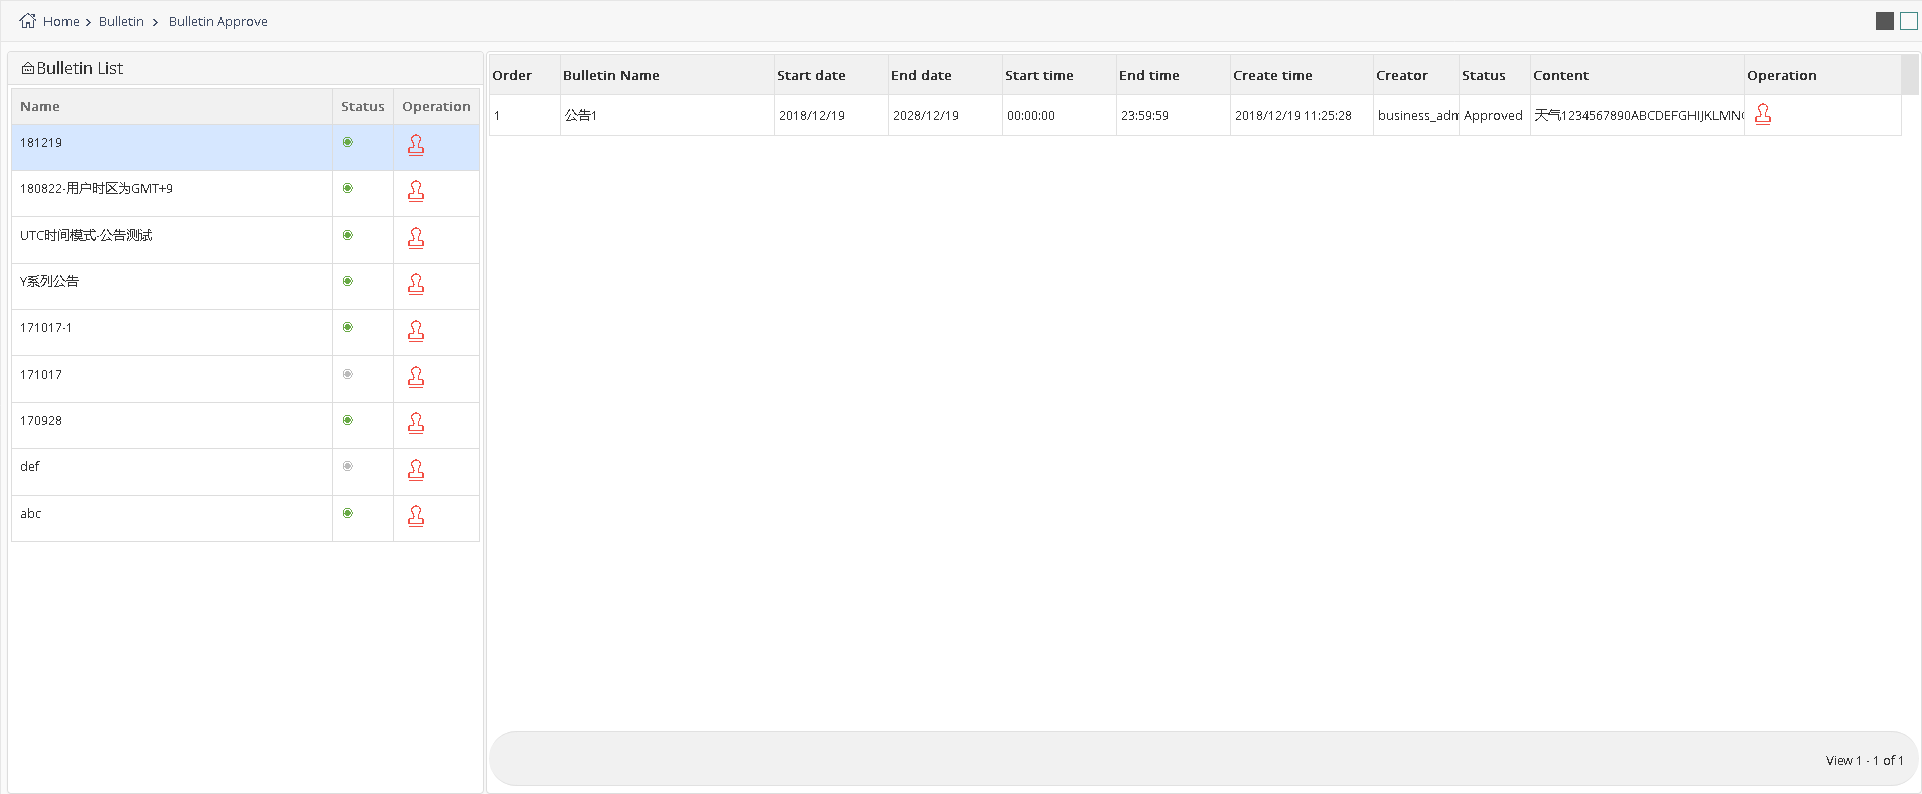
5.4.2 Bulletin Approve
Users can check all the bulletin lists from Bulletin Approve, like picture 5.4-4.
picture 5.4-4
5.4.3 Bulletin Release
Users can see all the approved bulletin lists on Bulletin Release (Note: the bulletin lists which are not released is not allowed to play), like picture 5.4-5.
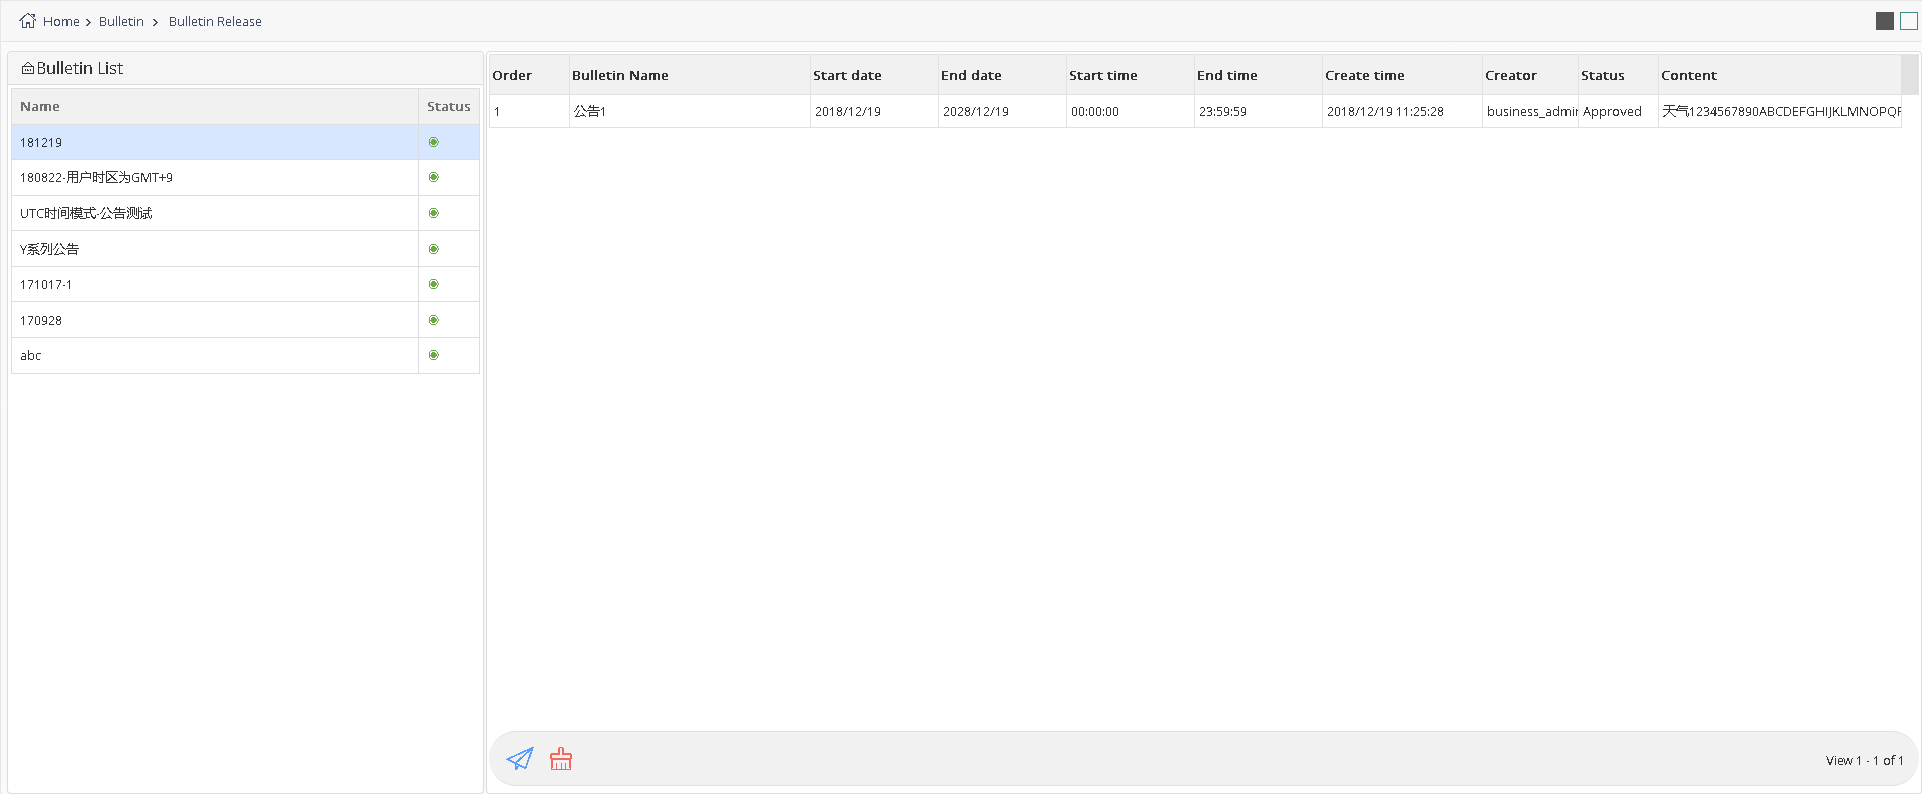
picture 5.4-5
5.5 System management
Different user type will have different management function in the system.if user is “business administrator ”,then can operate the follow roles: editor ,assessor and release person and so on.if user is “private account”then can only check the operation log information of his own in the system management.
5.5.1 User management
If only the business administrator can manage the user in the system as shown in the picture 5.5- 1, there are some button notes in the page ,as shown in the table 5.5-1,can add ,modify,delete and lock the user.
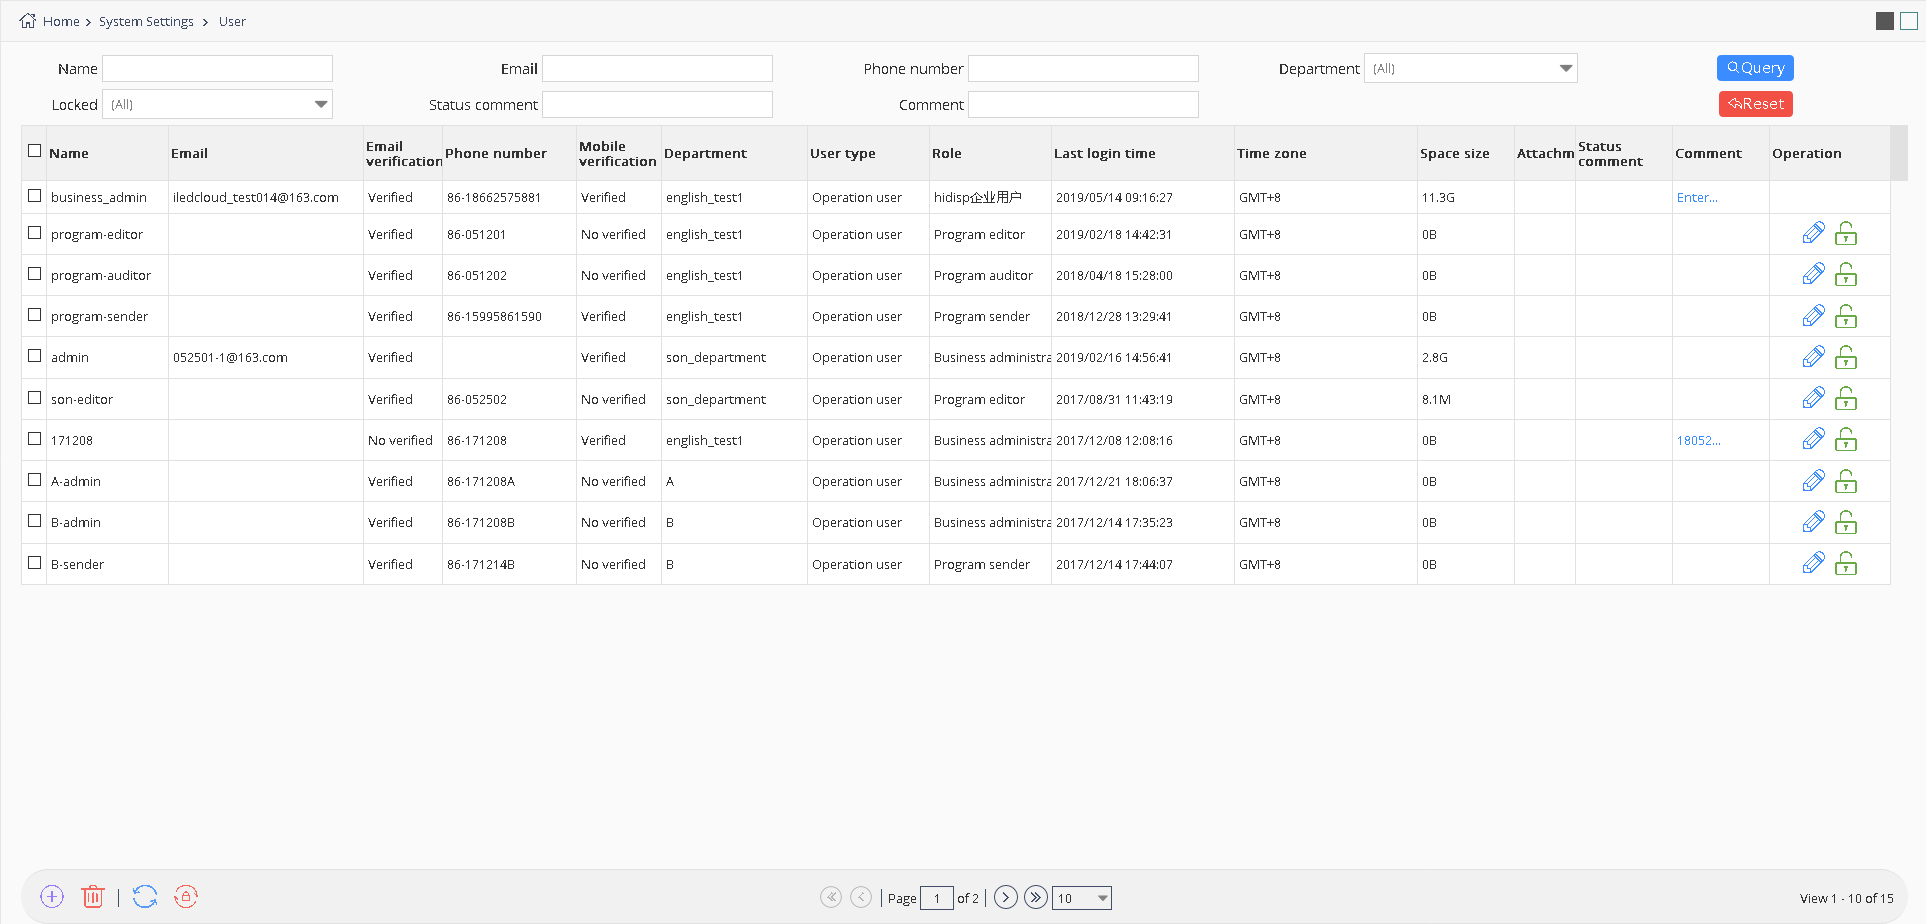
picture 5.5- 1
| button | Function |
|---|---|
 |
Lock button,click to lock user, the locked user can’t log in the platform |
 |
Reset the password button ,select user and click to reset the administrator log in password ,after that rest the password as 000000. |
table 5.5-1 user management button and function notes
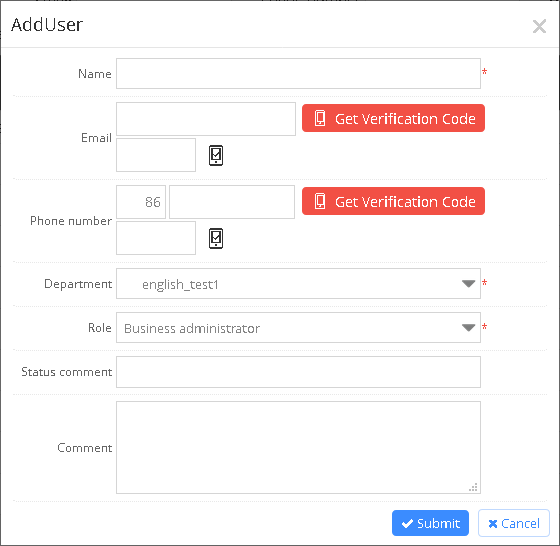
When the business administrator need add record ,can click the button as shown in the picture 5.5-2 ,email address or phone number, also whether it’s email or phone, all need dynamic verification. The new user default password is 000000. When the administrator allocation the user information ,click the modify button after the user record ,then pop up the same add page and allocation ,and modify them is ok .if want to locked the user ,click the according locked button of the user record, after locked ,the user can’t log in this platform.
picture 5.5- 2
5.5.2 Department management
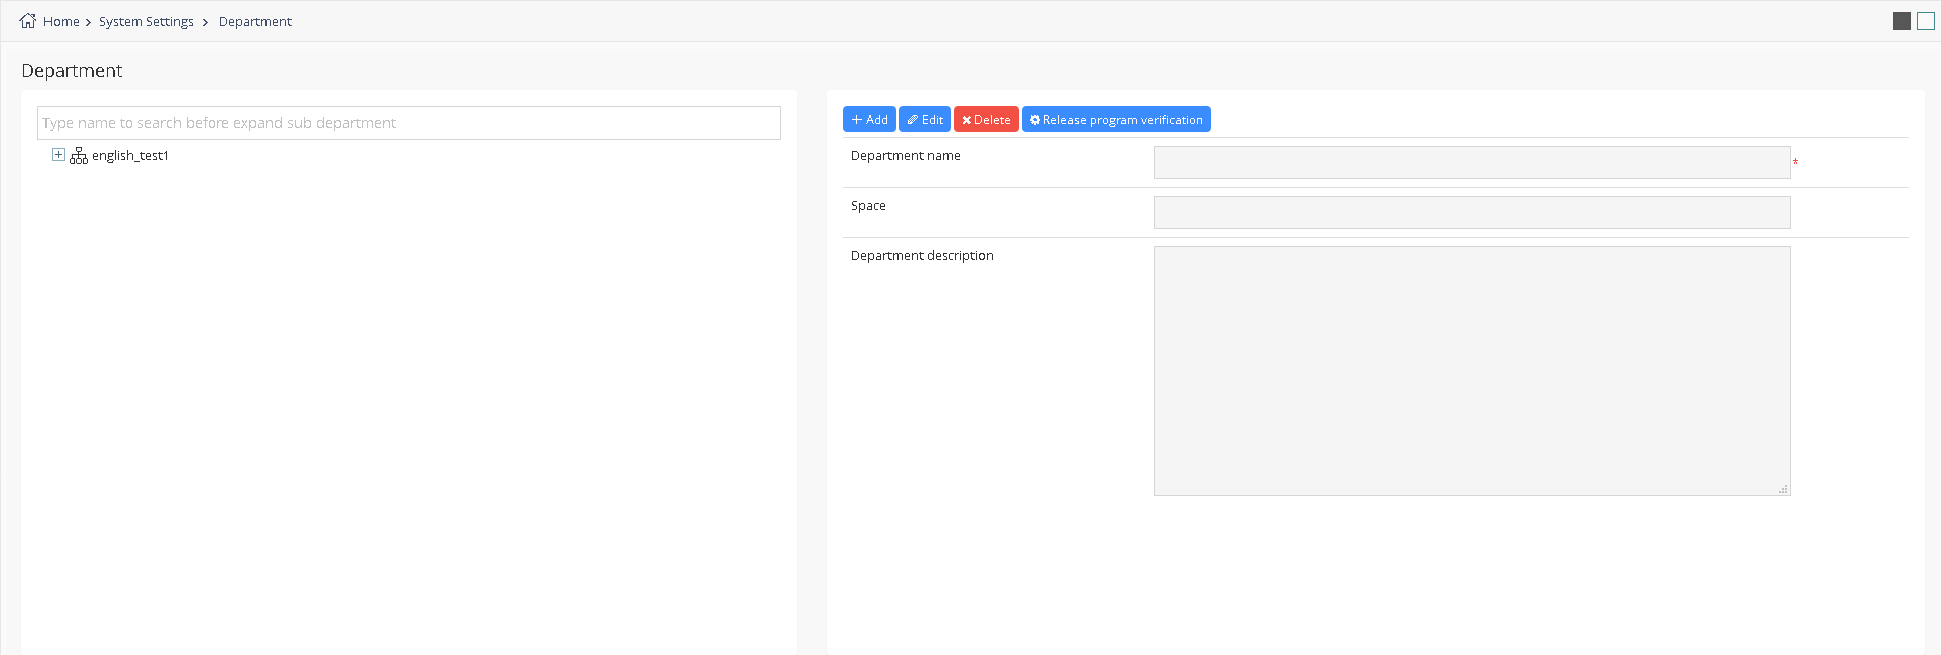
When the user role is the business administrator, can management organization in the system, as shown in picture 5.5-3, can add, modify, and delete, etc on the page.If you want to add department ,user need select a superior department, click the add button, enter the relevant information, then click on the submit.If to change institutions, to select an department, click the modify button.when delete department, if there is existing user data in the selected department, then cannot be deleted.
picture 5.5- 3
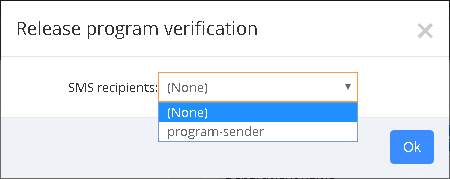
The business administrator can set up release program verification to the department,.Selected one department ,then click on the "release program verification" button, will pop up Settings page, as shown in picture 5.5-4.open "SMS recipients “ list, binding a mobile phone number of users in the selected department.Selected to a particular user and click "ok", after the release program ,will require input message authentication code before release wizard , otherwise can't release normally.
picture 5.5-4
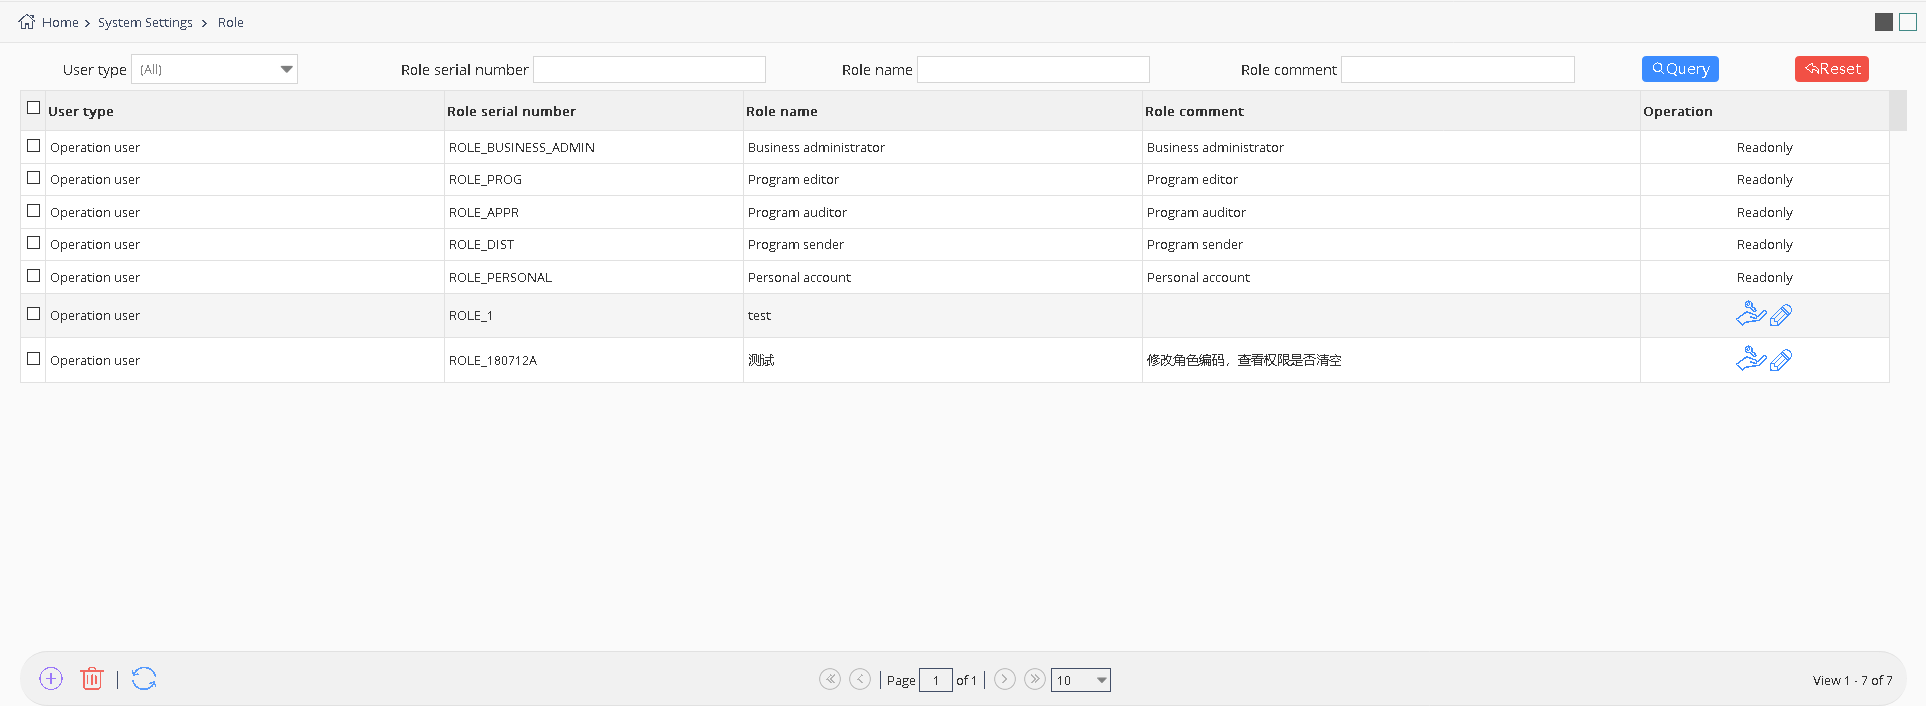
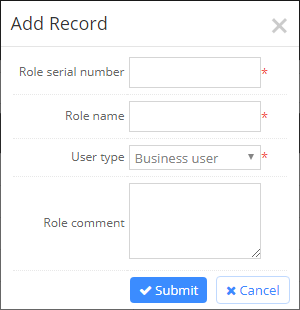
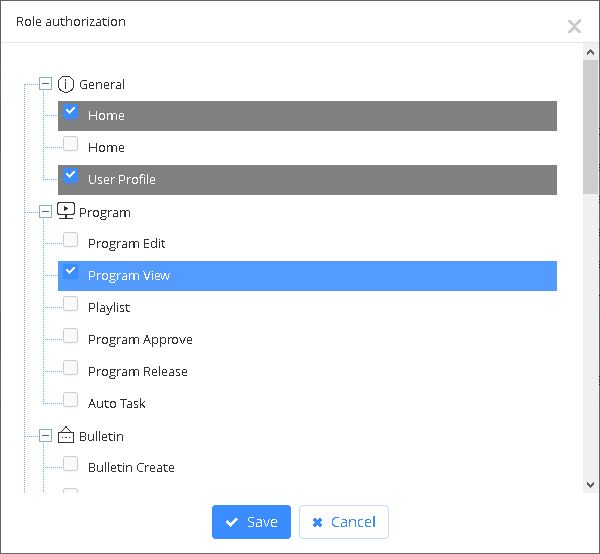
5.5.3 Role management
Only the business administrator can carry on the role authorization management in the system management, as shown in picture 5.5-5, some buttons on the page function, as shown in table 5.5-2.Can add new character, click the add button, as shown in picture 5.5-6, finish the new create after input corresponding information submitted.If you want to delete, select the role, click the delete button below.If you want to modify the role information, click the edit button corresponding records. change role authorization, as shown in picture 5.5-7.If you want to view the role of information, then click on the checking button of corresponding record .
There are four default roles in the platform ,they are:business administrator, program editor, program auditors, and program sender . Program editor mainly for add material ,create the new program and edit ,create and edit the play list . The program sender can send the program which have been audited to the screen
picture 5.5- 5
| button | function |
|---|---|
 |
Role authorization button ,authorized corresponding function to the role |
table 5.5-2 role authorization management button and notes
picture 5.5- 6
picture 5.5- 7
5.5.4 Log management on system and log management on controller
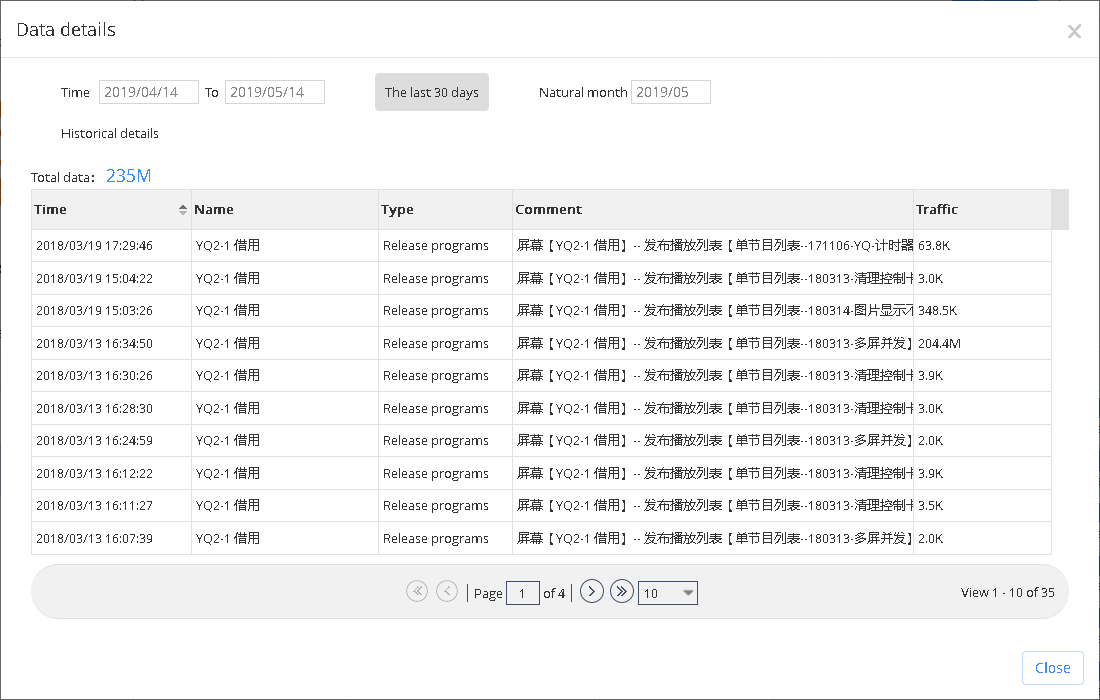
Different roles of user has log management of system and log management of controller, for example, log management of system, as shown in picture 5.5-8, business administrator can view the all users behavior in the organization structure ,but other roles can only see their own operating behavior, such as login, add, delete, etc. Users can also export the log, export as xls format.
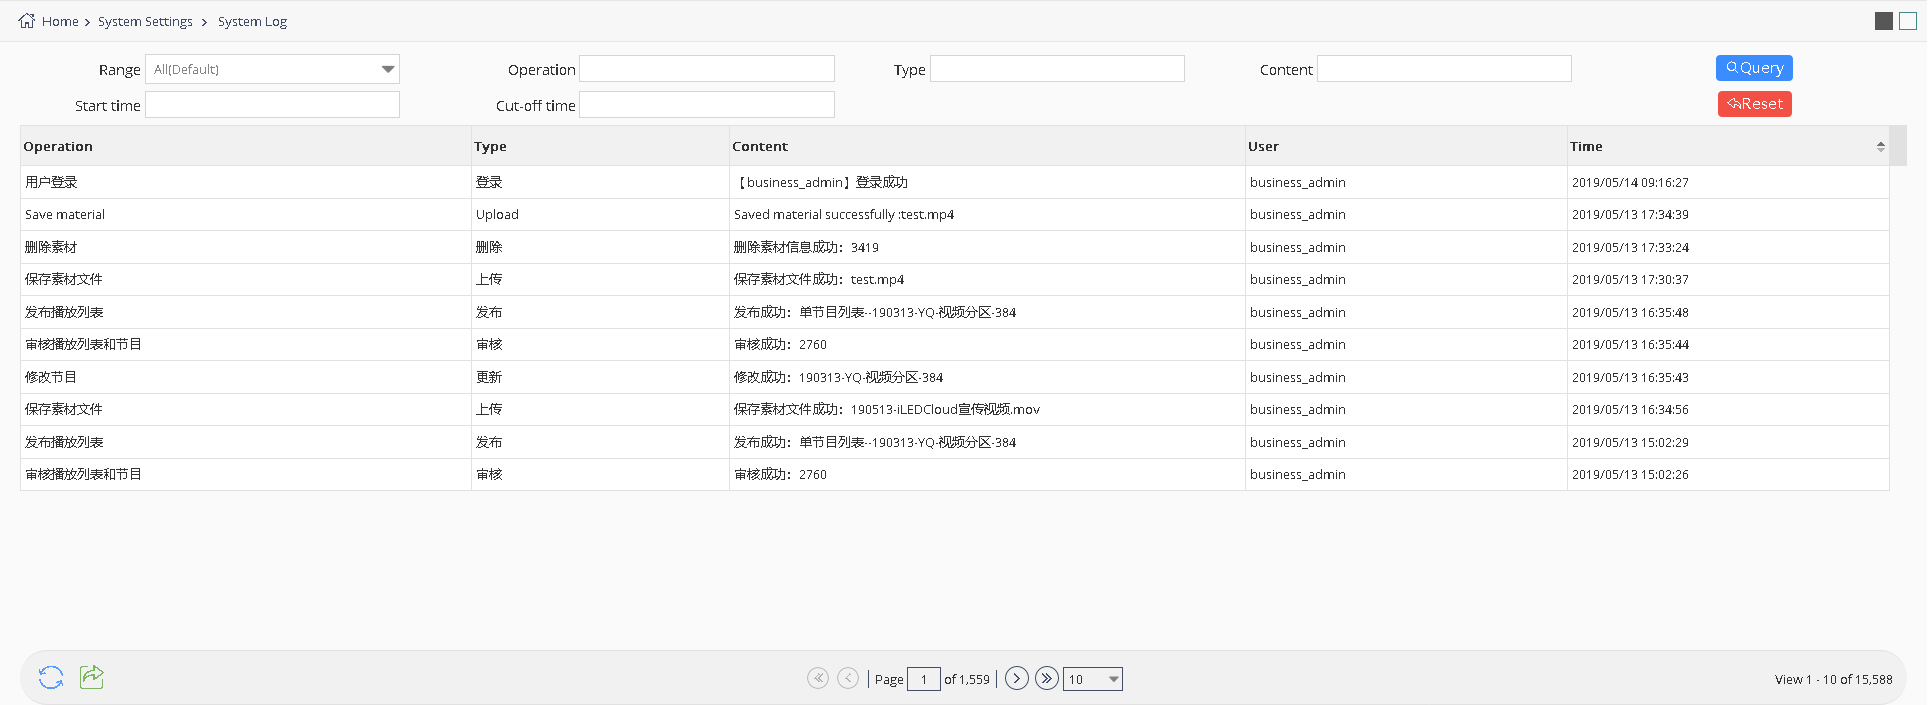
picture 5.5- 8
| Button | Functions |
|---|---|
 |
Export button, export the result to xls file. |
table 5.5-3 Log Management
5.5.5 Feedback management
Users can check the feedback from Feedback Management, like picture5.5-9. If there’s no reply for the feedback, users can modify or delete it. If the manager already replied the feedback, users can only check it.
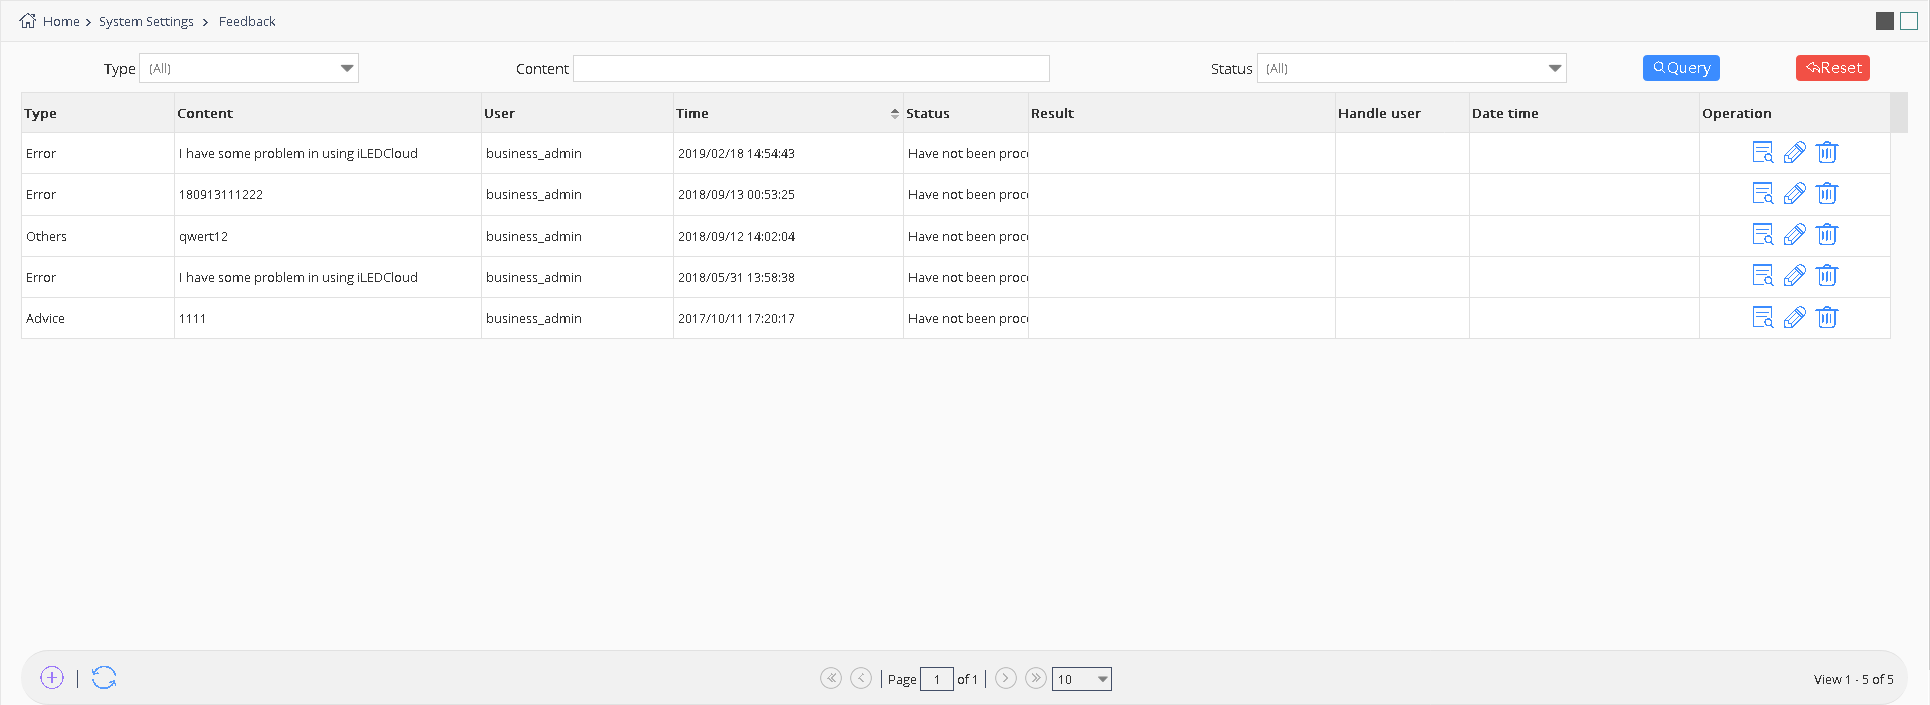
picture 5.5-9
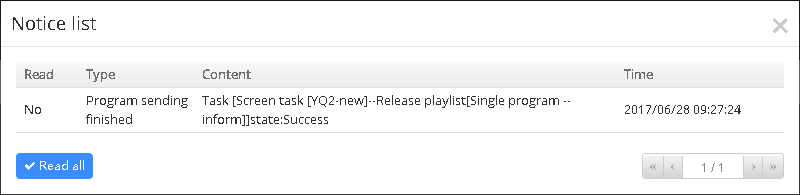
5.5.6 Notice management
Different roles of user has the notice management as shown in picture 5.5-10, on notice page, every user can see the operation of their own role. User can click “All read” button to mark as read.
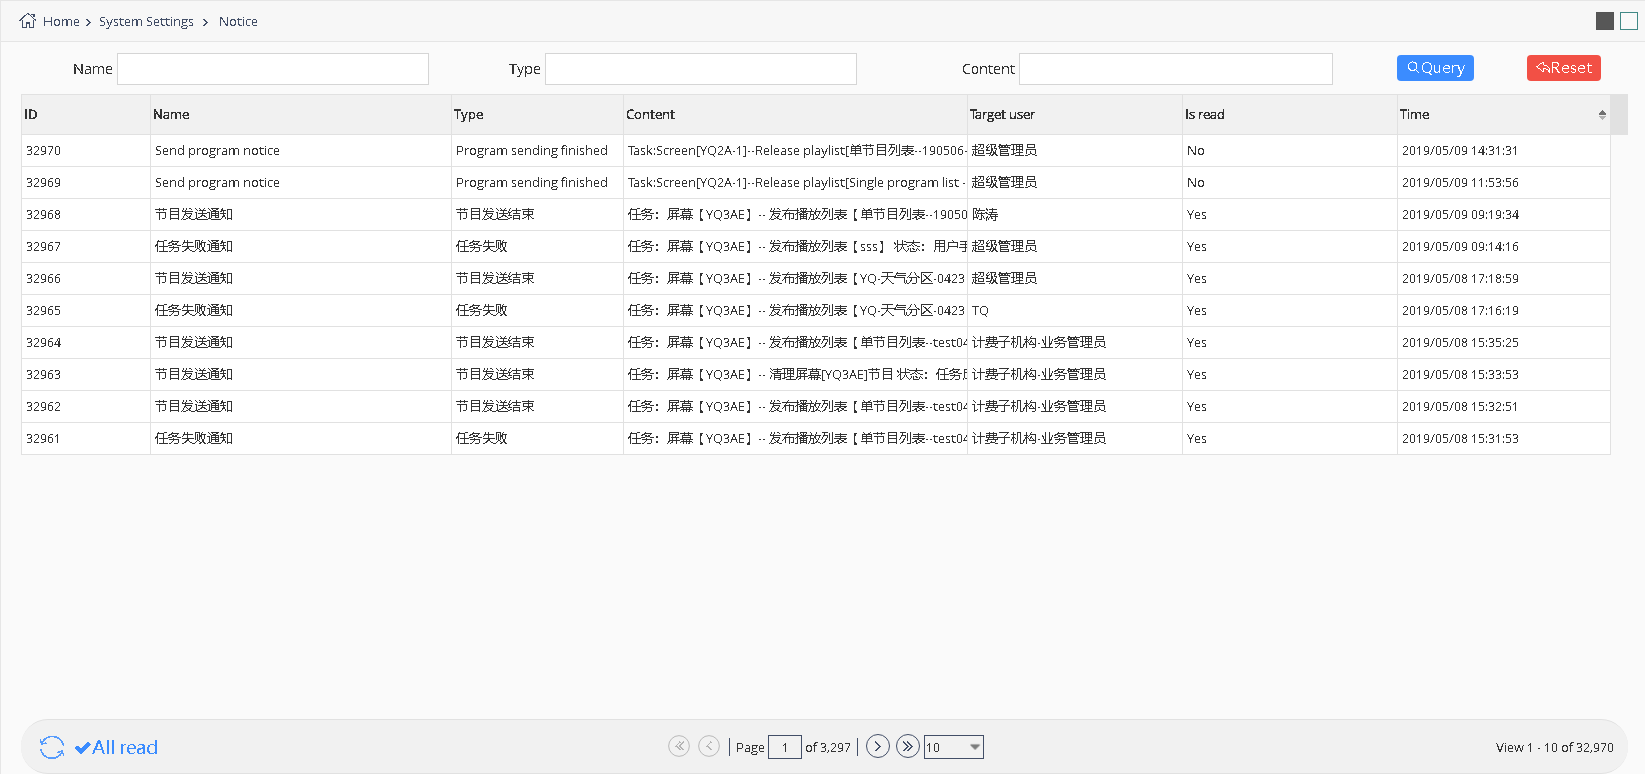
picture 5.5- 10
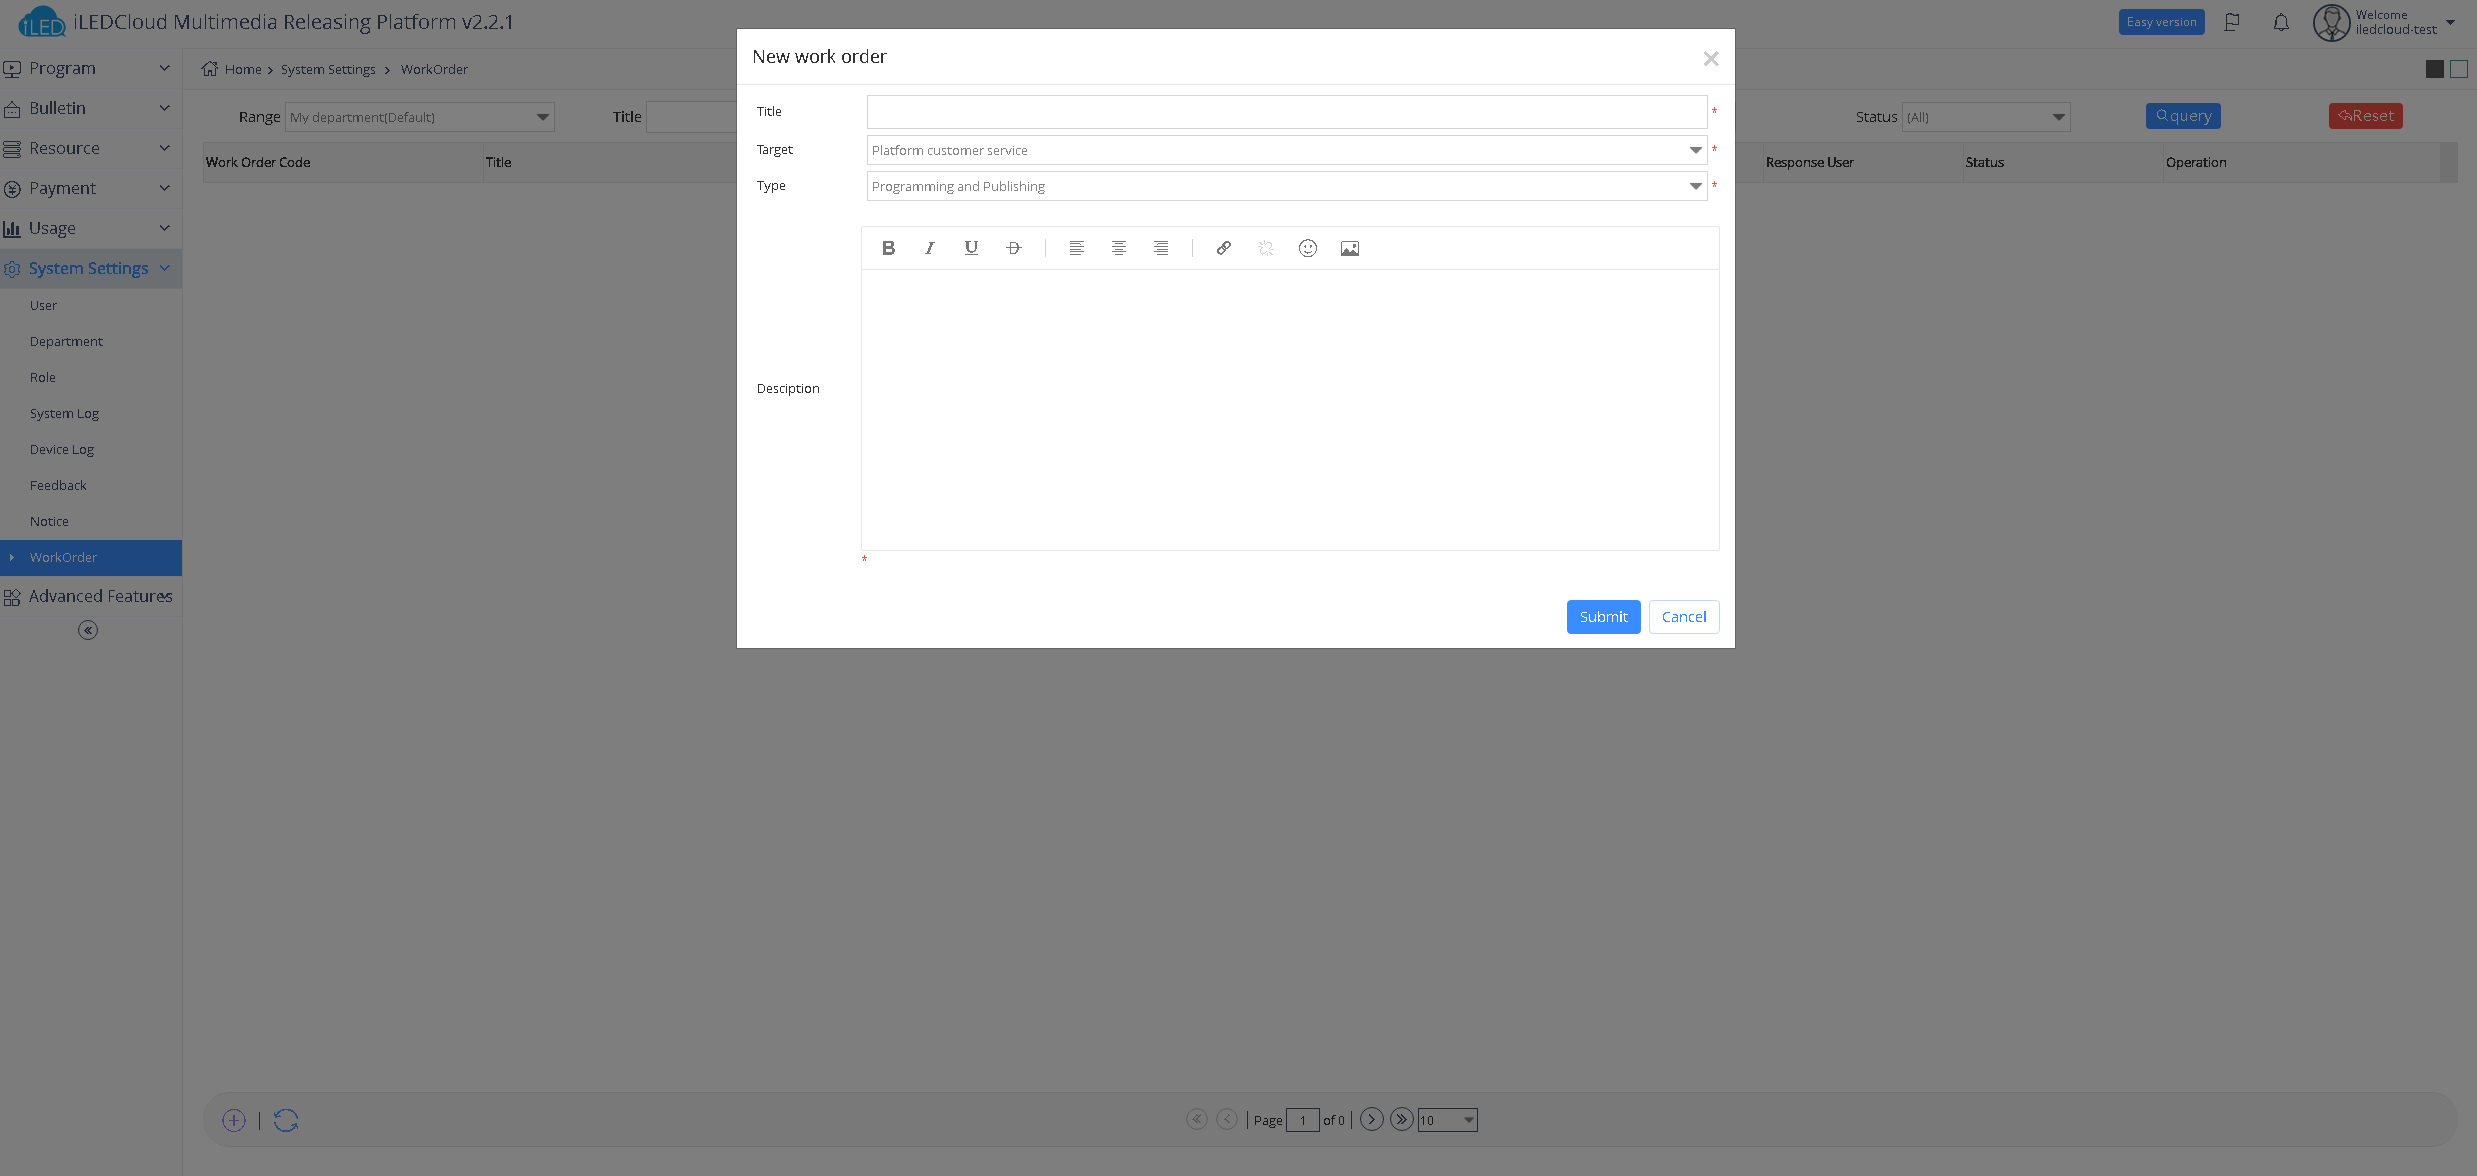
5.5.7 Work order
If users have problems or questions in the process of using the platform, they can consult the customer service of the platform by submitting the work order.
As shown in picture 5.5-11, the user can click the "+" button at the bottom left of the page, enter the title of the work order in the pop-up box, and select the type of work order.Describe in detail the problems or recommendations that arise from using the platform.
picture 5.5- 11
After the platform replies to the work order submitted by the user, the user's bound email or mobile phone will receive a reply reminder notice, and the user can go to my work order page to check the customer service reply, as shown in picture 5.5-12.
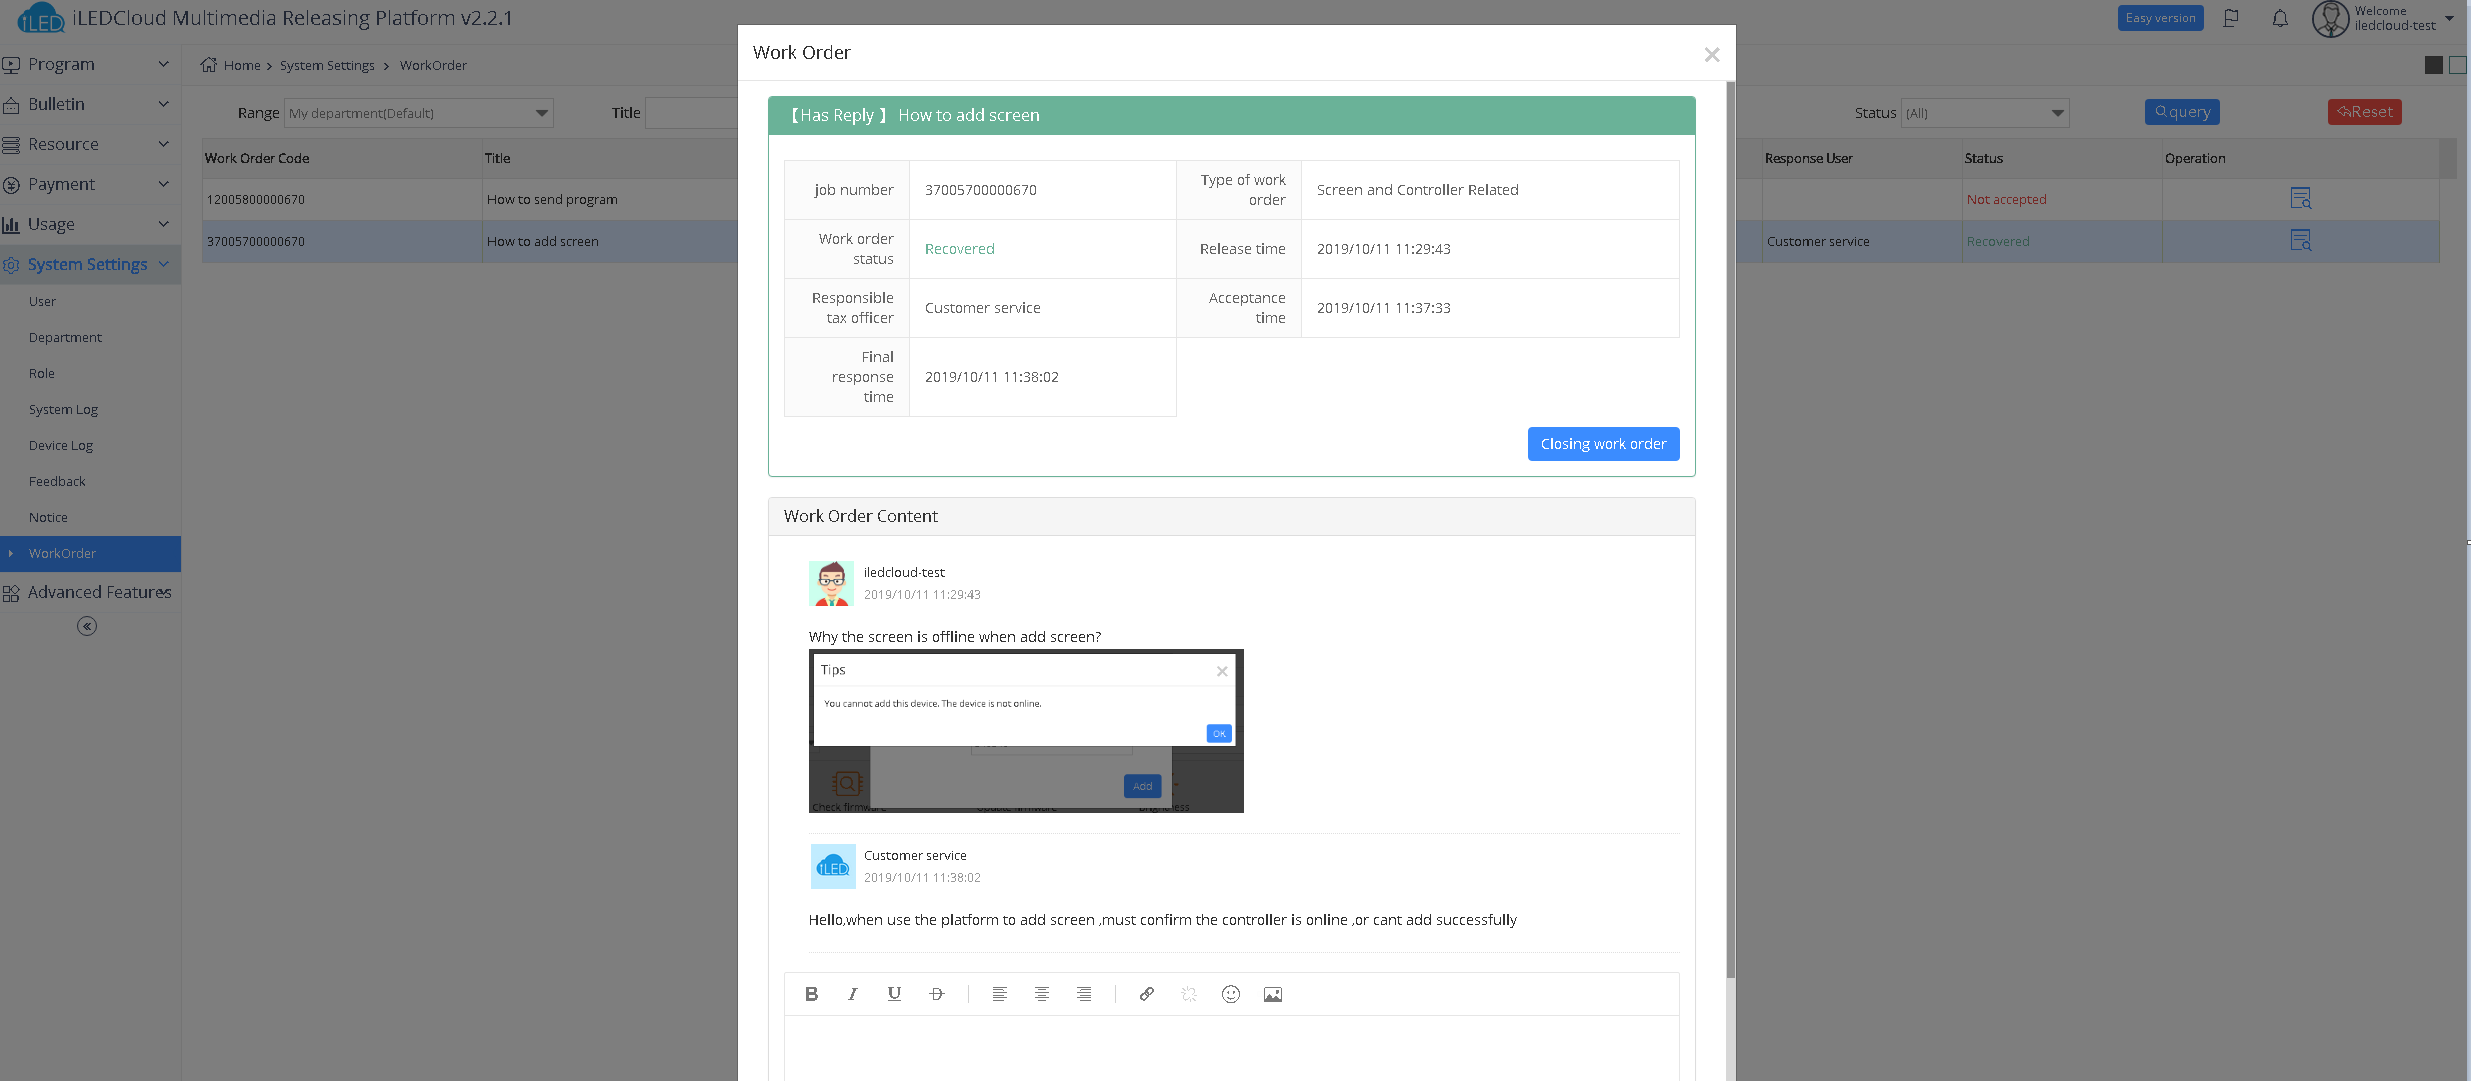
picture 5.5- 12
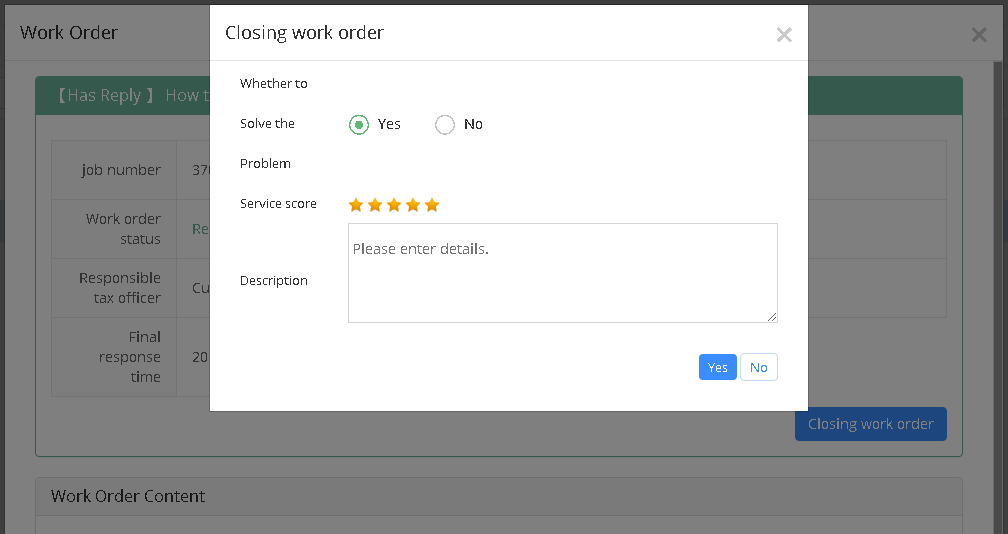
The user can continue to ask questions about the reply from the customer service of the platform, or close the work order, as shown in picture 5.5-13
picture 5.5- 13
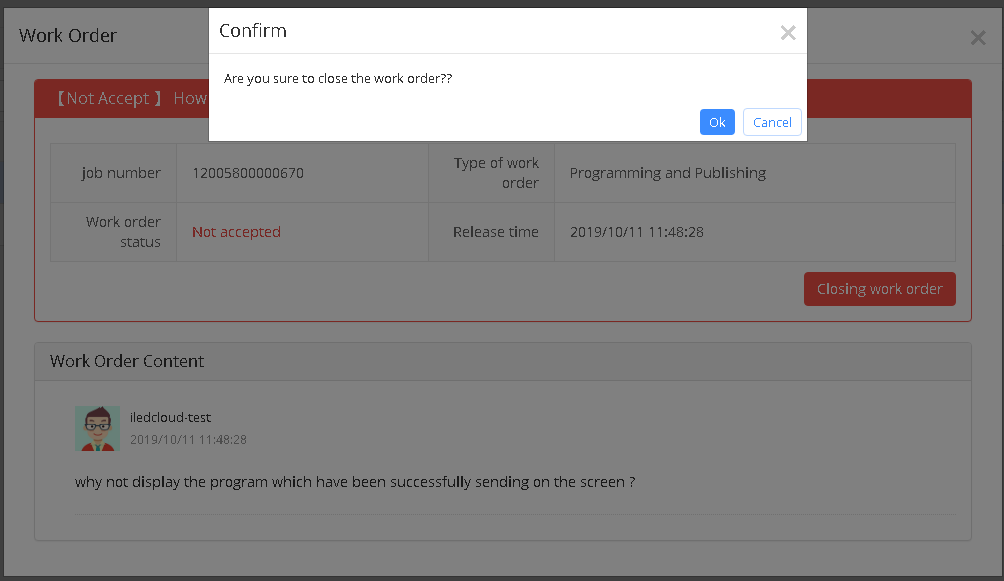
The user can also close the work order before the platform replies, as shown in picture 5.5-14.
picture 5.5- 14
5.6 Payment service
5.6.1 Package and service
We supply two kinds of package payment terms ,normal package and deep package ,including extend package and other details as shown in picture 5.6-1.

picture 5.6- 1
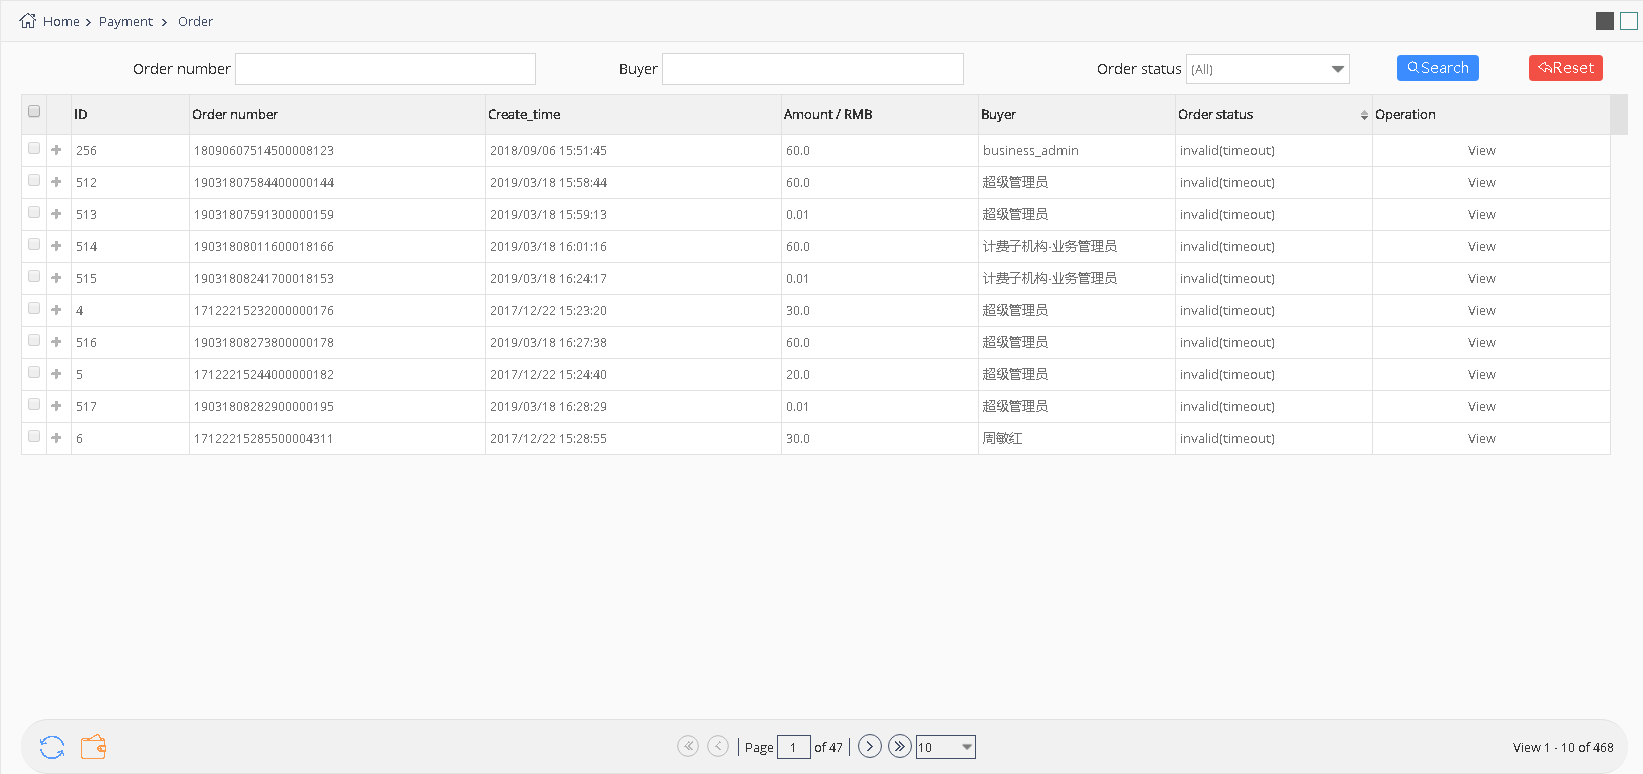
5.6.2 Order management
Users can find order information under order management interface, please refer to picture 5.6-2.Users can also pay, cancel, and view the details of the order in this interface. Platform supports payment for multiple orders. On the page of order, users can select multiple orders and click the "Pay" button at the bottom left of the page.
picture 5.6- 2
5.6.2.1 Payment
Users only need to click pay button in wait for payment interface ,that pay for the order (Overseas users can pay by PayPal).See picture 5.6-3 When paid successful ,the order status will be updated automatically, the content which has been purchased will be added to the relevant screen or organization.
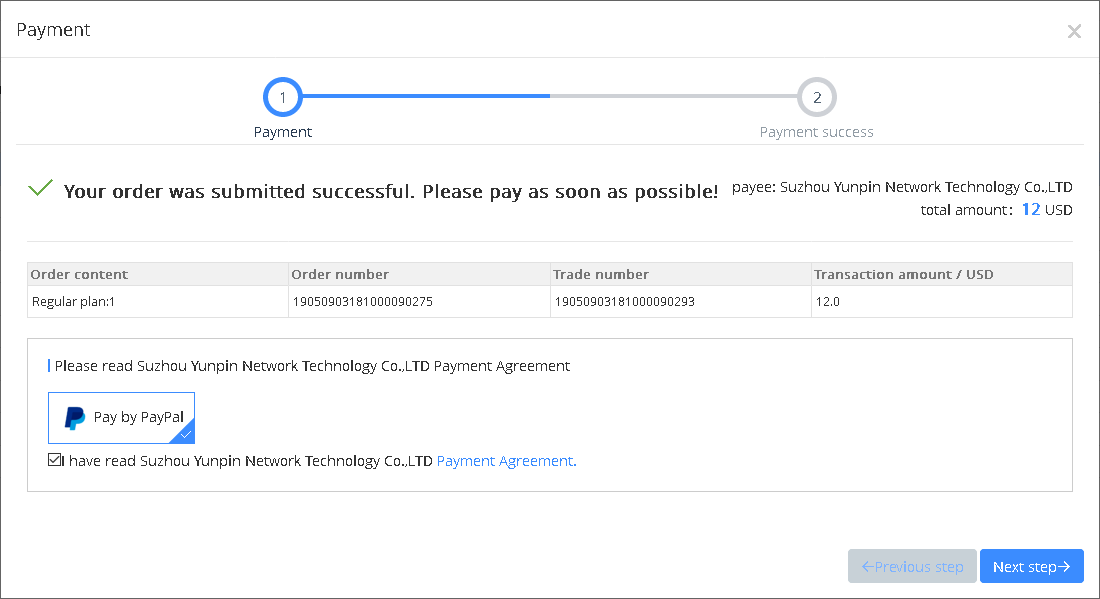
picture 5.6- 3
5.6.2.2 Cancel order
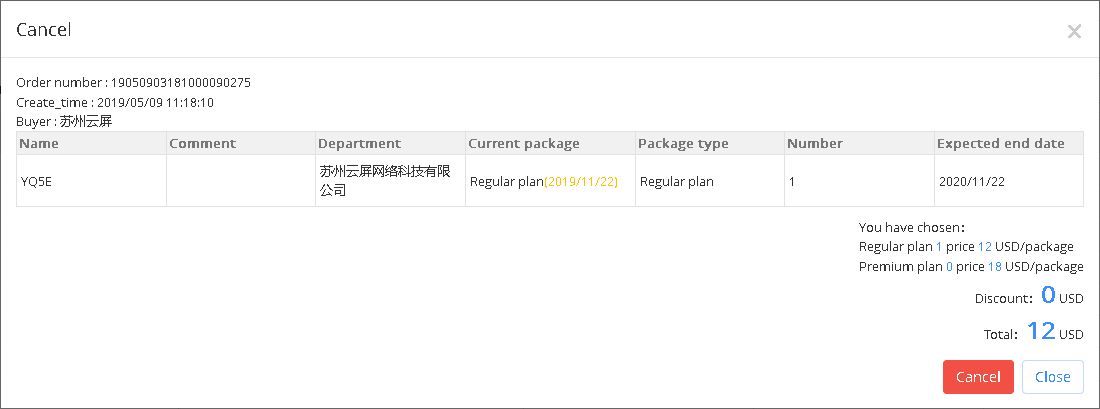
Users can click cancel button in waiting for payment interface to cancel the order ,see picture 5.6-4, when cancel it successfully , order status will be changed to closed.
picture 5.6- 4
5.6.2.3 Check order details
Users can click the check button to see the order details , see picture 5.6-5 for detail information.For Waiting for payment order ,the detail interface will show the remain time for payment, if users don’t pay it within 12 hours , then need to order it again.
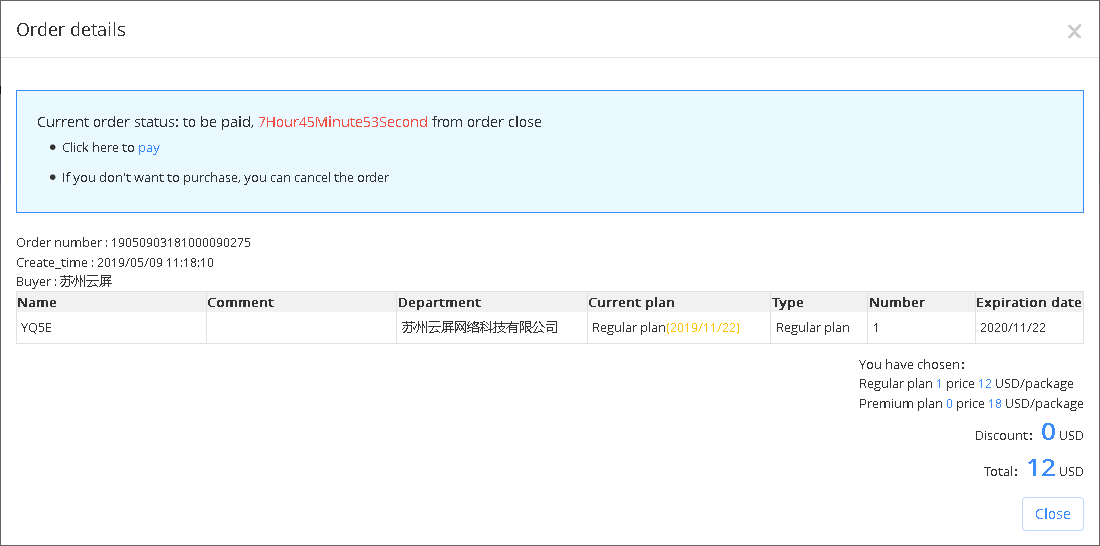
picture 5.6- 5
5.6.3 Coupon View
Users can check the coupon on Coupon View, like picture 5.6-6. If the status of coupon is “used”, please check is there any unpaid order in your order list.

picture 5.6- 6
5.7 Usage management
5.7.1 Storage management
Users can check capacity and the use of the package capacity expansion in storage management interface, and other relevant records.as shown in picture 5.7-1.

picture 5.7- 1
5.7.2 Flow management
Users can find the status of flow package, as well as the current use of the flow package status under the currently user account, see picture 5.7-2.
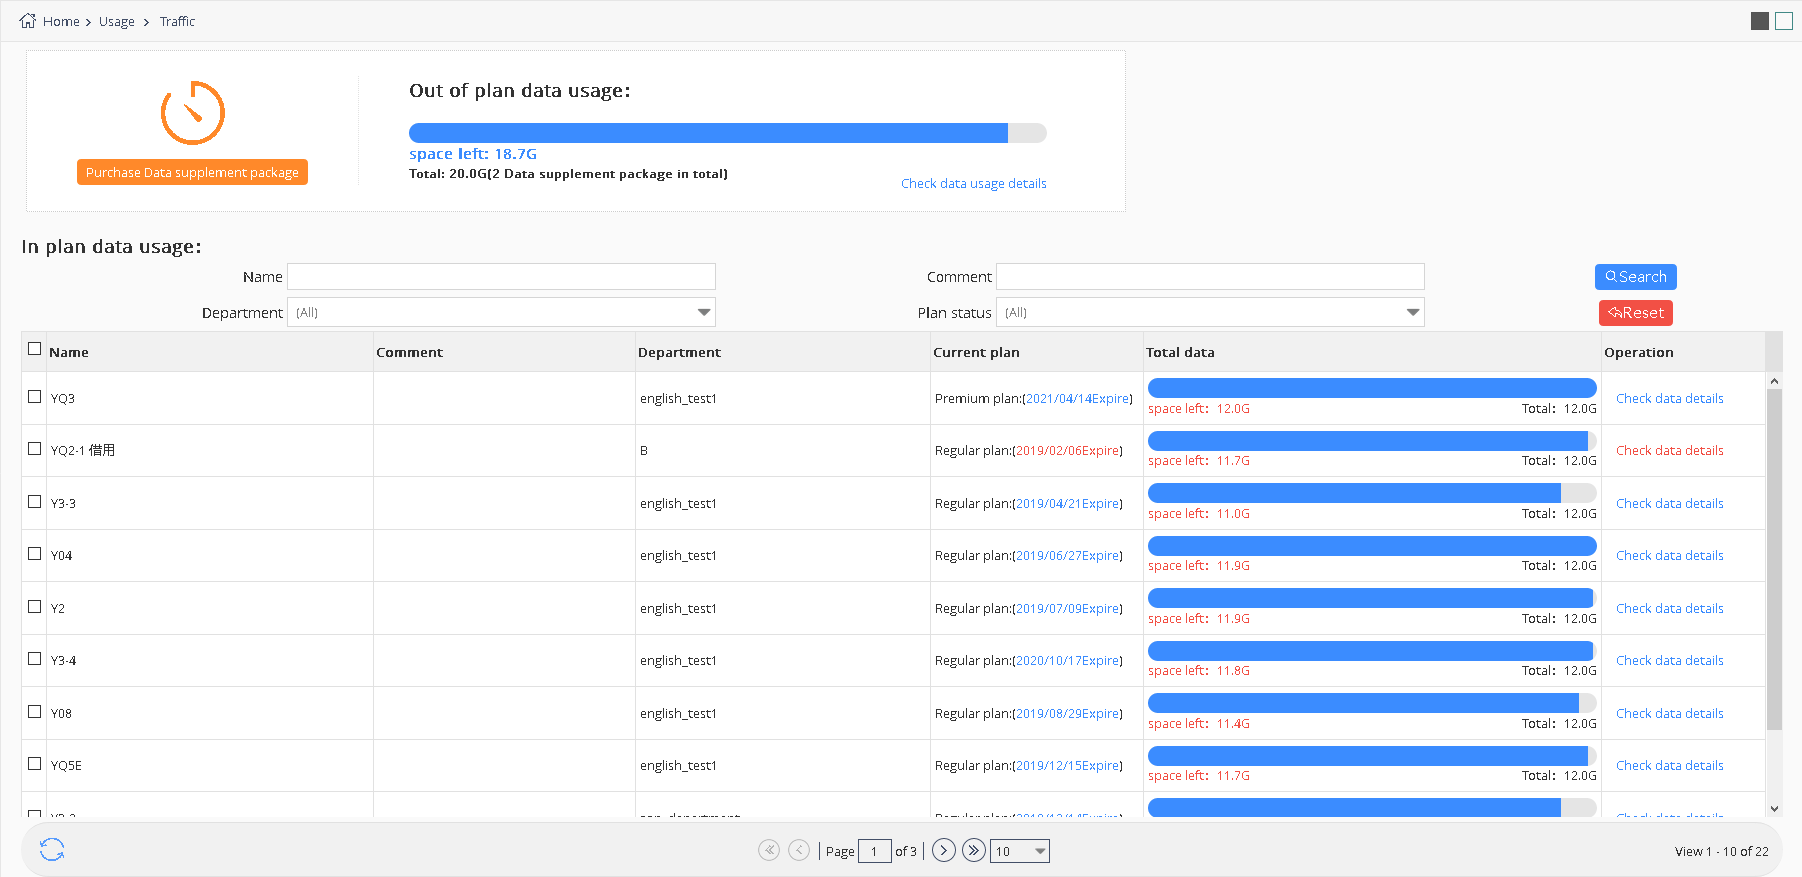
picture 5.7- 2
picture 5.7- 3
5.7.3 Distribute zone
When users finish the payment for package and extend package ,then can go to the current page to distribute the zone as shown in picture 5.7-4.
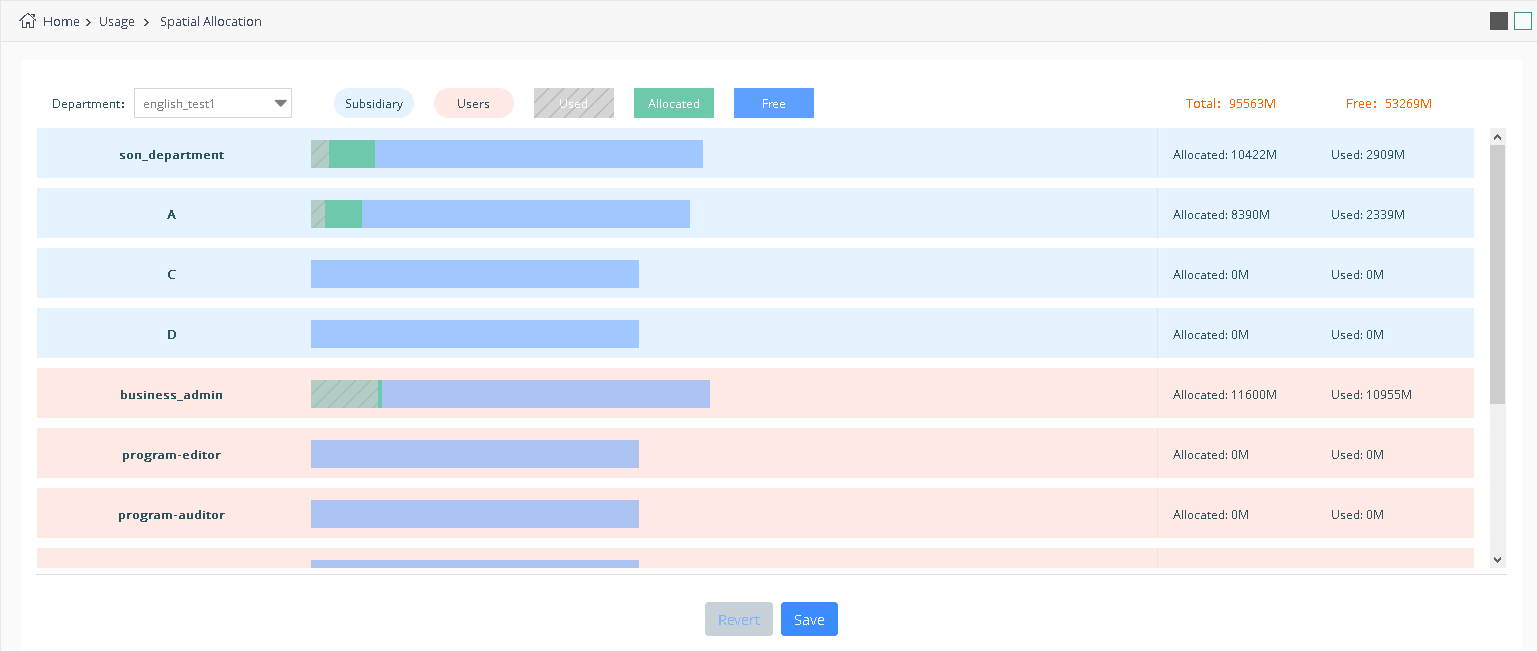
picture 5.7- 4
5.8 User center
After log in ,user can oepn the user information menu in the right up page ,as shown in picture 5.8- 1,there is 6 options,they are :user profile ,switch to Chinese/English ,feedback ,what’s new help and logout .if users click switch to Chinese or English ,then will change the platform language ,when click the log out ,then will exit the platform.
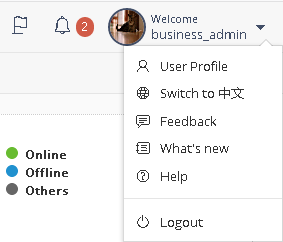
picture 5.8- 1
5.8.1 User profile
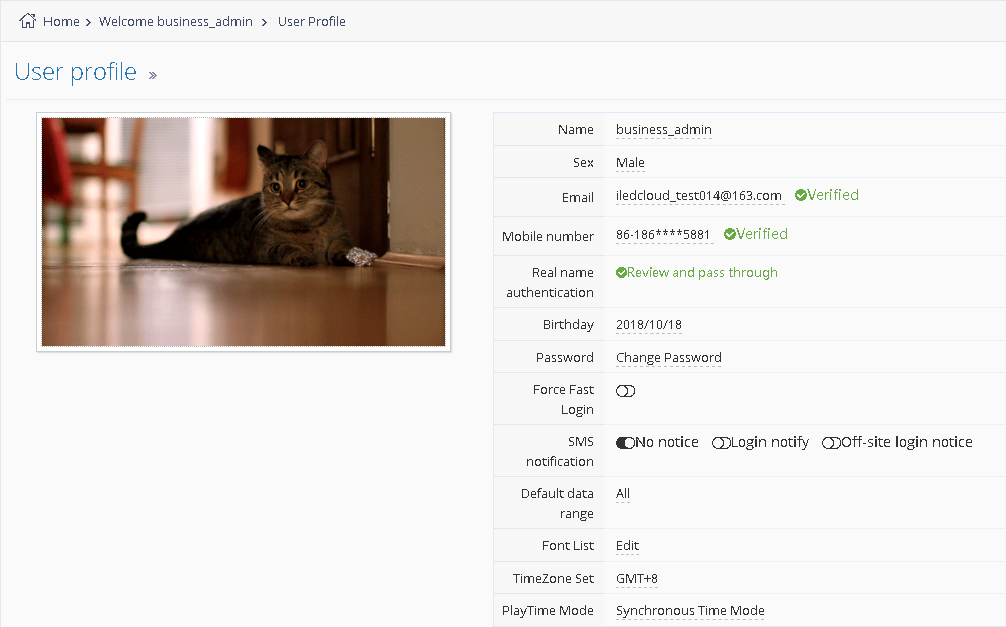
User can view their personal relevant information, as shown in picture 5.8-2, also can modify the name, gender, phone number, email address, birthday, and modify the password. New users need to hand in real name authentication. Users cannot release programs if you do not get approval after 20th, July.
picture 5.8- 2
Users can set the preferences in the personal profile page , and open "must be rapid login" (tied and complete the phone number validation), the user can login by rapid log in entrance,Users can also set remind after log in, the default value is "not notify".If open the "notice" after log in, every time after the account log in platform, will prompt message on your mobile phone.If open "long-distance log in notification" (open when asked to set common log in), when the account log in in from other cities (based on IP judgment), the user's mobile phone will receive different log in prompt message.
Personal user information page has "release program verification" option, every time need fill out the message authentication code to complete the verification, open and verify this function must bind mobile phone number.
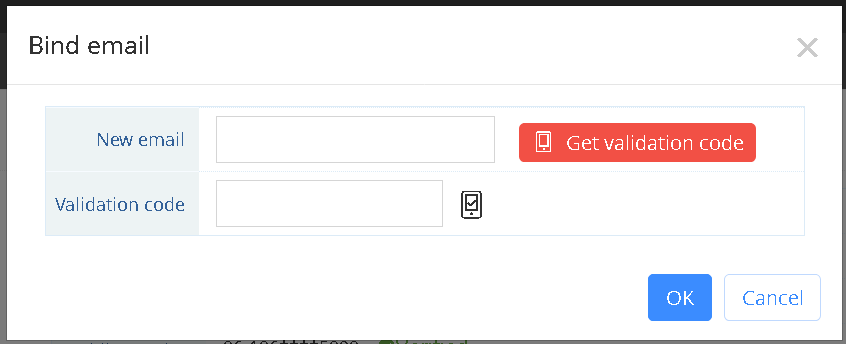
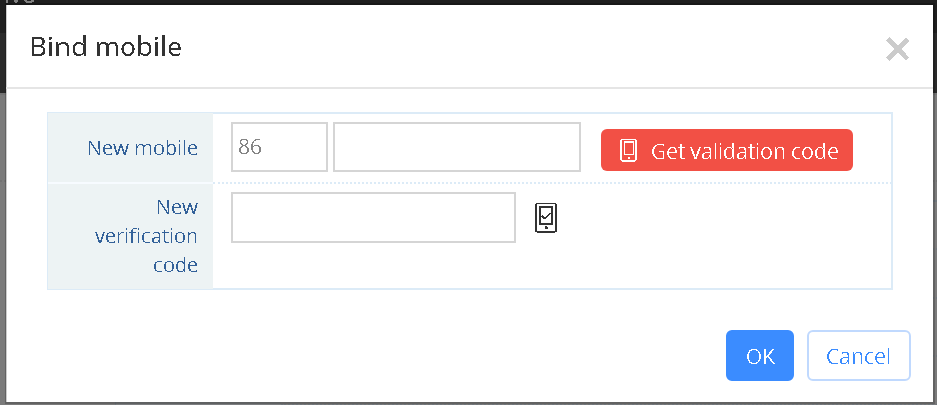
after click the mobile phone number or email In the user information page , phone number will pop up binding or binding email page, shown in the picture 5.8-3 and picture 5.8-4 , the user can change mobile phone number or bind operations in the pop up page.And the platform will require verification, message will be sent to the new phone number or new email box, new email box or new mobile phone number will receive a dynamic verification code, after binding , users can use the new phone number or email to log in. When users binding his mobile phone and email at the same time user can log in by mobile phone number or mail.
picture 5.8- 3
picture 5.8- 4
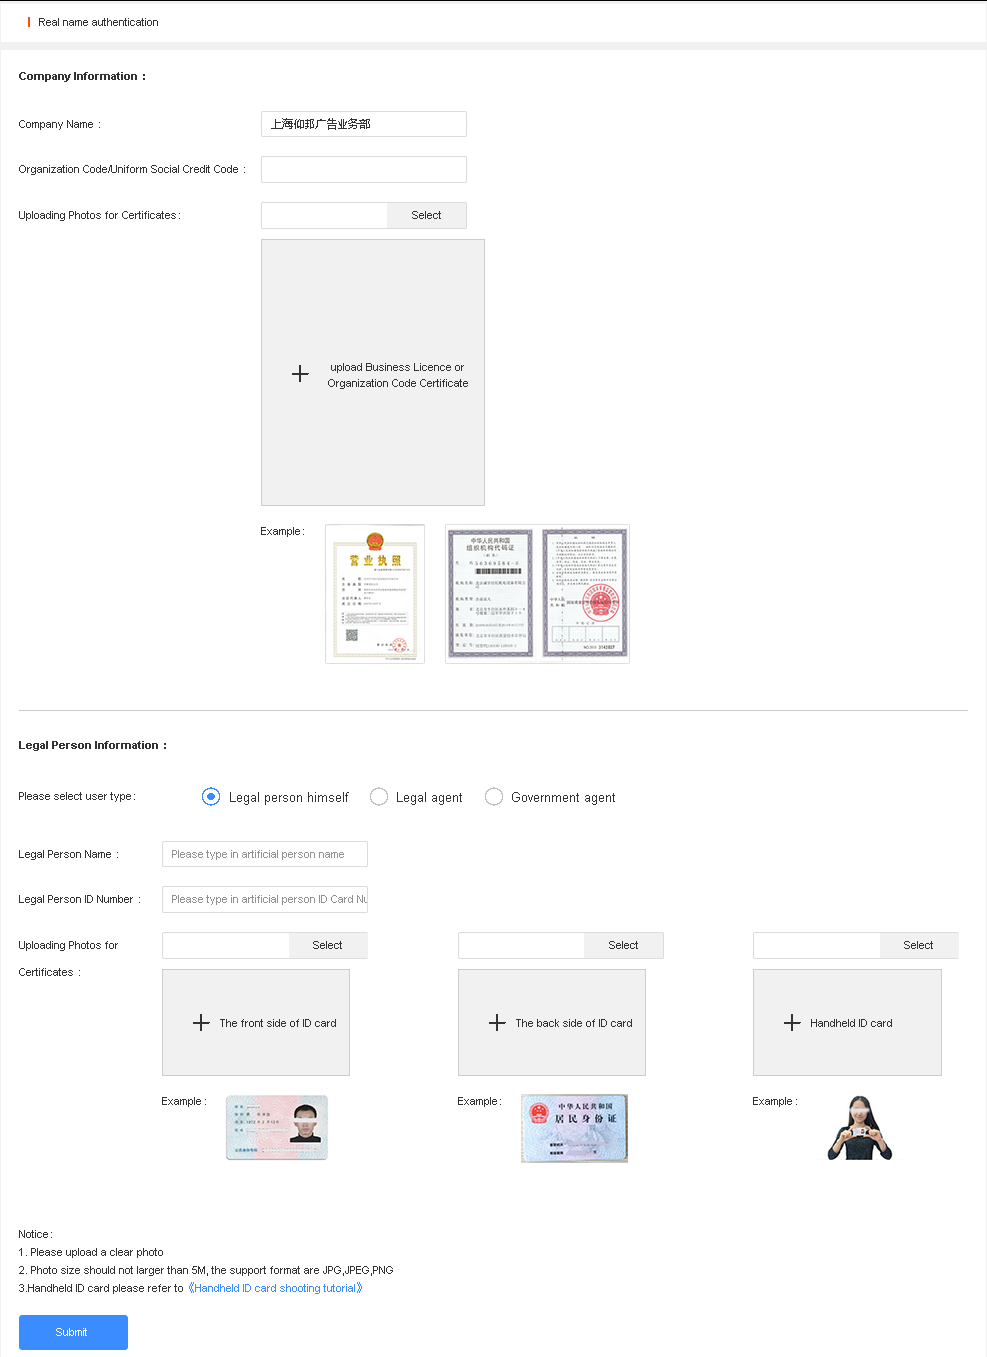
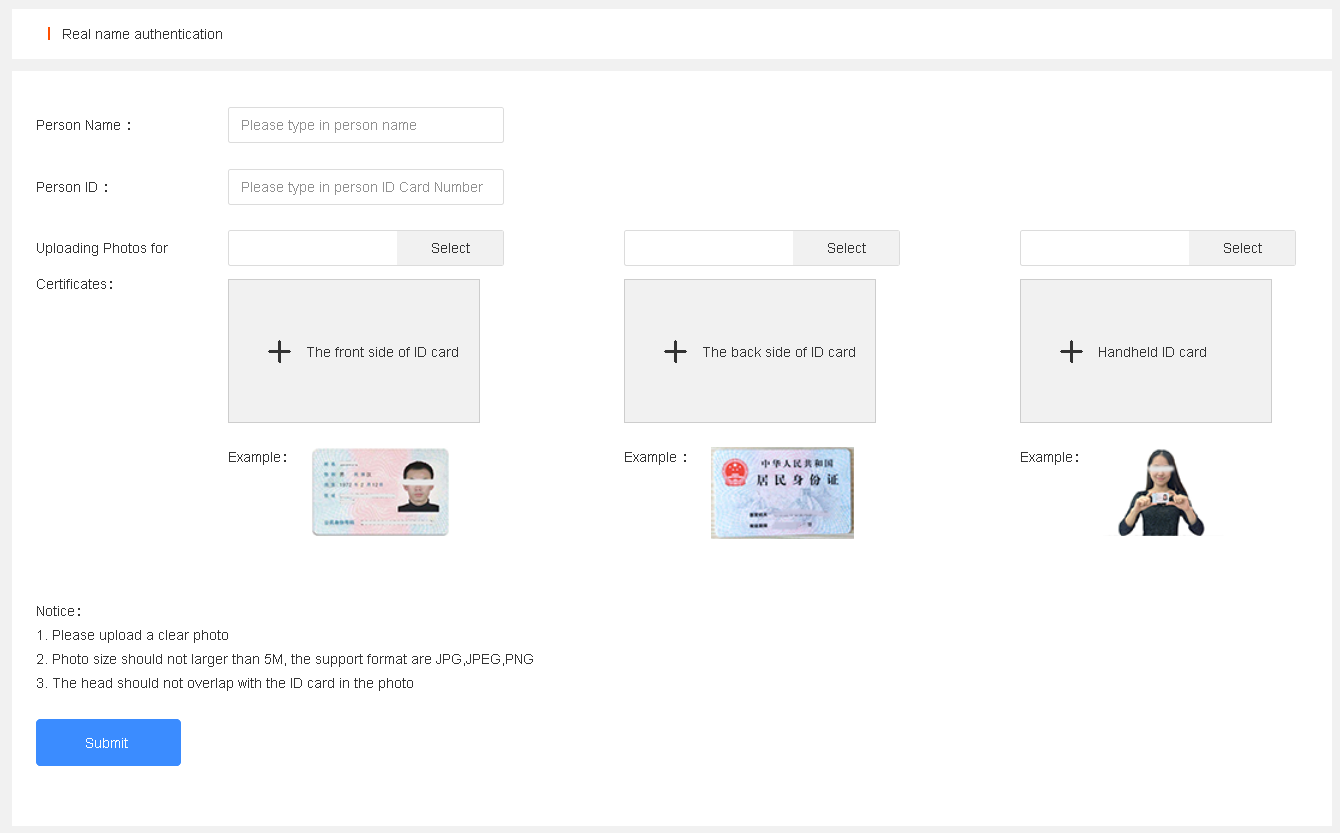
Click “real name authentication” on Profile, whatever you are private users or enterprises users, all need to do real name authentication, like picture 5.8-5and picture 5.8-6. Private users need to fill in name, ID number and ID photo (front side and back side); Enterprises users can modify the company name, the bar code of organizing institution (after “real name authentication”, it cannot be modified), and the picture of organizing institution, also need to fill in the name, ID number, ID photo (front side and back side) of legal person.Users can hand in the info according to their own status. After “real name authentication”, the platform manager will verify the information, users can release programs after approval (Users cannot approve by themselves, must be done by platform manager).
Note: As to promise the authenticity and uniqueness, the same bar code of organizing institution can be used only once, if others use it again, it cannot be worked normally.
picture 5.8- 5
picture 5.8- 6
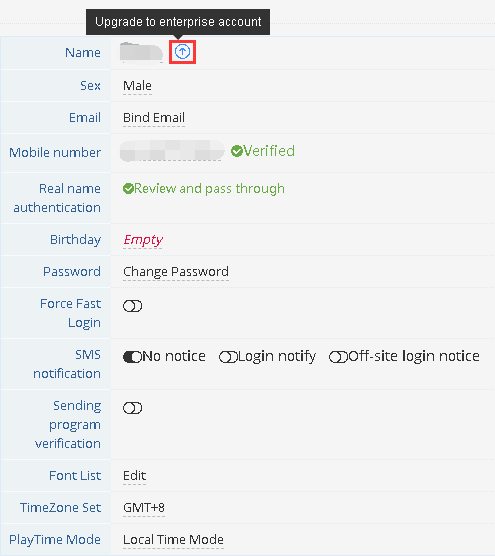
Private user can be upgraded to enterprise account after “real name authentication”, you will own all kinds functions in enterprise account. Like picture 5.8-7
picture 5.8- 7
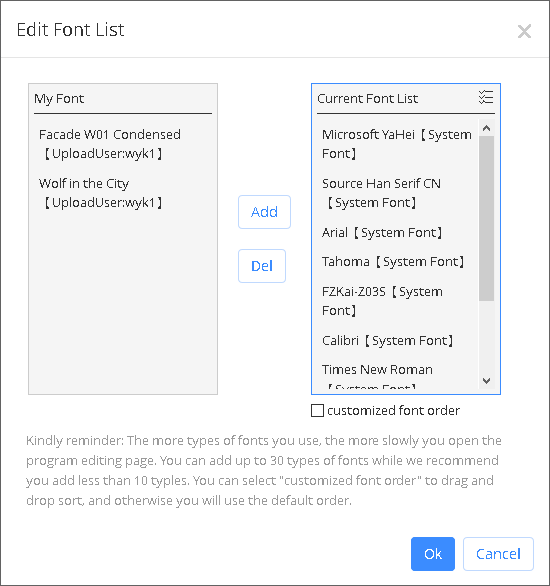
Users can modify the font type in “set account”, click “edit” button which is beside “font list”, users can add the new font into “current font list”, like picture 5.8-8.
picture 5.8- 8
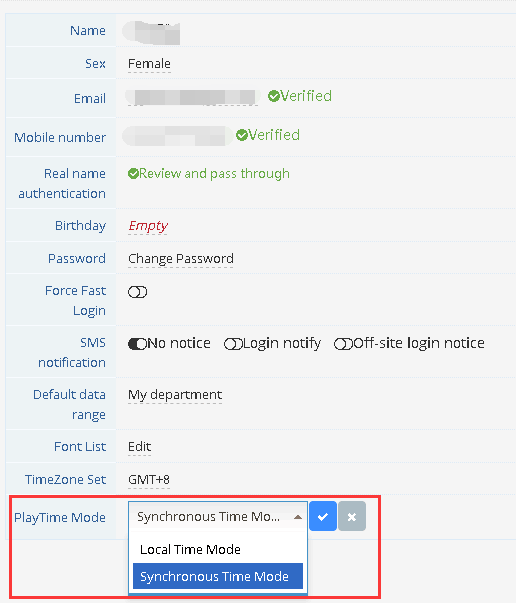
iLEDCloud adopts UTC time as to solve the program which is caused by time, users can set “play time mode”, like picture 5.8-9
picture 5.8- 9
If users set “local time mode”, the time will be the same with where the user is in. Means the time of playing programs in controller is the same with where the user is in (not the time you set in controller); If users set as synchronous time mode, the time will be the same with where the controller is in, means the time of playing programs in controller is the same with where the controller is in (not the user is in).
5.8.2 Feedback
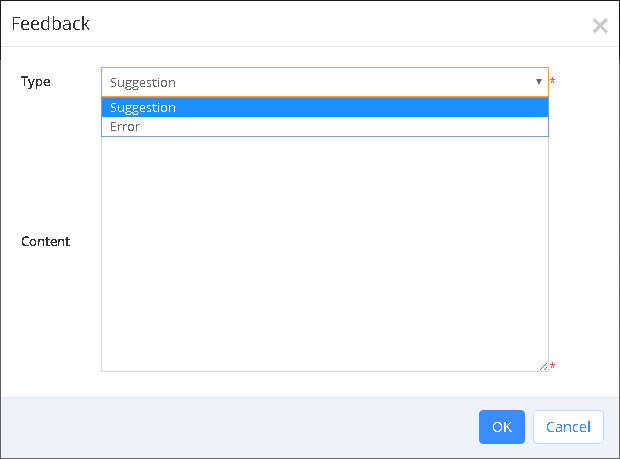
In the menu of user information ,click the feedback button ,then will pop up the feedback page as shown in the picture 5.8-10, user can feedback his suggestion or the platform error ,the platform staff will check and follow up to give solution.
picture 5.8- 10
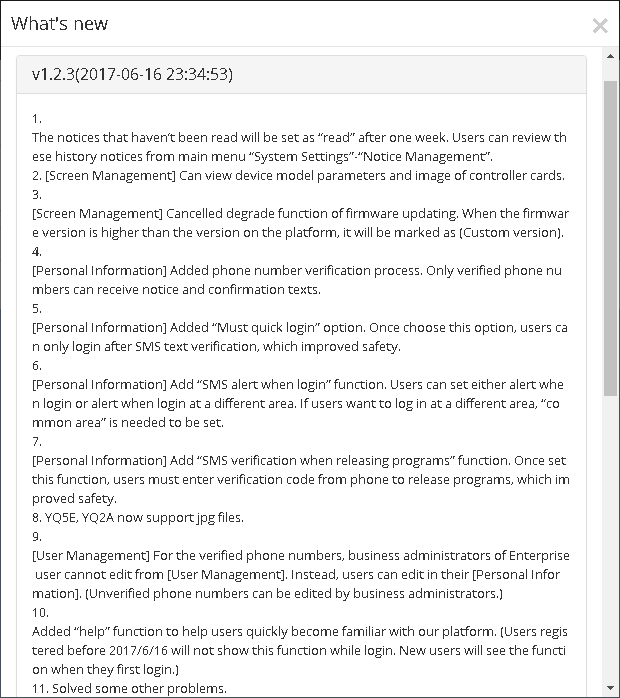
5.8.3 What’s new
Click the what’s new in the user information page ,as shown in the picture 5.8-11 ,then will pop up the what’ new page to display the update history of the platform.
picture 5.8- 11
5.8.4 User manual
Click the user manual in the user information page ,then will display the online user manual and fast guide user manual ,user can check as shown in the picture 5.8-12

picture 5.8-12
5.9 Advanced functions
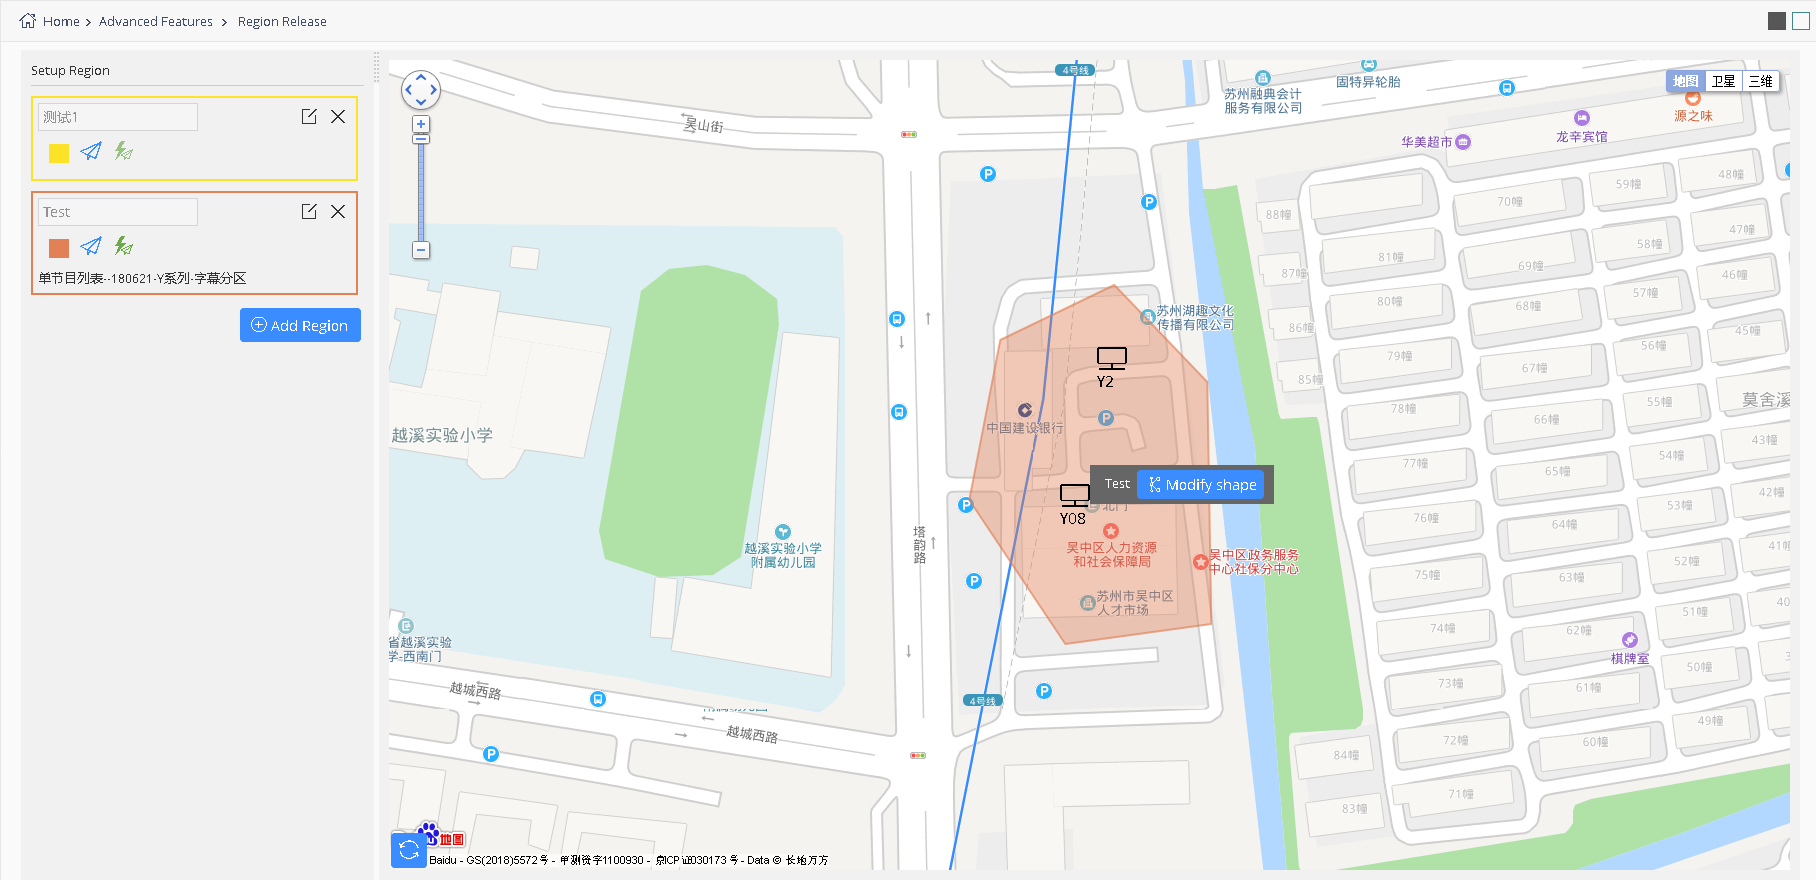
5.9.1 Release area
We add area function in V1.5.0, like picture 5.9-1. Users click “add area” button, then, can draw the area range, and finish drawing by double clicking. After finish drawing, click release. Click “Release fastly”, users can release the last playing list to the controller which is in this area.
Compare with normal releasing method, users can get a clear releasing status.
picture 5.9- 1
5.9.2 SDK
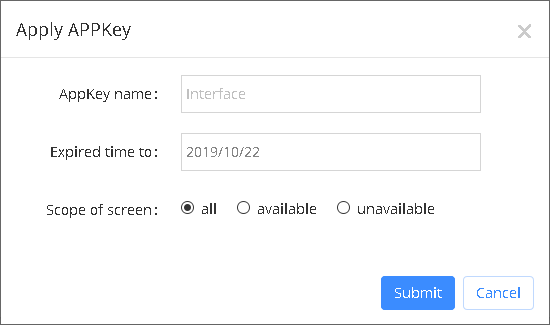
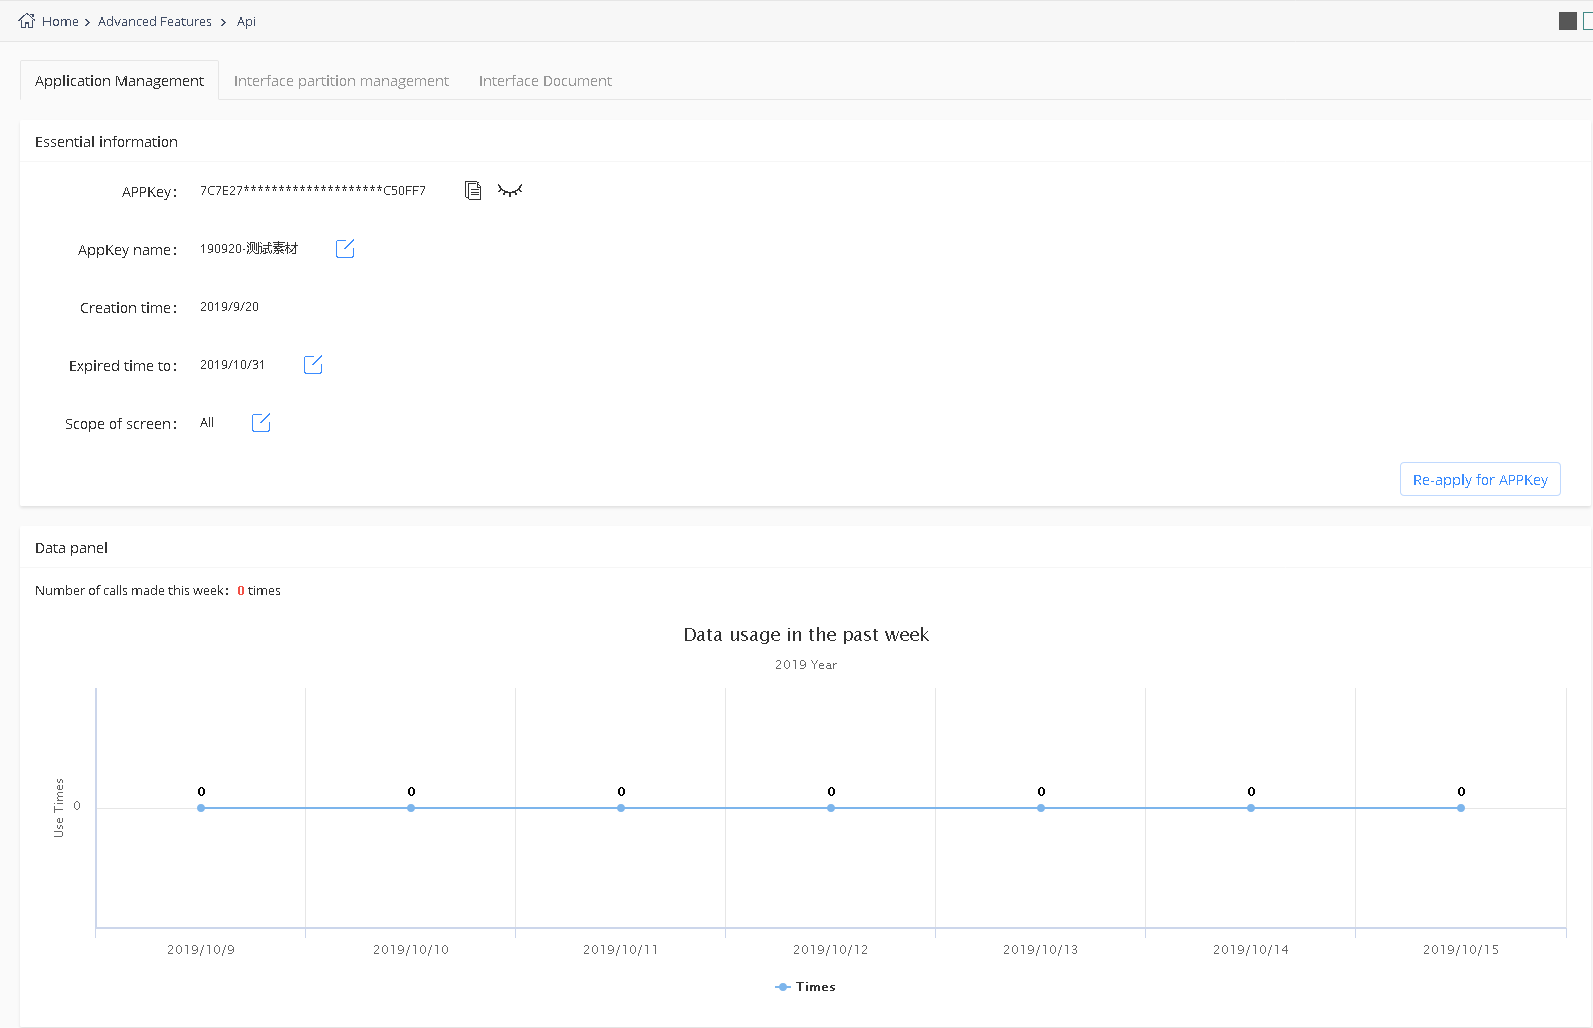
Secondary development is supported in the v2.1.0 version of the platform. Users who have not applied for APPKey will pop up the application page as shown in picture 5.9-2 when visiting the "secondary development" page.After the application is completed, the page will display the information of APPKey, as shown in picture 5.9-3.
picture 5.9- 2
picture 5.9- 3
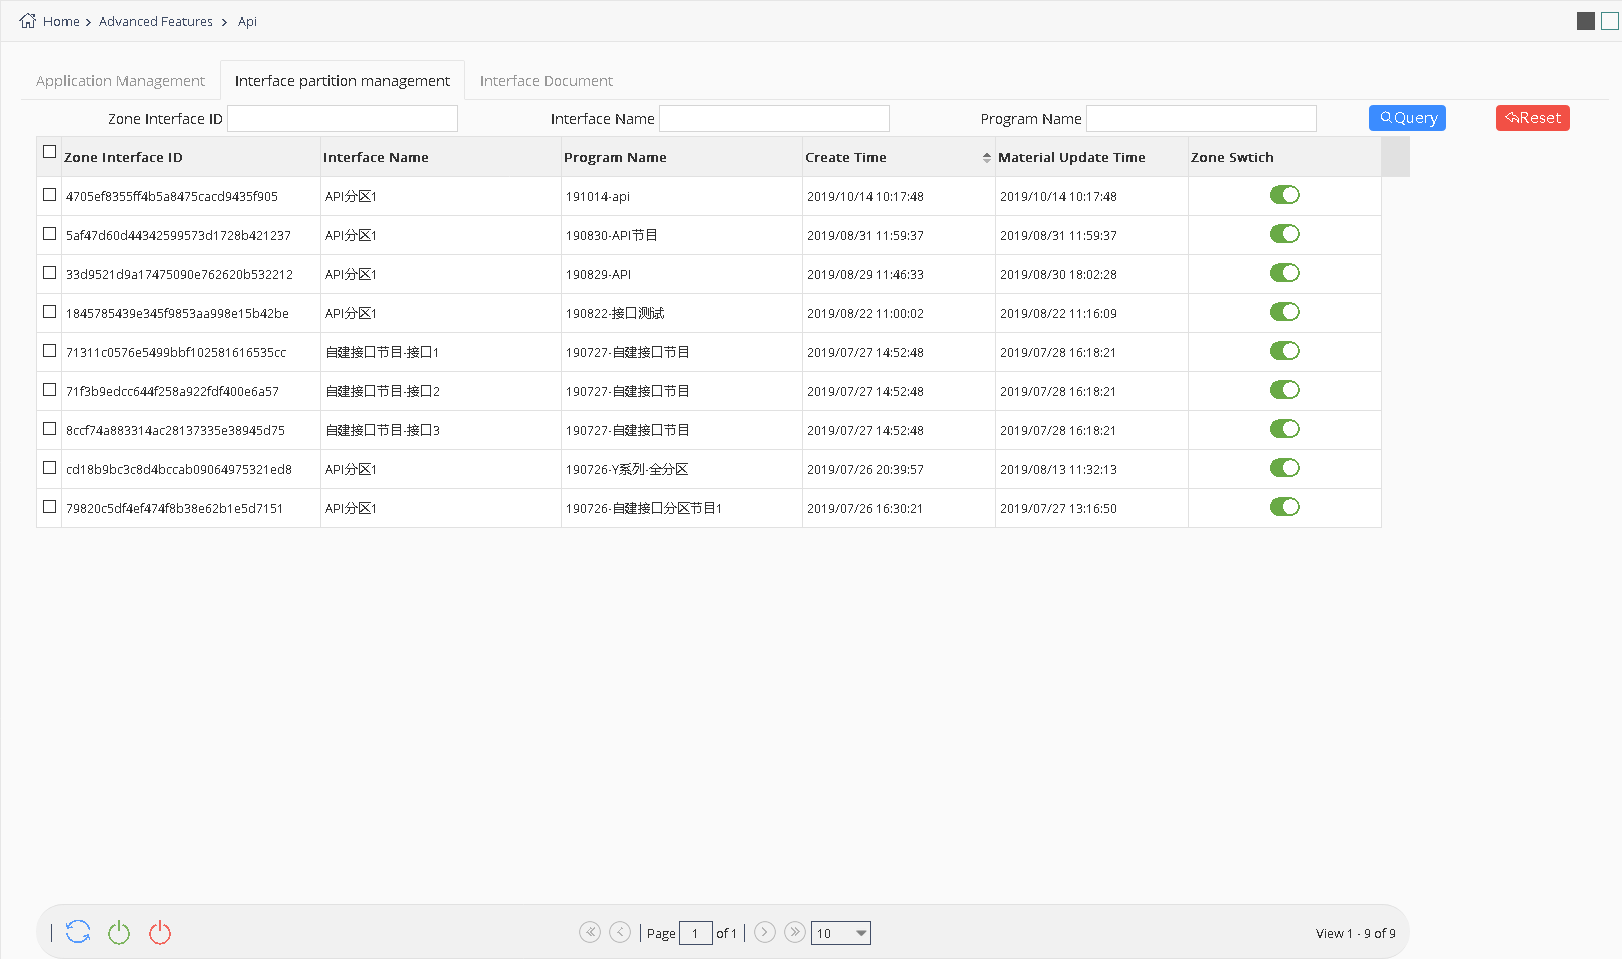
In the interface group management page, the user can view the relevant information of the interface partition in the program, as shown in picture 5.9-4.The on/off state of the API partition can be manipulated.
picture 5.9- 4
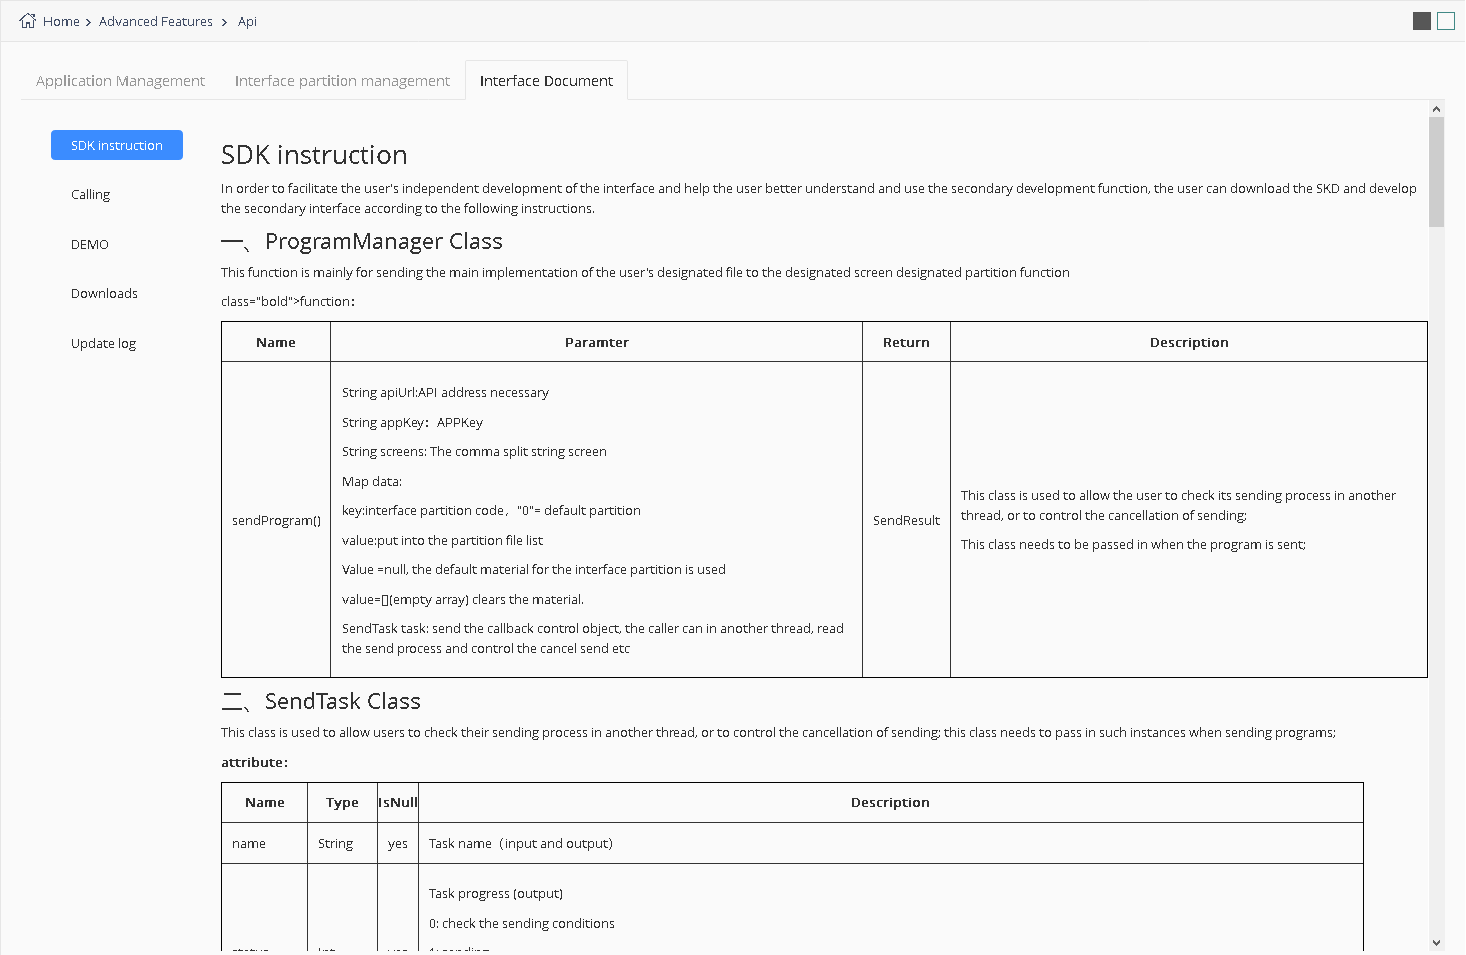
User can check the SDK instruction in the interface documents as shown in picture 5.9-5.
picture 5.9- 5
5.9.3 Synchronous combination
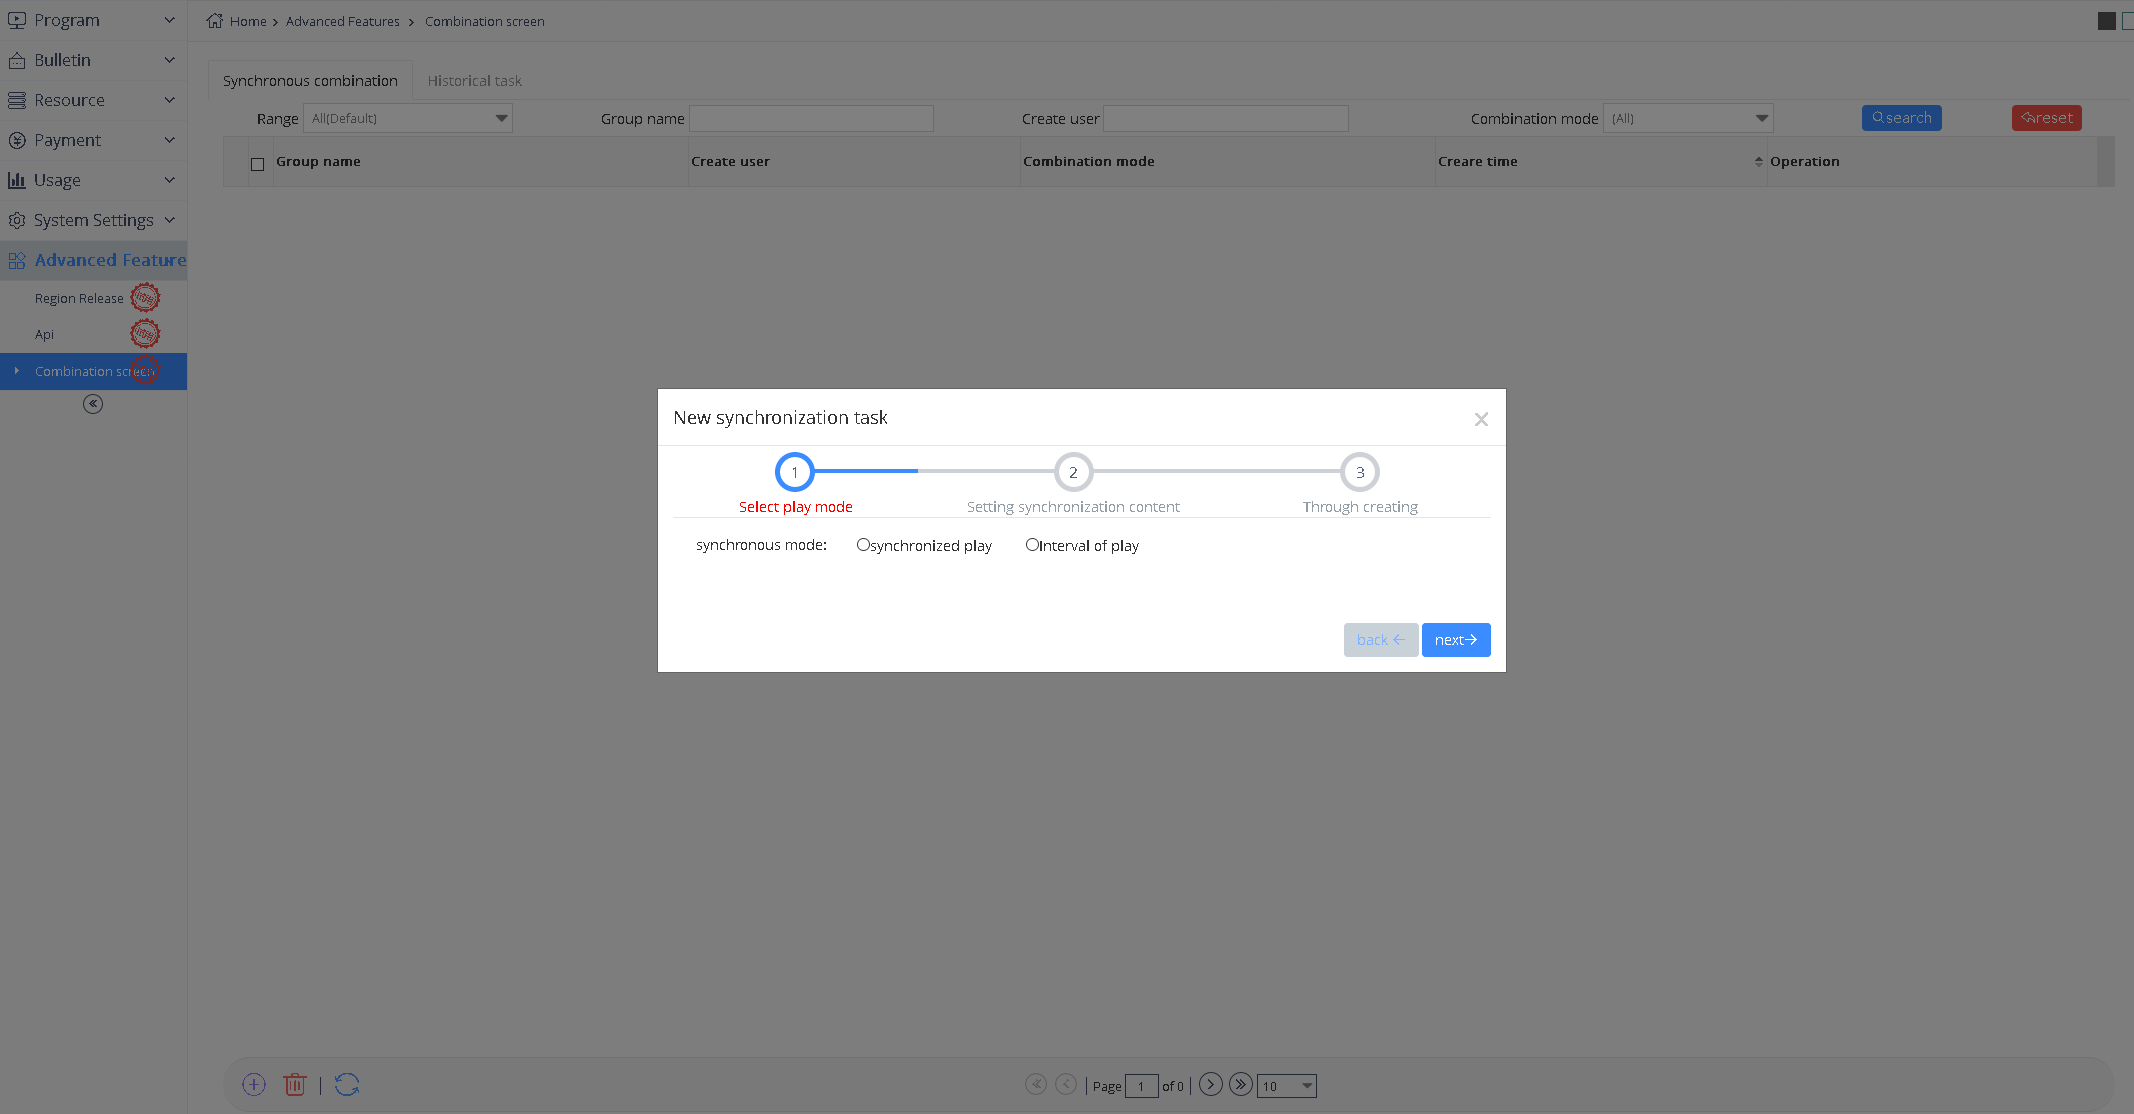
In order to meet the requirements of play the same picture on different screens at the same time, the v2.2.0 version of the platform has added the function of synchronous combination, including simultaneous play and interval play. Simultaneous play means that all screens play the same program at the same time.Interplay is a sequence of multiple screens, each X seconds slower than the previous one, allowing viewers on the move to seamlessly watch the full program.
The user can click the "+" button at the bottom left of the page to select the desired combination mode of synchronization, as shown in picture 5.9-6.
picture 5.9- 6
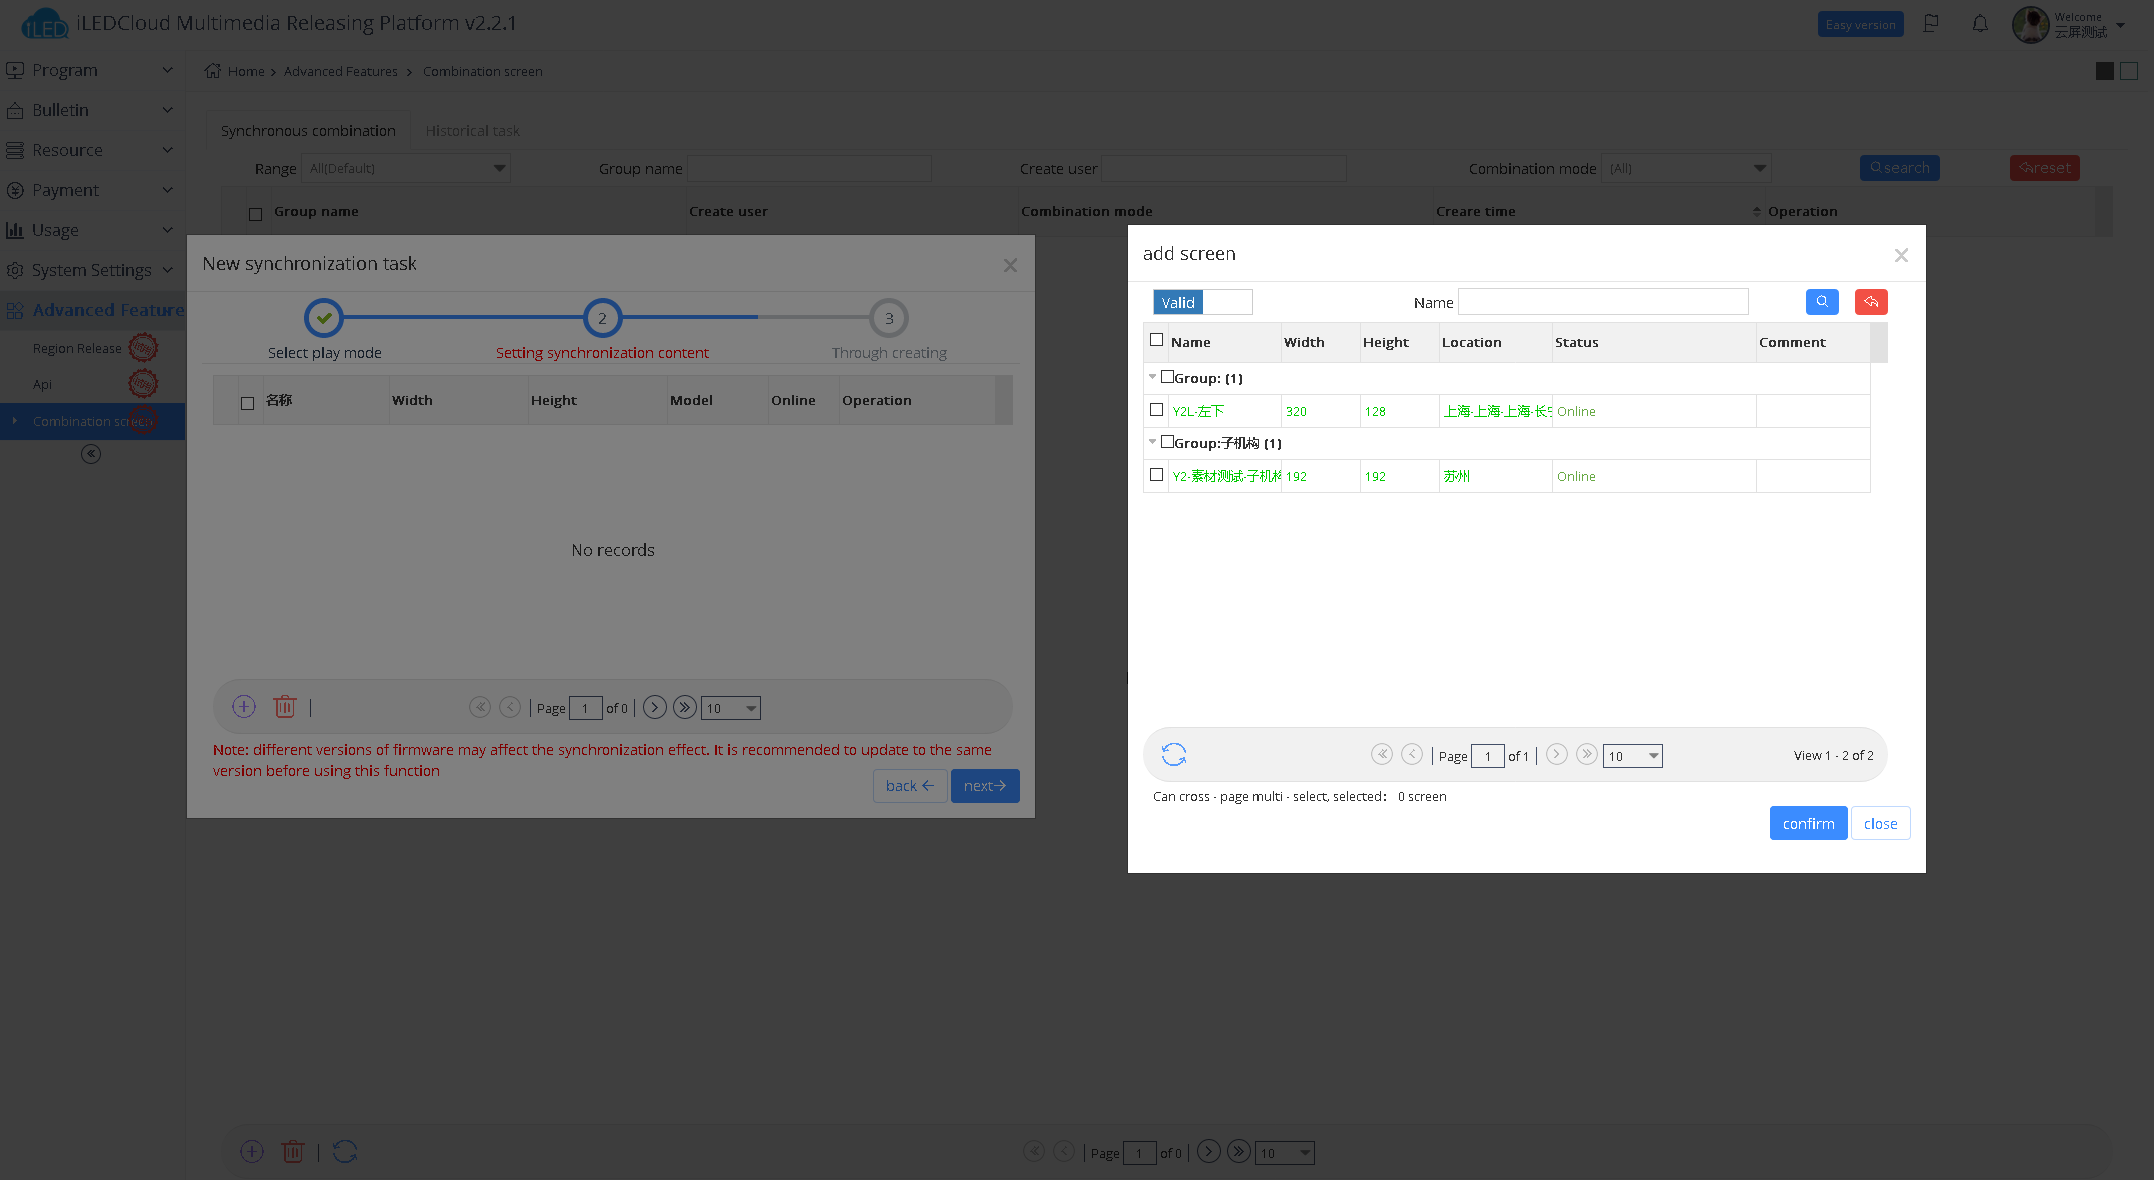
Click the next step to enter the page of setting synchronization content, click the "+" in the lower left corner to select the screen that needs synchronization (currently only supports the online Y series controller). In order to ensure the synchronization effect, it is recommended to select the Y series controller of the same model and firmware version, and ensure that the matching degree of each controller's screen parameters is greater than 60%.See picture 5.9-7.
picture 5.9- 7
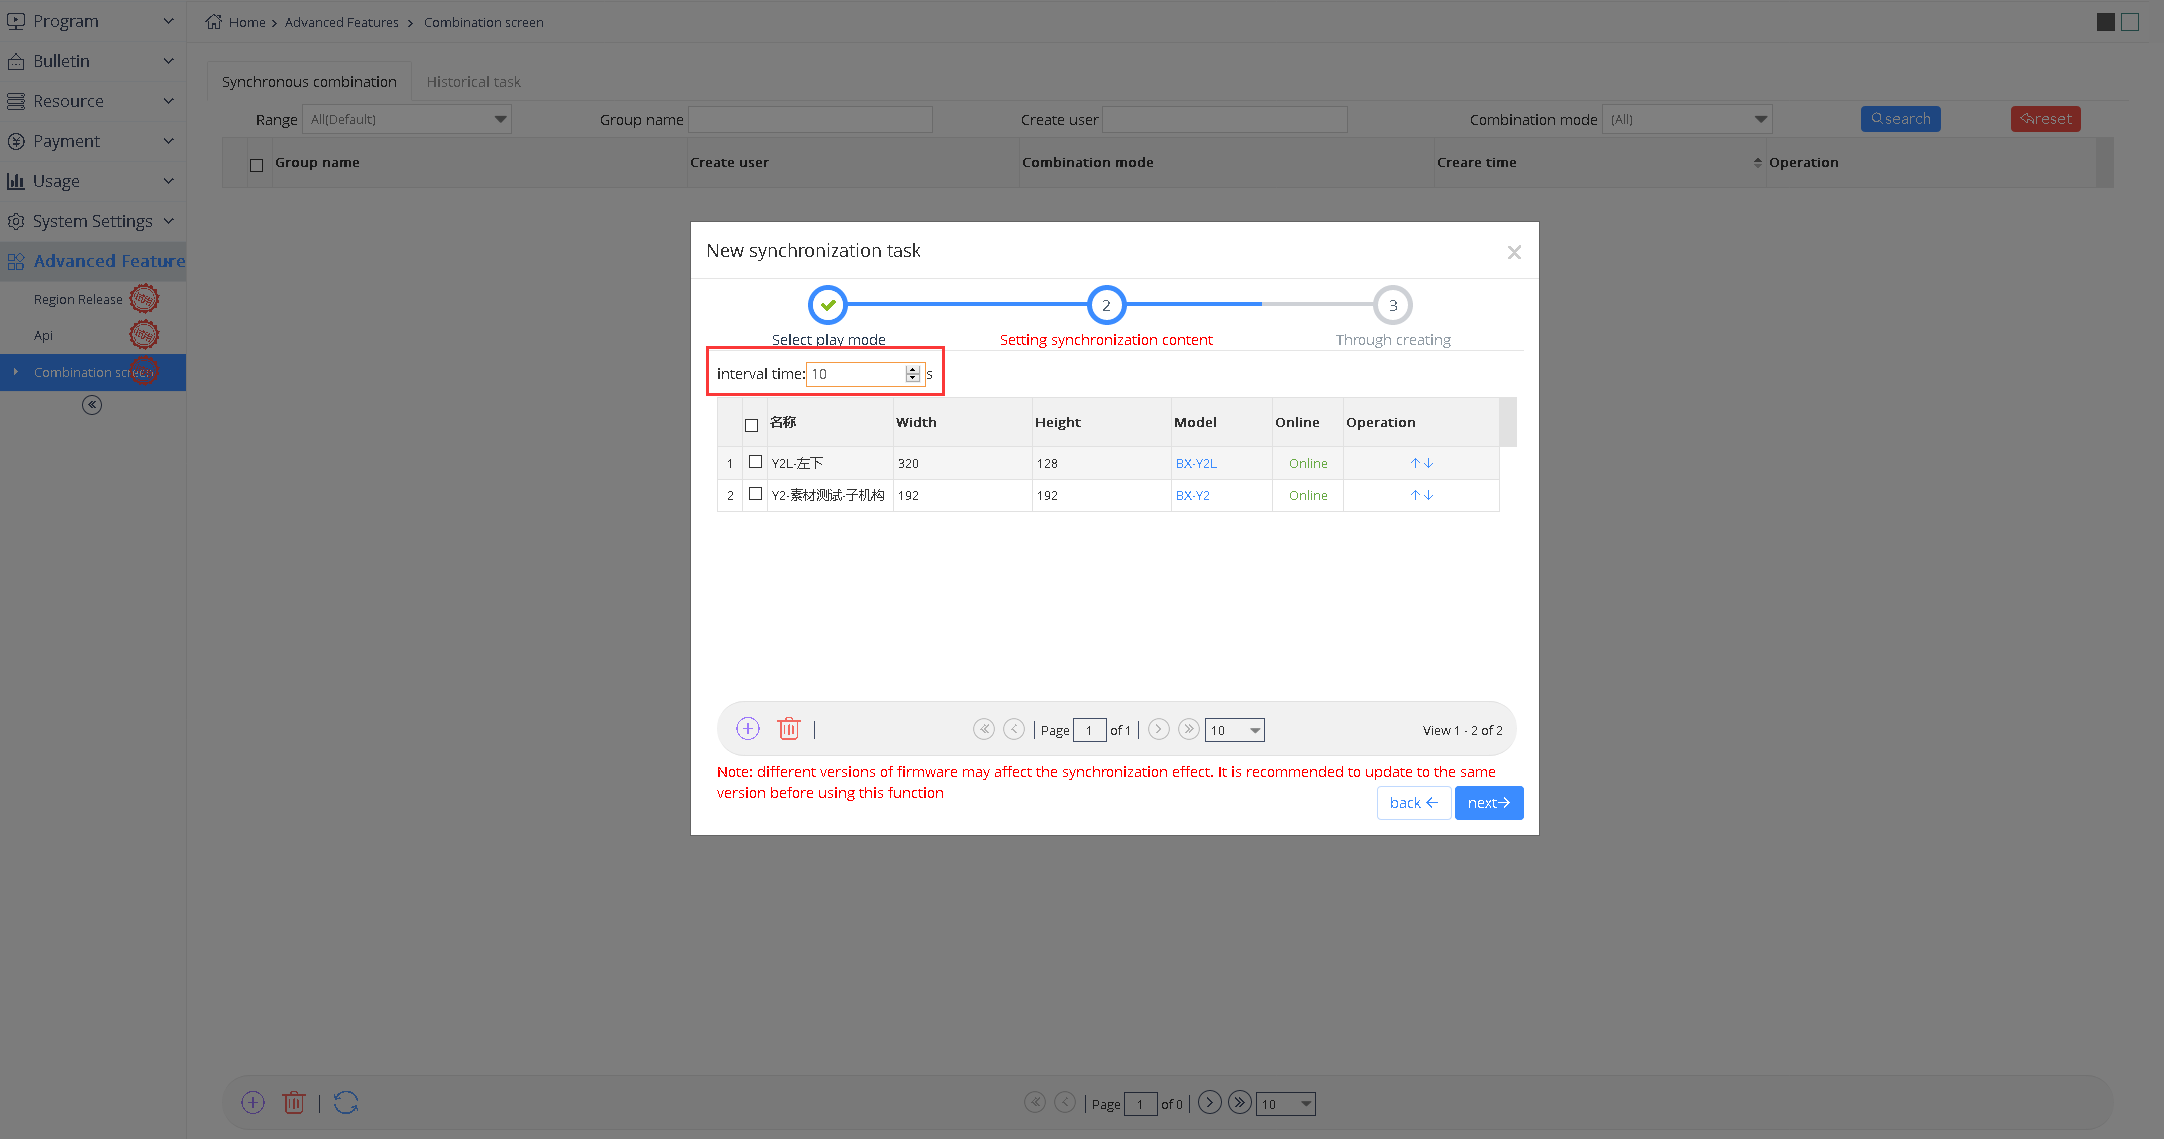
If interval play is selected, the interval time of the synchronous content page should be set. After the setting is completed, each screen will start playing X seconds slower than the previous screen. Users can sort each screen in the operation column, as shown in picture 5.9-8.
picture 5.9- 8
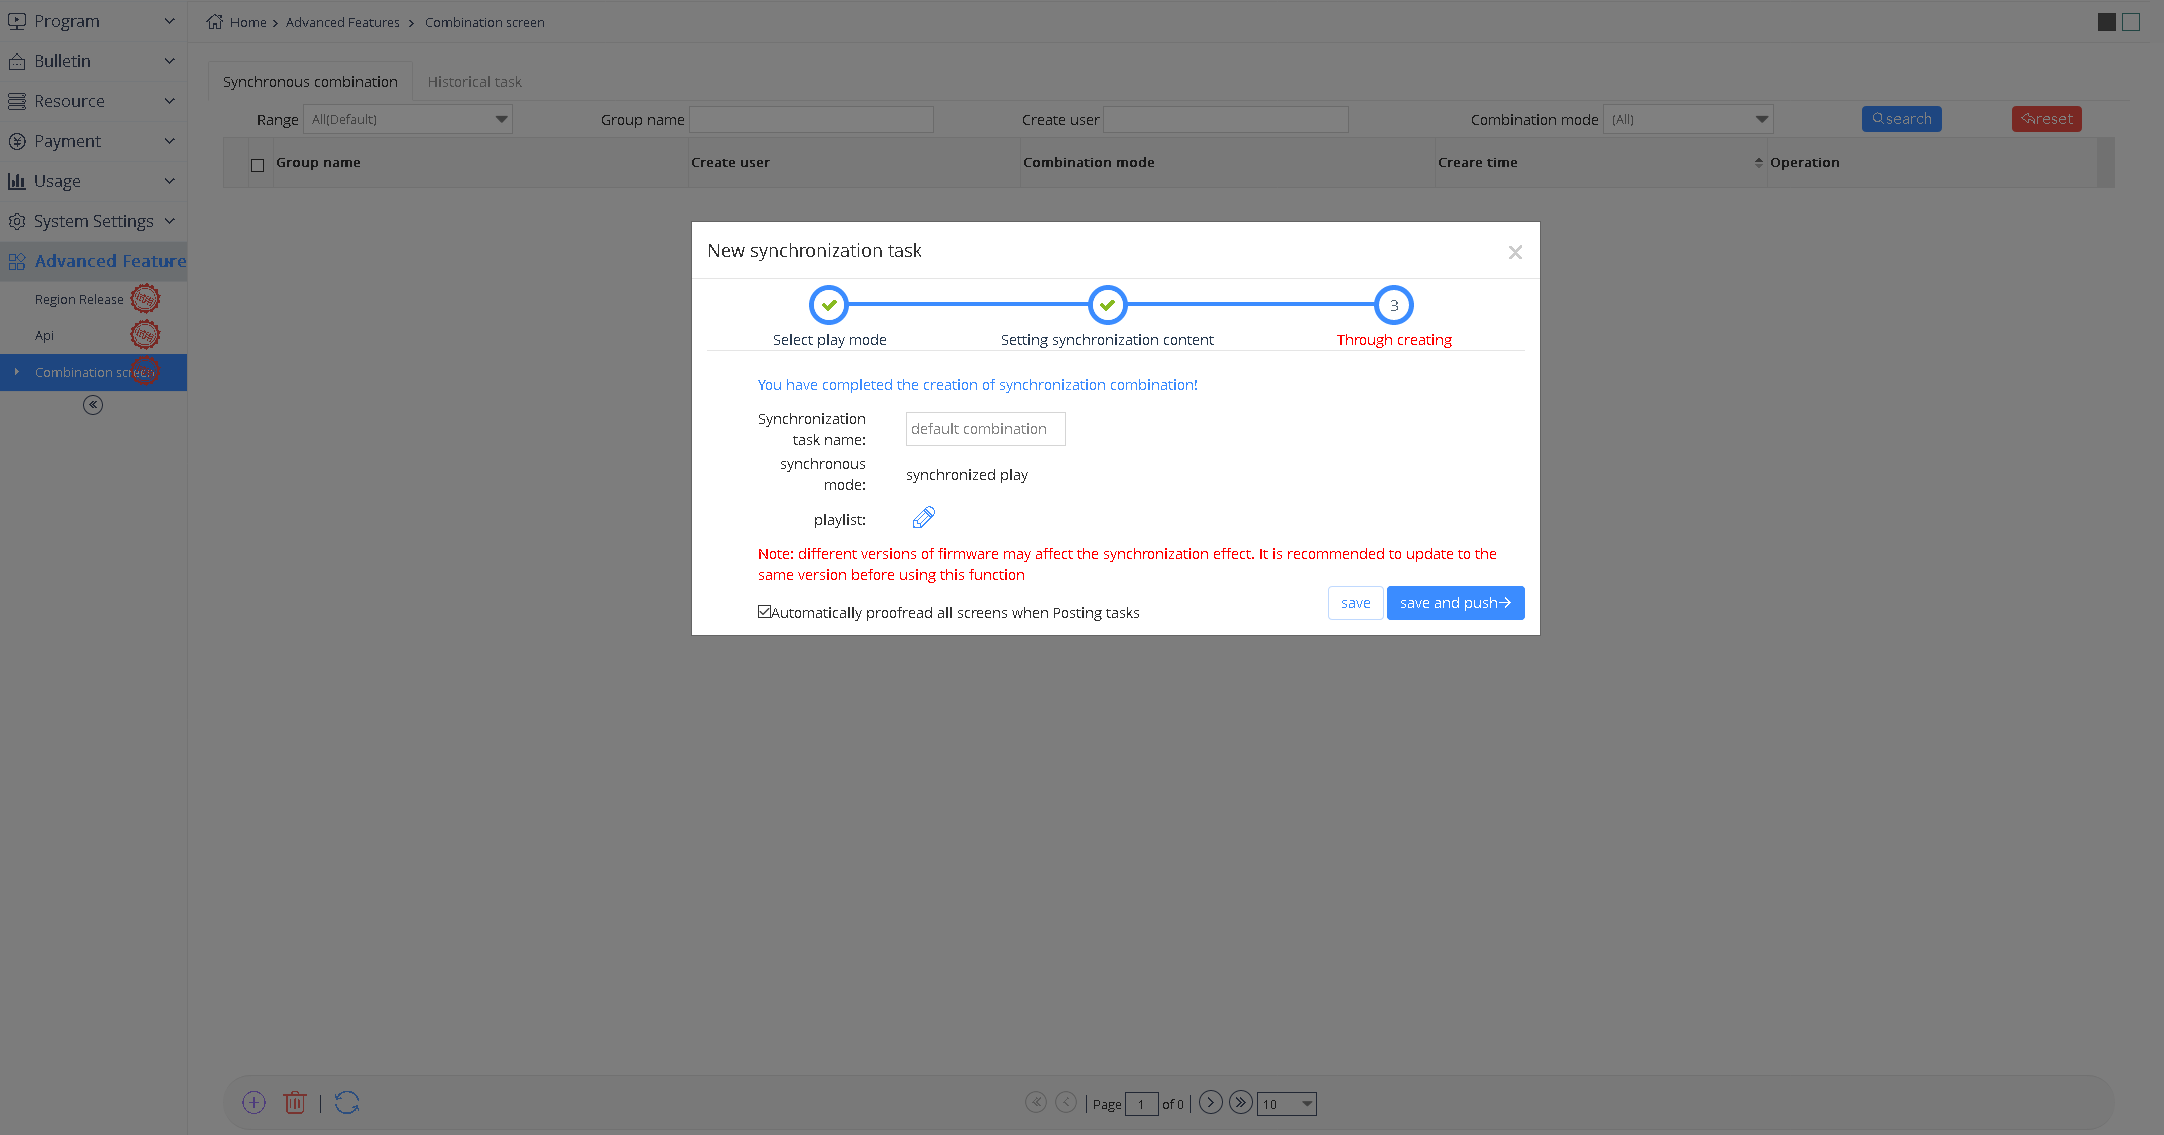
Click the next step to complete the creation of the synchronous combination. The user can also select the playlist here. If not, only the combination can be saved and not published.If selected, it can be saved or published, as shown in picture 5.9-9.By default, the platform will check "automatically proofread all screens when posting tasks". After checking, the platform will automatically send instructions to the selected screen when publishing tasks to ensure synchronization effect.
picture 5.9- 9
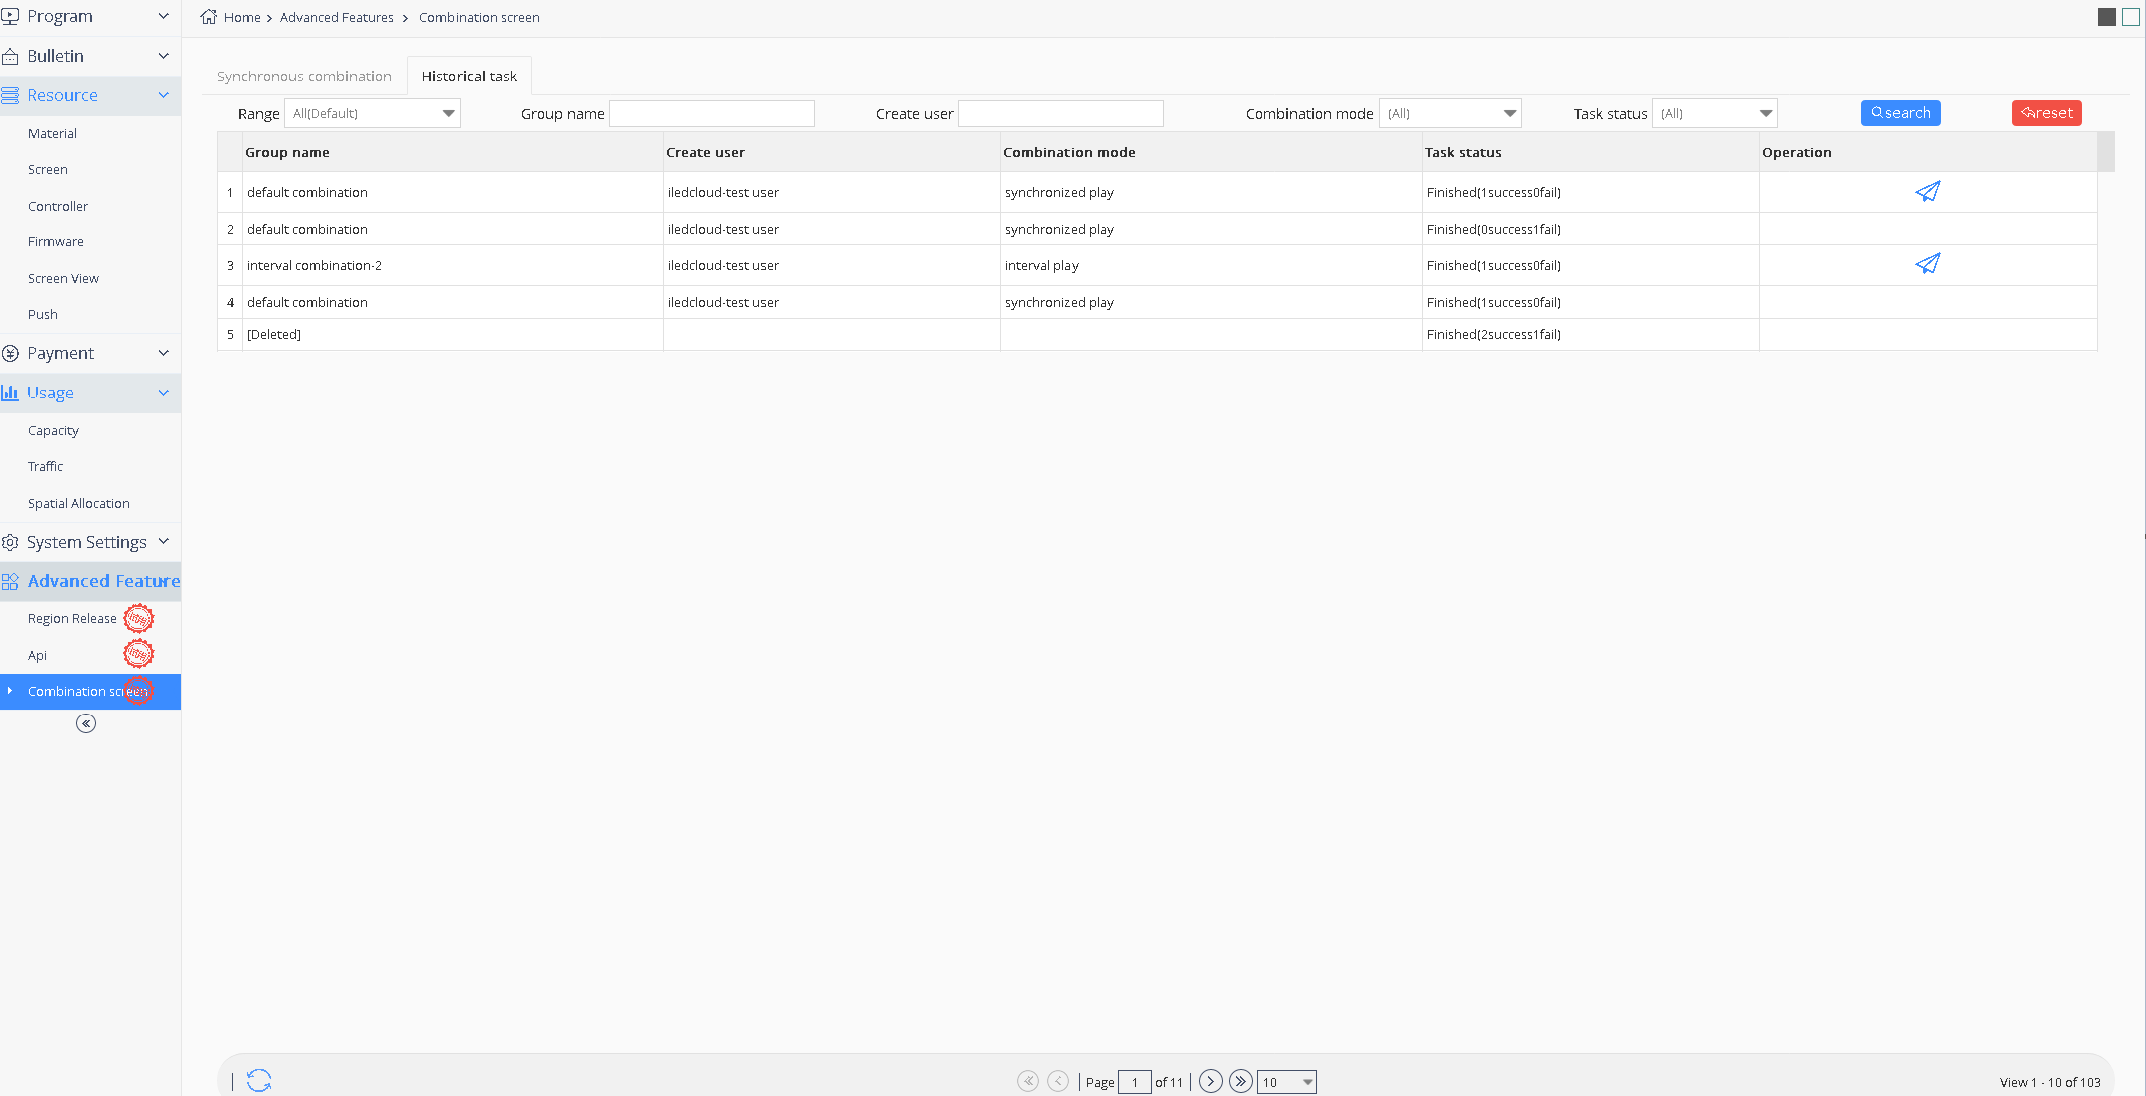
The user can view published synchronous composite tasks on the history task page or republish composite tasks, as shown in picture 5.9-10.
picture 5.9- 10
5.10 iLEDCloud easy version
iLEDCloud platform is simple and easy to use, professional and stable multimedia information release platform. On the basis of retaining the basic program production, release, screen management and other functions, it reduces the user's operation difficulty and simplifies the operation steps.
The simplified version is mainly for individual users, small business users and users commonly used to publish simple programs.
Simple version provides: screen management, program list, task management three modules, see picture 5.10-1 simple version home page.
Screen management is mainly to add screen modification and switch machine and other operations.
The program list module is mainly used to create and edit the entire program list. The module is divided into list making, list viewing and list publishing.
The simplified version can only use the form of list to present the program, and no longer provides the operation function for the single program.
Task management can view the user's action log.

picture 5.10-1
5.10.1 Screen management
Users can perform relevant operations on the screen in the screen management page of resource management. The page is shown in picture 5.10-2. Some operation button notes on the screen management page as shown in table 5.10-1.

picture 5.10-2
| button | function |
|---|---|
|
Screen control button,click to set the screen parameters |
|
Add button to create new records |
|
Delete button to delete the selected single record or bulk records |
|
Refresh button to refresh the list |
 |
Empty list button to clean up list |
|
Restart the controller button |
|
Adjust the screen brightness button |
|
Screen time correction button ,select then click this button to make time correction |
|
Power on button |
|
Power off button |
|
purchase the screen price package after select the screen |
table 5.10-1
5.10.2 Program list
Users can make, edit, view, and publish the program list in the program list interface, as shown in picture 5.10-3.The simplified version can only use the form of list to present the program, and no longer provides the operation function for the single program.Some button comments on the page, as shown in table 5.10-2, can then be managed by the action button after each playlist.

picture 5.10-3
| button | function |
|---|---|
 |
Edit program button ,click to create page,user can secondary edit in the base of original program. |
 |
Preview program button ,click and turn to the program preview page,as shown in picture 5.10-4 |
|
Copy the display button and copy the current display list. |
 |
Release program button ,click and go to the program release interface as shown in the picture 5.10-5 |
table 5.10-2
picture 5.10-4
picture 5.10-5
5.10.3 Create the list
In the simplified version, users will directly create and edit play lists, and a single program can only exist attached to each play list.Users can create and edit programs in the program list.If the user wants to create a new program list, click the plus sign in the lower left corner of "program list", as shown in picture 5.10-6. A window for creating a new program list will be displayed on the page.

picture 5.10-6
After creating a new program list, it will enter the production page, which is divided into left, middle and right parts, including playlist, screen, partition and properties, as shown in picture 5.10-7.
picture 5.10-7
1. on the left of page
On the left is a preview of the playlist, as shown in picture 5.10-8. Each rectangle represents a program, which will be highlighted when selected.Users can add, delete, copy, paste, and adjust the order of programs in the list here, with some button comments as shown in table 5.10-3.
picture 5.10-8
| button | function |
|---|---|
 |
add one empty program in the end of playlist |
 |
copy one same program in the end of playlist |
 |
Delete the selected program |
 |
Save this list |
 |
adjust the program location up and down |
|
The name of edit list |
table 5.10-3
2. Middle area of the page
The middle area of the page is composed of screen parts for partition placement and effect display, as shown in picture 5.10-9. Some button notes are shown in table 5.10-4.The black area in the middle is the screen, where the user can place the partition for editing.
picture 5.10-9
| button | function |
|---|---|
 |
Undo and redo |
|
Zoom scale, display the current screen zoom scale, can be manually adjusted |
|
zoom in screen |
|
zoom out screen |
|
screen show follow the original size |
|
display all the screen |
|
delete the selected zone |
|
select the locked ,after unlocked then to move |
|
Alignment, select multiple partitions at the same time to set its alignment (there are multiple alignment options in the sub-menu) |
|
Size assimilation, which keeps the size, width, or height of the selected partitions consistent (there are multiple size assimilation options in the sub-menu) |
|
Expand the partition to full screen and fill the screen with partitions |
|
move up and move down to adjust the structure position of the selected partition |
|
Non-grayscale program preview button, preview different color mode program effect (sub-menu has "single color", "dual-color" and "tri-color" button) |
|
Preview the current program (there are buttons of "accelerated play", "normal play" and "decelerated play" in the sub-menu) |
|
release the program list |
table 5.10-4
3. The right zone of the page
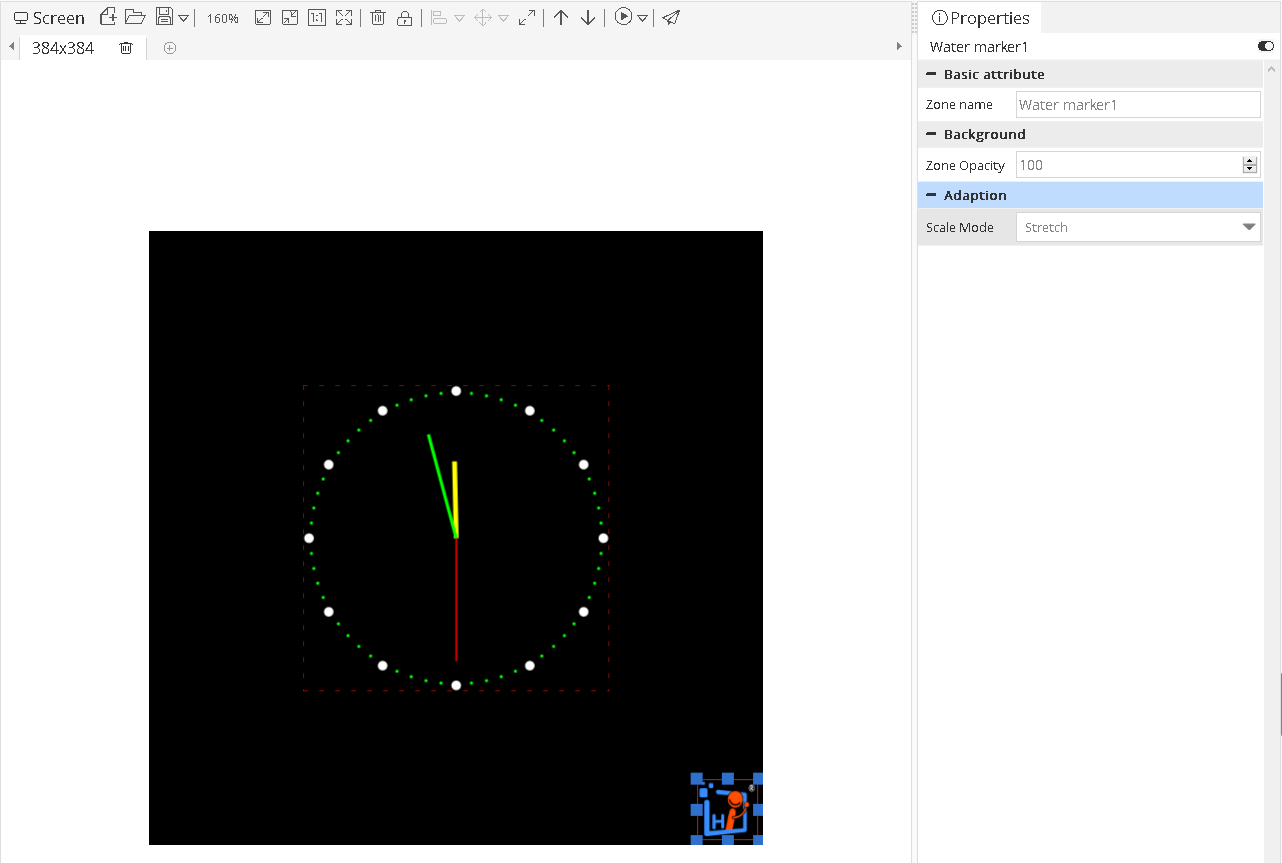
The area on the right side of the page is composed of partition bar, property bar and material bar. The corresponding supported partition will be displayed in the partition bar, as shown in picture 5.10-10. Each partition has different effects, and users can directly double-click or drag to add a partition.At present, there are six simple version of the partition, respectively is image-text, video, date,clock, weather and text partition.

picture 5.10-10
After adding graphic, video, plain text partition, the right area will show the material bar.Users can directly right - click, double - click or drag to add material in the partition.Users can also add materials in the material bar. Just click the add button to complete the adding, as shown in picture 5.10-11.
picture 5.10-11
The property bar will display some property values of the current program and the currently selected partition. If no partition is selected, the broadcast property of the program will be displayed. Users can modify the data to change the broadcast mode and duration of the program, as shown in picture 5.10-12.
picture 5.10-12
After a partition is selected, the right property bar will show the partition property of the partition. In the simple version, we appropriately reduce the items that can be modified in the partition property according to the user's habits, hoping to shorten the time for the user to make the program.In addition, we have designed the style template for the dial, weather, and time partition, which can be opened in the "style" of the partition attribute. Each partition has 8 styles and 8 shading patterns for users to freely combine and match according to their needs, without requiring users to manually adjust the styles.As shown in picture 5.10-13 below, the dial partition can be used as an example to select the dial style and replace the background pattern.
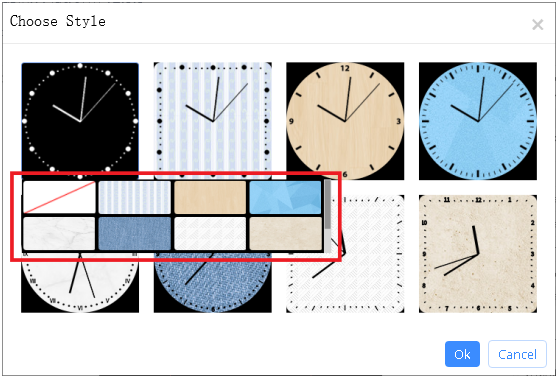
picture 5.10-13
5.10.4 Release the program list
Users can publish the program list in the "program list" and program list production page, and select the corresponding screen in the pop-up publishing wizard (picture 5.10-5) to complete the publishing task.In the simplified version, complete the program list publishing wizard, and the list will be directly and instantly sent to the corresponding screen.At present, the platform can conduct publishing operations and generate publishing tasks for both online and offline screens, and normally complete publishing tasks for online screens.For the offline screen, publishing tasks are automatically completed after going online.
In addition, the simplified version supports the adaptive function. We will calculate the matching rate of the user's program list and other screen sizes according to the formula. If the matching rate is greater than 60%, you can choose to send it to the screen.Otherwise, you cannot choose, as shown in picture 5.10-14 below.
picture 5.10-14
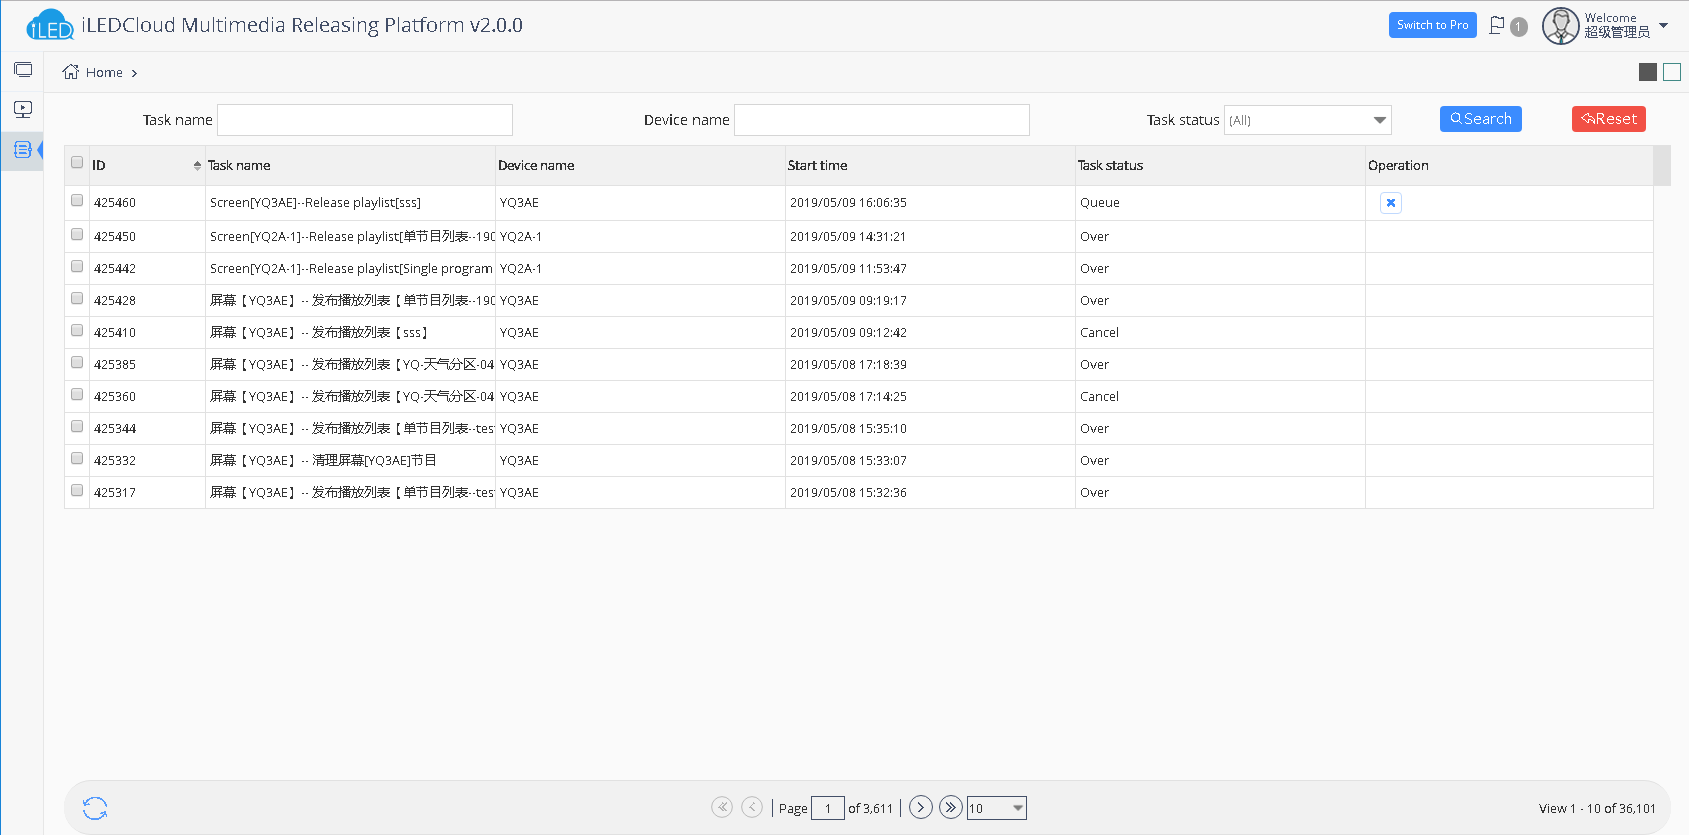
5.10.5 Task management
User can query the task in the task management as shown in picture 5.10-15 ,also can check the task status in the same time.Also user can check the release process in the top right corner of the page.
picture 5.10-15
5.11 platform security management specifications
5.11.1 The watermark logo
When the watermark mode is enabled on the platform, the user enters the page of making the program, and the watermark mark will be automatically added into the partition. It cannot be deleted and is always placed on the top, but the watermark mark can be moved. When the user publishes the program, the watermark mark will be displayed normally, as shown in picture 5.11-1.
picture 5.11- 1
5.11.2 Forced offline the illegal broadcast
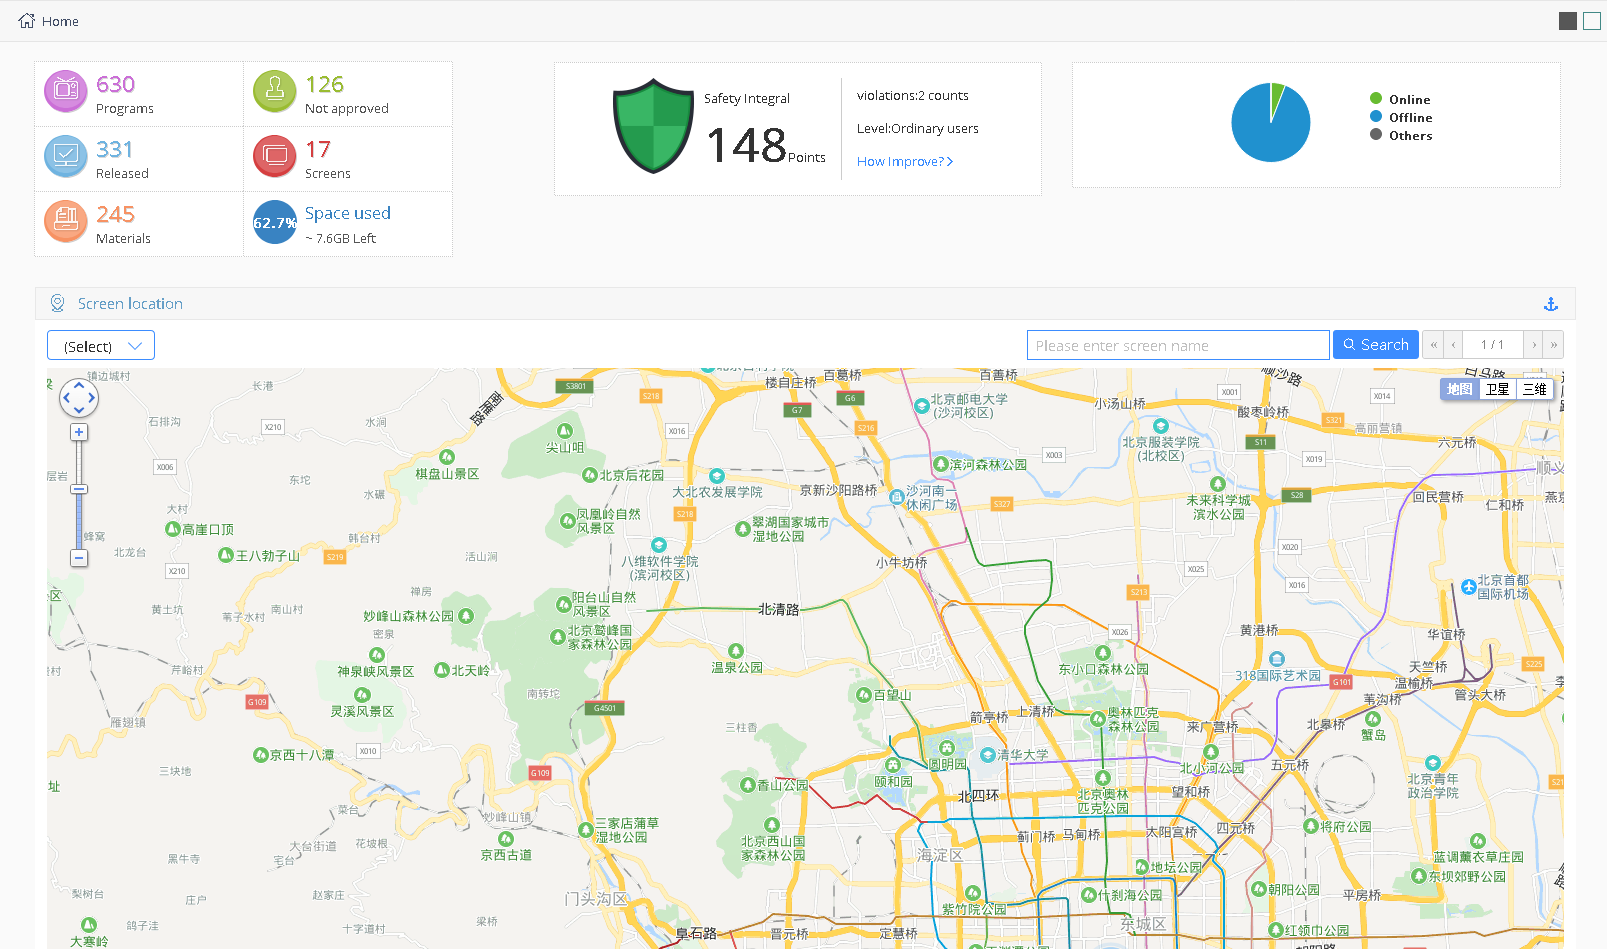
After receiving the report/sample review and confirming that the illegal content is released through the platform of iLEDCloud, the platform will take the program offline forcibly and deduct the corresponding security points or blacklist it.When the user logs in the system again, the current security score and security level will be displayed on the home page and the number of violations will be recorded, as shown in picture 5.11-2.
picture 5.11- 2
5.11.3 Material approval
Your material will enter the risk audit first after uploading, at this time, you can still use the material for program production, but only when all the materials in your program are in the state of approval, your program can be released.(in order to reduce the impact on your use, it is recommended that you upload the material in advance.)
picture 5.11- 3
5.11.4 Program approval
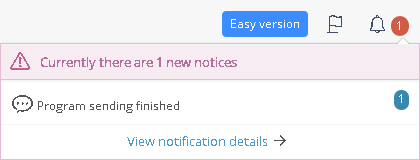
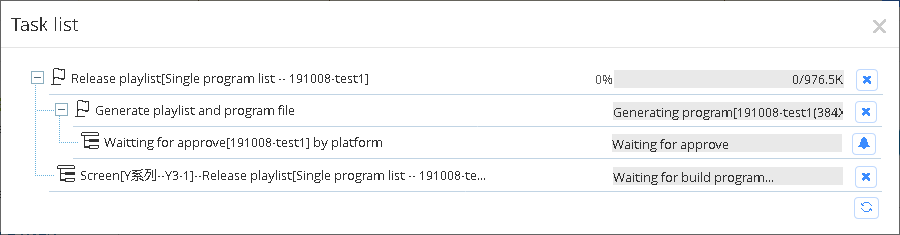
Your program will enter the program audit stage after clicking release, and your program will be released automatically after completion of the audit.If the program is not approved after a certain period of time, you can click the little bell next to the release list to urge approval, as shown in picture 5.11-4.
picture 5.11- 4
5.11.5 Fill in the screen position
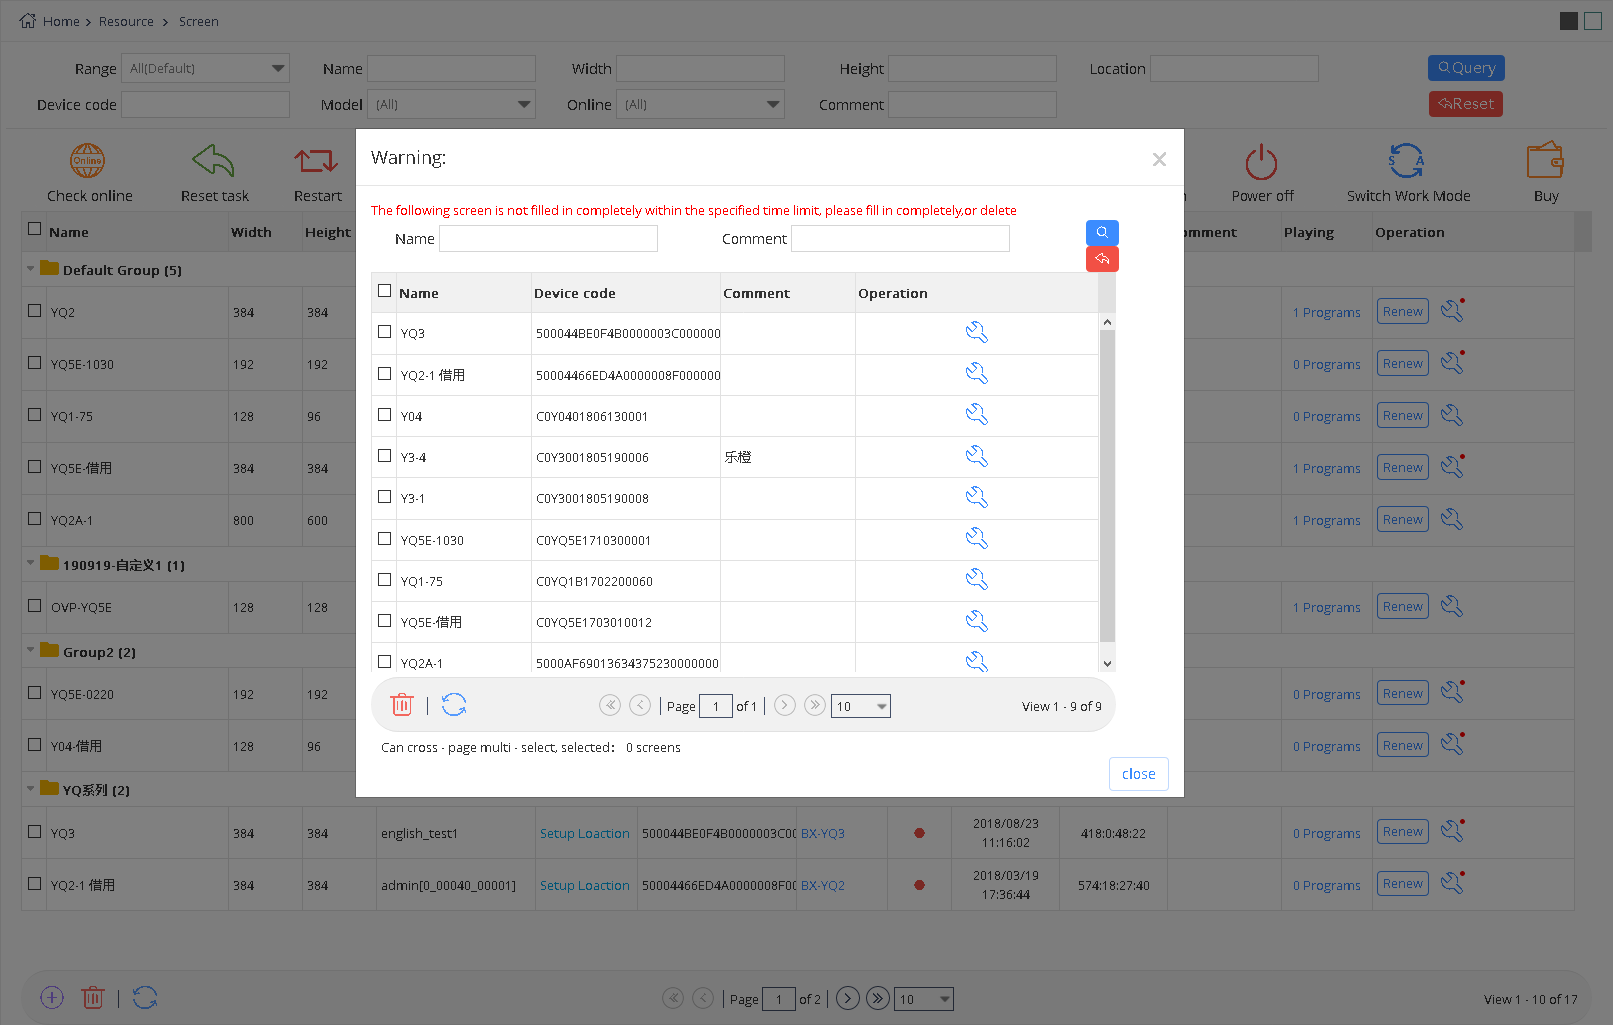
When the user adds a new screen and does not fill in the screen address, the boot window at the top of the home page will show that there are xx screens that have not been filled in. Please fill in the screen location information before xx, xx, xx, xx, xx, as shown in picture 5.11-5.If it is still not filled in after 20 days, the prompt will turn red, as shown in picture 5.11-6.

picture 5.11- 5

picture 5.11- 6
If the screen location has not been filled in 30 days after the screen was added, when the user enters the screen management page, a pop-up window will appear to guide the user to fill in the screen location, as shown in picture 5.11-7. Otherwise, the screen cannot be used.